September 20, 2026
How to Mud and Tape Drywall: A Step-by-Step Guide
Every drywall job comes down to this moment: the boards are hung, the screws are set, and now you're staring at a wall full of seams that need to disappear. Learning how to mud and tape drywall correctly is what separates a wall that looks factory-smooth from one that shows every joint under bright light. Rush this step and you'll be sanding for hours or, worse, watching cracks reappear a few months later.
This guide walks you through the real process, not the shortcut version. You'll get the layering technique professionals use, from embedding tape in the first coat to feathering out each successive layer so the seam blends into the surrounding surface. We'll also cover the common mistakes that trip up first-timers, like applying mud too thick, skipping dry time, or using the wrong tape for corners.
We've spent over 30 years finishing walls and ceilings across the Sacramento Valley, so we know where DIY jobs typically go wrong and how to fix them before they become bigger problems. Follow these steps in order, and you'll get a wall ready for texture or paint. If the project turns out bigger than expected, our crew is a call away for a free estimate.
What you need before you start taping and mudding
Before you crack open a bucket of mud, get your workspace and tools sorted. Gathering the right supplies up front saves you from stopping mid-coat to run to the hardware store with wet compound drying on your knife. A little preparation here pays off in fewer redos later.
Tools you'll need
Grab these basics before you start, and see the full list of drywall tools worth owning for DIY patching if you're building a kit from scratch. Most are inexpensive and will last through several projects if you clean them properly after each use.
- 6-inch and 12-inch taping knives
- A mud pan for holding compound while you work
- A utility knife for trimming tape
- 150-grit sanding sponge or pole sander
- Corner trowel for inside corners (optional but helpful)
- Drop cloths and painter's tape to protect floors and trim
- A bright work light, since shadows hide ridges and low spots
Types of joint compound
Compound isn't one-size-fits-all, and it pays to know how the types of drywall compound differ before you buy. All-purpose compound works fine for beginners because it's forgiving and easy to sand, but it shrinks more and takes longer to dry between coats. Setting-type compound (often called "hot mud") hardens through a chemical reaction instead of drying, so it's ready for the next coat in under an hour, though it's less forgiving if you're new to the trade.
| Compound Type | Dry Time | Best For | Sanding |
|---|---|---|---|
| All-purpose (ready-mix) | 12-24 hours | Second and third coats, first-timers | Easy |
| Setting-type (20, 45, 90 min) | 20-90 minutes | First coat, filling deep gaps | Harder |
| Taping compound | 24 hours | Embedding tape on the first pass | Moderate |
If you're working on a tight timeline, start with a 90-minute setting compound for the first coat, then switch to all-purpose for the smoother finish coats.
The compound you choose for the first coat matters more than the brand on the bucket.
Choosing your tape
Paper tape and fiberglass mesh tape both do the job, but they behave differently, so it helps to know which drywall tape belongs on which seam. Paper tape needs to be embedded in wet mud and creases neatly into corners, which is why most pros still reach for it on inside angles. Mesh tape is self-adhesive and faster to apply, but it needs setting-type compound underneath since regular mud can shrink and let it telegraph through the finished surface. Skimp on this choice and you'll notice a faint seam line months later, especially under raking light from a window.
Prep the room and safety gear
Sweeping and covering the room matters as much as the mudding itself. Dust control becomes a real headache once you start sanding, so lay down plastic sheeting over flooring and seal off doorways with painter's plastic if the room connects to living space. Open a window for airflow, especially in enclosed rooms without HVAC circulation, since setting-type compounds release some heat and moisture as they cure.
Wear a dust mask rated for fine particles when you sand, and safety glasses if you're working overhead on a ceiling. If your project involves an older popcorn ceiling or any material you suspect might contain asbestos, stop and get it tested before you disturb it. Sanding or scraping asbestos-containing material without proper containment is a health hazard covered under OSHA's asbestos standards, and it's not a DIY situation. Super Shooters handles asbestos inspection and safe removal if that's a concern on your project, so reach out before you start cutting into anything questionable.
Once you have your tools, compound, and tape lined up, and the room is protected, you're ready to start filling screws and dents, which is where the actual mudding work begins.
Step 1. Cover screws and dents with mud
Start with the small stuff before you touch a single seam. Screw dimples and minor dents need their own pass of mud, and filling screw holes in drywall properly is why so many DIY walls end up with a field of tiny craters showing through fresh paint when it's skipped. Load a small amount of all-purpose compound onto your 6-inch knife and drag it across each screw head in one smooth motion, working from one side of the dimple to the other rather than circling it.
Check every screw before you load your knife
Walk the wall first and run your hand over every screw location. Any screw head sitting proud of the drywall surface will telegraph through the mud no matter how many coats you apply, so drive it in flush before you start. A few things to check as you go:
- Screw heads should sit just below the paper surface, not punched through it
- Look for torn paper around screws, which needs a light skim of mud to stabilize
- Check corners and edges for dented drywall from hanging or transport
- Mark any spots where the paper is bubbled or loose, since mud won't stick well there
Gouges and dents from hammers or careless handling get the same treatment as screws, just with a bit more compound since you're filling a deeper void. Press the mud in firmly with your knife so no air pockets form underneath, then scrape the excess flush with the surrounding drywall.
A wall full of filled screws and dents before you ever touch a seam is what separates a smooth finish from a lumpy one.
Don't rush this coat
Compound shrinks slightly as it dries, so don't be surprised if some screw dimples need a second light pass once the first one dries. This is normal, and it's faster to catch it now than after you've textured or primed the wall. Let this first application dry completely, usually overnight for all-purpose compound or under an hour if you're using a 20-minute setting compound, before moving on.
Once everything is flush and dry, run your hand across each spot again. If you feel a ridge or dip, mark it with a pencil so you remember to address it during sanding later. This quick screw-and-dent pass takes less time than any other step in the process, but it's the foundation for how flat your finished wall will look under paint or light texture.
Step 2. Apply the first coat and embed the tape
With screws and dents filled, move on to taping the flat seams between drywall sheets. This is where embedding the tape happens, and it's the single most important pass in the whole process because every later coat builds on top of it. Load your 6-inch knife with compound and spread a layer about 1/8 inch thick directly over the seam, running the full length of the joint before you touch the tape.
Bed the tape into wet mud
Press your paper tape into the wet compound while it's still workable, centering it over the seam so you have even coverage on both sides. Starting at one end, run your knife down the length of the tape at a low angle, pressing firmly enough to squeeze out excess mud and air bubbles from underneath. Work in one continuous stroke rather than short choppy passes, since stopping and restarting tends to lift the tape and trap air pockets that show up as bubbles once the mud dries.
Tape that isn't fully bedded in wet mud will bubble, crack, or peel no matter how many coats you add on top.
A few checkpoints as you go:
- Tape should lie flat with no visible ridges or bubbles underneath
- A thin bead of mud should squeeze out along both edges of the tape
- Don't leave the tape floating on a dry section of drywall with no compound beneath it
- Wipe your knife clean between passes so you're not dragging dried chunks across the wet seam
Feather the edges as you finish
Once the tape is bedded, run your knife over the seam one more time at a slightly higher angle to smooth the surface and thin out the compound toward the outer edges. This is your first attempt at feathering , the technique of tapering mud into the surrounding wall thinner and thinner as you move away from the seam so there's no hard ridge once the coat dries. You won't get it perfectly smooth on this pass, and that's fine since the second and third coats do most of the leveling work.
Let this coat dry fully before moving forward. Taping compound and all-purpose mud typically need 24 hours, while a 90-minute setting compound is ready much sooner, and drying times shift with humidity and coat thickness. Resist the urge to add a second coat while the first is still soft, since trapped moisture underneath leads to cracking down the line. Once it's dry to the touch and shows no cool or damp spots when you press a finger against it, you're ready to move on to the corners.
Step 3. Tape and mud inside and outside corners
Corners behave differently than flat seams, so treat taping inside and outside corners as its own step rather than an extension of what you just finished. Inside corners need paper tape folded down the center crease and pressed into a bed of compound on both walls at once, while outside corners rely on a metal or vinyl corner bead nailed or mudded into place before you ever pick up your knife. Mixing up the technique between the two is one of the fastest ways to end up with corners that crack within a year.
Working inside corners
Apply a thin layer of mud to both sides of the corner, then fold your paper tape along its factory crease and press it into place so each half sits flat against its respective wall. Run a corner trowel or the edge of your 6-inch knife down one side at a time, never both sides in the same stroke, since trying to smooth both planes at once tends to crush the crease and pull the tape loose.
A corner that isn't creased and bedded properly will split open the first time the house settles.
A few things to watch for as you work:
- Keep the fold centered so you're not left with more tape on one wall than the other
- Avoid overloading the corner with mud, since excess compound just means more sanding later
- Check that the tape lies flat with no visible air pockets along the crease
Working outside corners
Outside corners take a corner bead instead of tape, and setting corner bead step by step is worth reading if you've never done it. Set the bead so it's plumb and square, then cover it with a coat of mud using long strokes that run parallel to the corner rather than across it. Feather the mud outward on both sides so the bead disappears under a smooth taper rather than sitting as a raised ridge down the wall.
Sand lightly if a high spot shows up before the next coat, but don't chase perfection on this first pass. Outside corners take a beating from foot traffic and moving furniture, so a slightly heavier first coat here isn't a bad idea, as long as you keep feathering it thin at the edges. Once both types of corners are bedded and drying, you're ready to move on to the second coat, where the real leveling work happens across the entire wall.
Step 4. Apply the second coat and feather edges
Once the first coat and corners are dry, switch to a wider knife and cover more surface than you did on the first pass. The second coat widens the seam by several inches on each side, burying the edge of the tape completely and building the gentle slope that makes a seam disappear under paint. This is also where most of the visible ridge from the embedding coat gets smoothed away, so don't rush past it just because the tape is already bedded.
Widen the coat with a wider knife
Switch to a 10-inch or 12-inch taping knife for this pass, since a wider blade naturally feathers the mud thinner as it spreads further from the center. Load the knife with a thin layer of compound and run it down the length of the seam, applying slightly more pressure toward the outer edges than at the center so the compound tapers instead of sitting flat. Work the corners with the same wider blade, though keep your strokes running parallel to the crease rather than across it.
- Center of the seam should carry the thickest layer of mud
- Outer edges should thin to almost nothing, blending into bare drywall
- Check that no ridge from the first coat is still visible through the new layer
- Wipe your knife clean between passes to avoid dragging dried chunks into wet mud
If you can still feel a hard edge where the mud stops, you haven't feathered wide enough.
Feather until the transition disappears
Run your hand across the dried seam once this coat sets, feeling for any spot where the mud stops abruptly instead of tapering into the wall. A flat hand test like this catches ridges faster than eyeballing the wall under normal light, especially in rooms without strong natural light. If you find a hard edge, don't try to fix it wet. Let the coat dry fully, typically 24 hours for all-purpose compound, then knock down the ridge with a light pass of your sanding sponge before the third coat goes on.
Corners get the same feathering treatment here, widening the mud on both sides of the crease so the transition from wall to corner becomes gradual rather than abrupt. This second coat won't look perfect yet, and that's expected since the third coat is what brings the final, paint-ready smoothness to every seam and corner on the wall.
Step 5. Apply the third and final coat
The third coat is your finishing pass, the one that turns a functional seam into a surface nobody notices at all, though some walls need more or fewer mud coats than three. The final skim coat should be thin, wide, and applied with the widest taping knife you own, typically 12 to 14 inches, so the mud tapers gradually across the entire width of your second coat. You're not building structure at this stage, you're refining the surface so every joint reads as flat drywall under any light in the room. This is the pass that finally proves whether you learned how to mud and tape drywall correctly on the first two coats, since sloppy feathering earlier will still show through now.
Load the knife light and stretch it wide
Keep the compound thin on this coat, thinner than either of the previous two, since you're smoothing rather than filling. Load a small ribbon of mud onto your wide knife and drag it down the seam in one continuous stroke, applying just enough pressure to leave a whisper-thin layer that blends into the surrounding drywall with no visible edge. Overlap your strokes slightly as you move down the seam so you don't leave gaps or thin spots where the previous pass ended, and wipe the knife clean between strokes so dried flecks don't drag through the wet compound.
A good third coat is so thin you can barely see it went on at all, yet it's what makes the seam disappear.
Cover corners and screws in the same pass
Run the same thin coat over your inside and outside corners, keeping strokes parallel to the crease just like you did on the second coat. Touch up any screw dimples or dents that still show a faint shadow, since a single light pass here saves you from patching after primer. A quick checklist before you call this coat done:
- No visible ridge where the mud meets bare drywall
- Corners look crisp and straight, not wavy or bulged
- Screw dimples sit flush with no shadow under raking light
- Surface feels smooth to a flat hand pass once dry
Give this coat a full 24 hours to dry if you're using all-purpose compound, longer in a humid or unventilated room. Resist the urge to sand while it still feels the slightest bit cool or soft to the touch, since that means moisture is still trapped underneath. Once it's bone dry, you're ready to move into sanding, which is where any remaining imperfections finally get knocked down for good.
Step 6. Sand the walls smooth
Once the third coat is fully cured, sanding is what turns your layered mud work into a wall that's actually paint-ready. Sanding drywall the right way at this stage isn't about removing material, it's about knocking down the last faint ridges and tool marks so light doesn't catch them once paint goes on. Wear a dust mask rated for fine particles before you start, since dried compound turns into a fine powder that spreads through the room fast.
Use the right grit and tool
Start with a 150-grit sanding sponge or pole sander and work in wide, even circles rather than pressing hard in one spot. Heavy pressure digs grooves into the mud and can expose the tape underneath, which means redoing part of a coat you already finished. A pole sander with a swivel head covers ceilings and upper walls without a ladder, while a hand sponge gives you better control around corners and outlets.
- 150-grit sponge or screen for general smoothing
- 220-grit for a final light pass before priming
- Pole sander for ceilings and tall walls
- A dust mask and safety glasses, since overhead sanding drops debris straight down
Sand to smooth the transition, not to remove mud, or you'll be back for another coat.
Check your work with a light
Grab your work light and hold it at a low angle against the wall, almost skimming the surface. This raking light shows every ridge, dip, and sand-through spot that normal overhead lighting hides completely. Mark any trouble spots with a pencil as you find them, since it's easy to forget where they were once you move the light away.
Touch up any spot where you sanded through to bare tape or exposed paper with a thin skim of compound, then let it dry and sand it again lightly once it's cured. Wipe the entire wall down with a damp cloth or tack cloth after your final sanding pass to remove dust, since leftover dust under primer causes a rough, gritty texture that shows up under paint. Vacuum the floor and any nearby surfaces before you move furniture back or start the next step, since drywall dust settles into everything in the room given the chance.
Step 7. Prime and inspect your work
Drywall primer is the last checkpoint before paint, and it's also the best diagnostic tool you have left. Primer coat seals the porous mud so it doesn't drink paint unevenly, but it also flattens color differences across the wall, which makes any remaining flaw jump out in a way raw drywall never does. Skip this step or roll paint straight over bare mud, and you'll see flashing, those dull patches where compound soaked up more sheen than the surrounding paper.
Roll on a full coat of primer
Use a PVA drywall primer or a high-build primer if you're covering a lot of patched area, applying it with a roller in slow, even passes so you don't leave lap marks. Cut in around corners and trim with a brush first, following the same room prep steps you'd use before painting, then roll the field of the wall while the cut-in edges are still wet to avoid visible seams in the primer itself. One full coat is usually enough, but don't stretch the roller too thin just to save product, since a light, patchy coat won't do its job of evening out absorption.
Primer isn't decoration, it's the test that tells you whether your mud work is actually finished.
Inspect under raking light again
Once the primer dries, bring your work light back and hold it low against the wall the same way you did before sanding. Flashing, ridges, and sand-through spots that hid under wet compound show up clearly now that everything is one flat color. A quick checklist to run before you call the wall done:
- No dull, flat patches (flashing) where mud absorbed more primer than the surrounding drywall
- No visible ridge or dip along any seam or corner
- No exposed tape or paper texture showing through the primer
- Screw dimples read flat, not shadowed
Any spot that fails this check needs a thin skim of compound, a light sand once dry, then a spot-prime before you move to paint. Feathering compound variation matters less here since you're patching a small area, not building a whole coat, so keep it tight and blend the edges carefully. Once the wall passes inspection under raking light with primer on it, you're looking at a surface ready for applying wall texture or your final paint color, with none of the seams, screws, or corners visible once the room is lit normally again.
Common mistakes to avoid when mudding drywall
Even after seven careful steps, a few habits sneak in and undo hours of work. Recognizing these mistakes before you make them saves you a weekend of redoing coats you thought were finished. Most of these come from rushing dry time or trying to shortcut the layering process that makes tape and mud actually hold.
Applying mud too thick
Heavy coats feel like progress, but thick mud takes longer to dry, cracks as it shrinks, and hides ridges you'll have to sand through later. Thin, layered coats always beat one thick pass, even if it means an extra round with the knife, which is one of the first taping tricks pros rely on. Loading your blade heavy might feel efficient in the moment, but it just moves the work to the sanding stage instead of eliminating it.
Thick mud doesn't save time, it just moves the work to the sanding stage.
Skipping dry time between coats
Mud that looks dry on the surface can still be damp underneath, especially in humid rooms or thick corners. Sealing in that moisture with another coat traps it there, and it eventually shows up as a crack or a soft spot months later. Setting-type compound solves this if you're on a tight schedule, since it hardens through a chemical reaction rather than air drying.
Using the wrong tape for the job
Mesh tape without setting-type compound underneath is a common shortcut that backfires, since regular mud shrinks enough to let the tape telegraph through the finished wall. Paper tape needs full embedding in wet mud, not a quick press with a dry knife, or it lifts and bubbles later. Match your tape to your compound every time, not just whatever's left over from the last project.
A few more errors worth flagging before you start your next coat:
- Sanding too aggressively and exposing the tape or paper underneath
- Skipping the raking light check and missing ridges until paint is already on the wall
- Not feathering wide enough, leaving a visible hump down the center of the seam
- Reusing dirty mud contaminated with dried chunks, which drags grooves through every fresh pass
- Ignoring corner beads that aren't plumb before mudding over them
Fixing any of these after the fact usually means sanding back to bare tape and starting that coat over, which costs more time than doing it right the first time. If a mistake shows up on a wall you've already primed, don't panic. A thin skim coat, a light sand, and a spot-prime almost always solves it without redoing the whole surface.
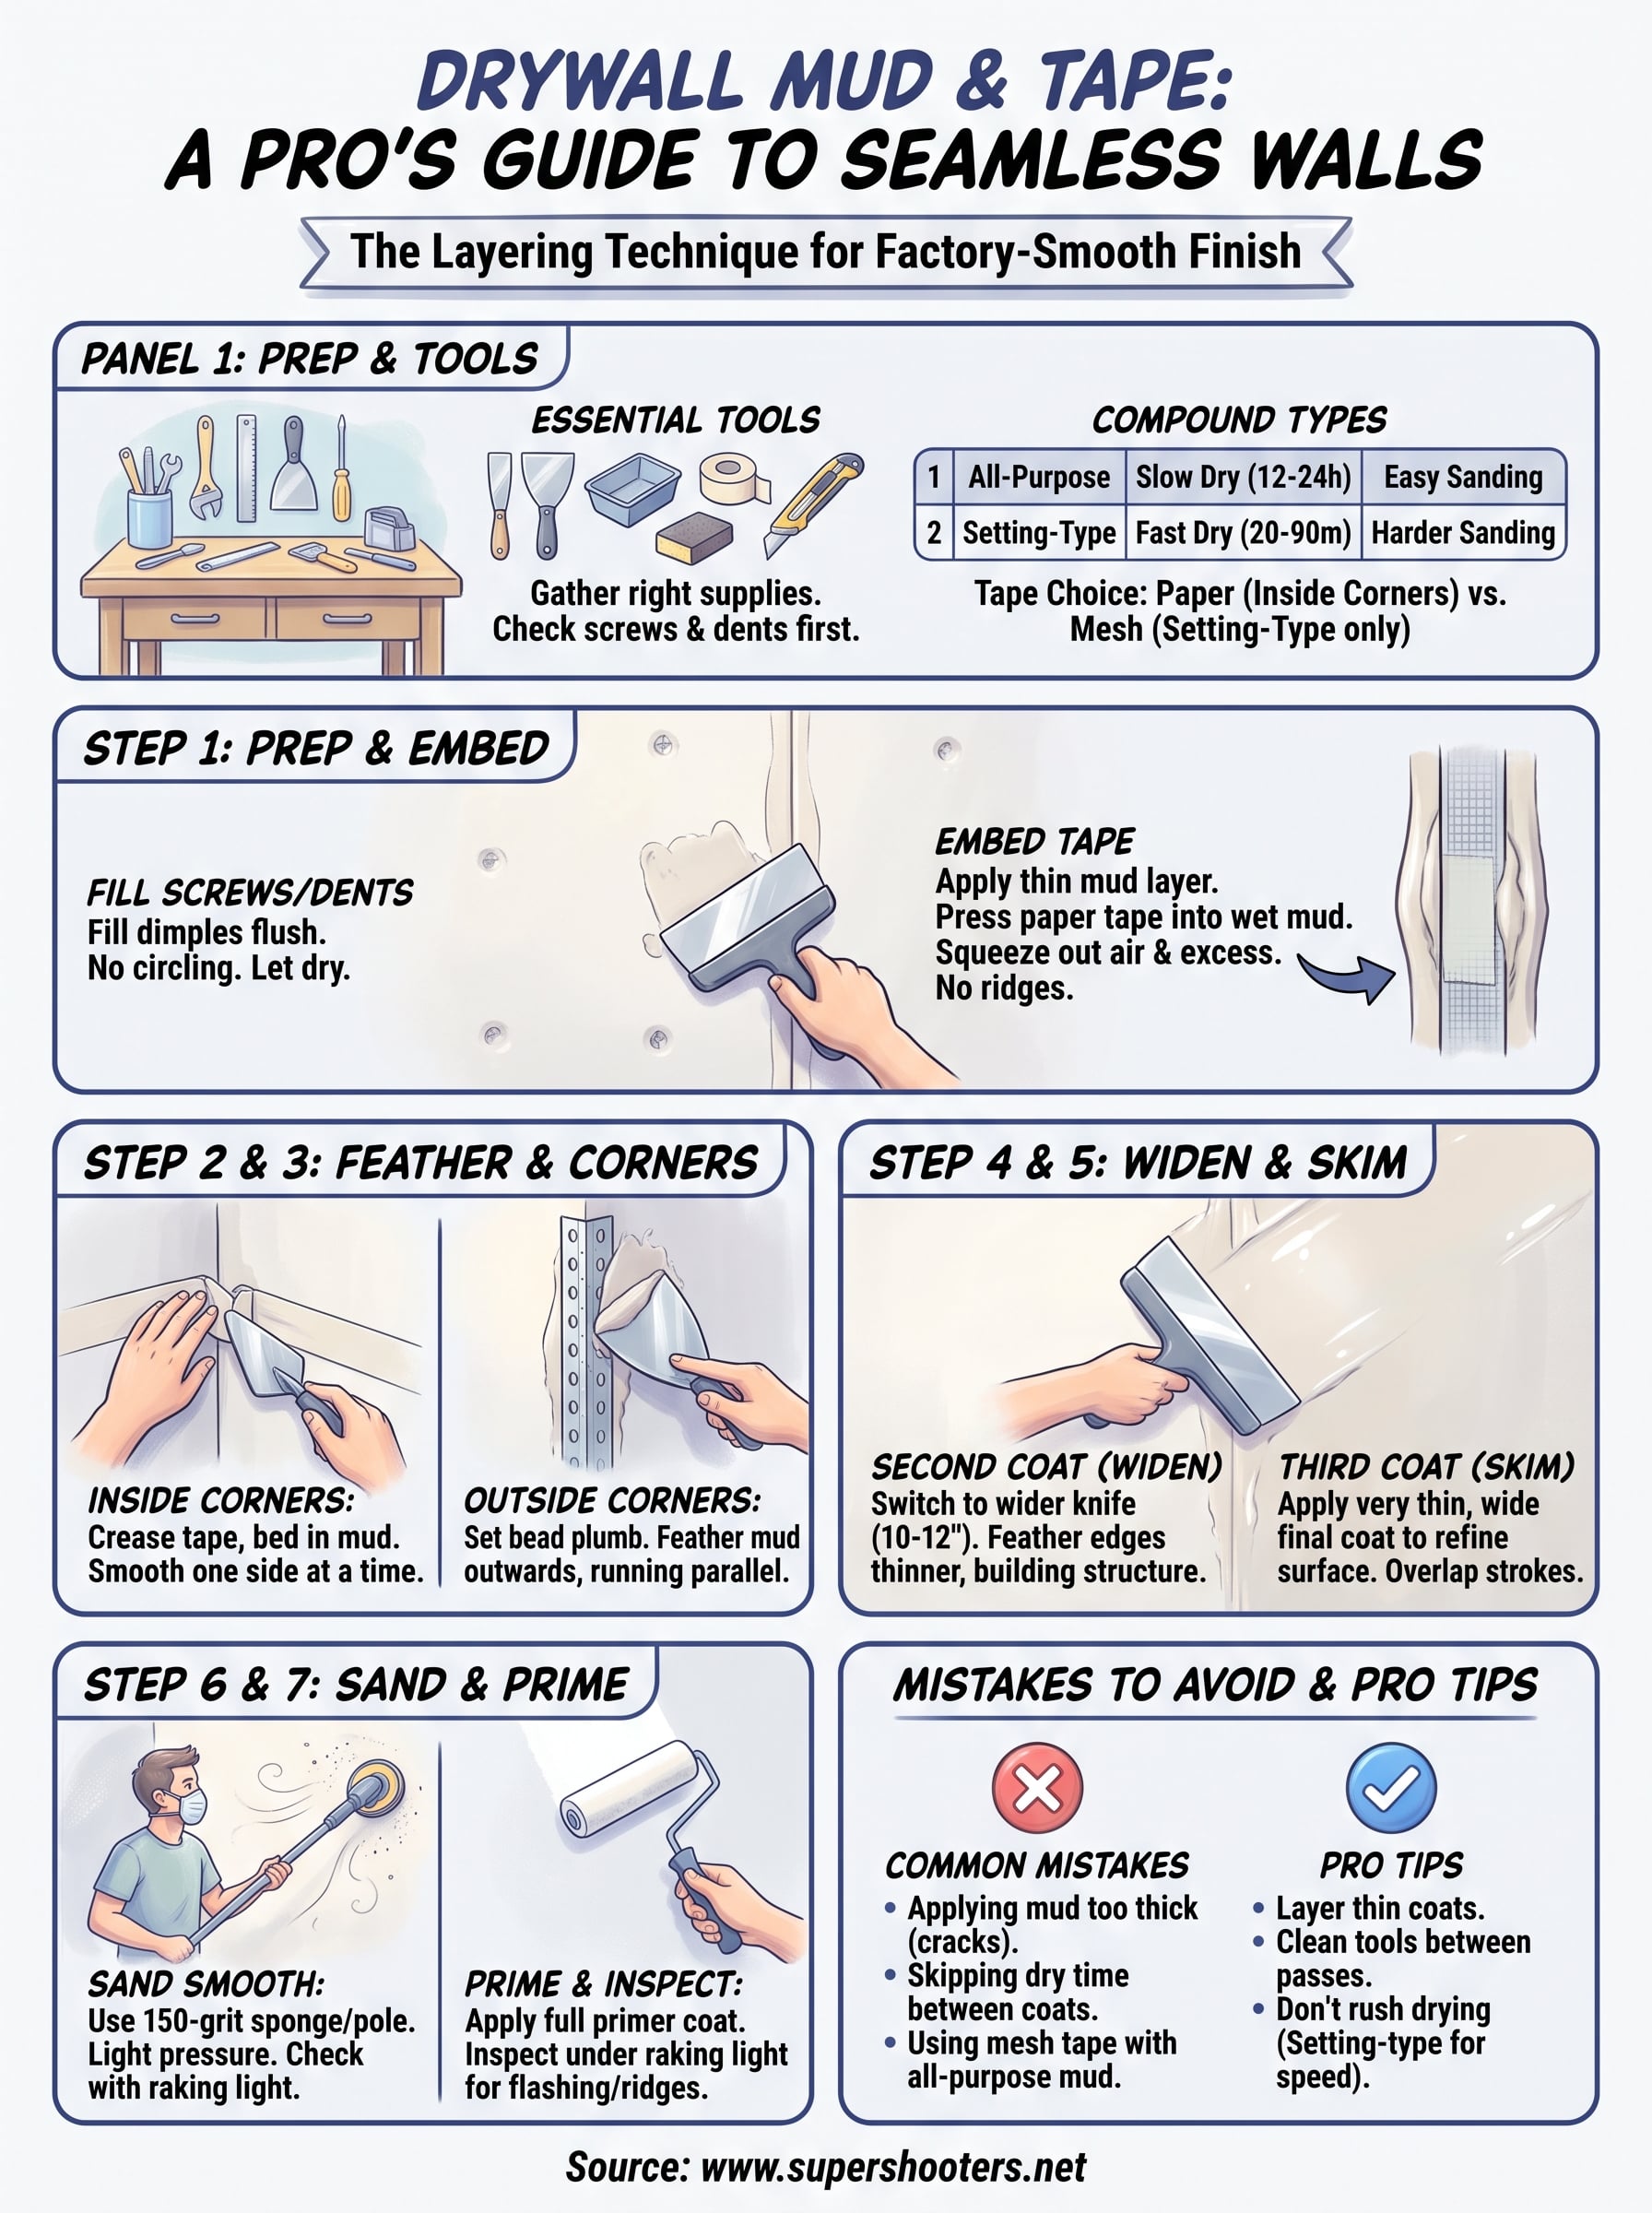
From rough seams to paint-ready walls
Getting from raw drywall to a paint-ready wall comes down to patience more than skill. Layering thin coats , letting each one dry fully, and checking your work under raking light will catch nearly every mistake before it becomes permanent. Follow the seven steps in order, resist the urge to rush drying time, and you'll end up with seams that vanish under paint instead of ridges that show up the moment the sun hits the wall at the wrong angle.
Some jobs, though, are bigger than a weekend project. Large water-damaged sections, whole-room drywall replacement, or anything involving an old popcorn ceiling calls for more hands and the right equipment. If your walls need more than a patch job, or you're not sure what's hiding behind that texture, get a free estimate on professional drywall repair and patching and let our crew finish it right the first time.
Recent Posts