Share this article

July 9, 2026

How Many Coats of Drywall Mud Do You Really Need?

You've patched a hole, taped a seam, or hung a new sheet of drywall, and now you're staring at that first layer of mud wondering if you're done. How many coats of drywall mud do you actually need before it looks finished instead of lumpy? Guess wrong and you'll either sand through a coat that wasn't ready or end up with visible seams once you paint.

The short answer: most drywall work needs three coats of mud , each one wider and thinner than the last, with full drying time and a sanding pass between them. Skip a coat or rush the drying, and you'll see it later under raking light or a fresh coat of paint.

In this article, we'll break down what each coat actually does, how long to wait before sanding, and when you might need a fourth coat for tricky spots like inside corners or textured ceilings. If the job sounds like more than a weekend project, our crew at Super Shooters has handled drywall finishing across the Sacramento Valley for over 30 years and can take it off your hands entirely.

Why the number of coats affects your finish

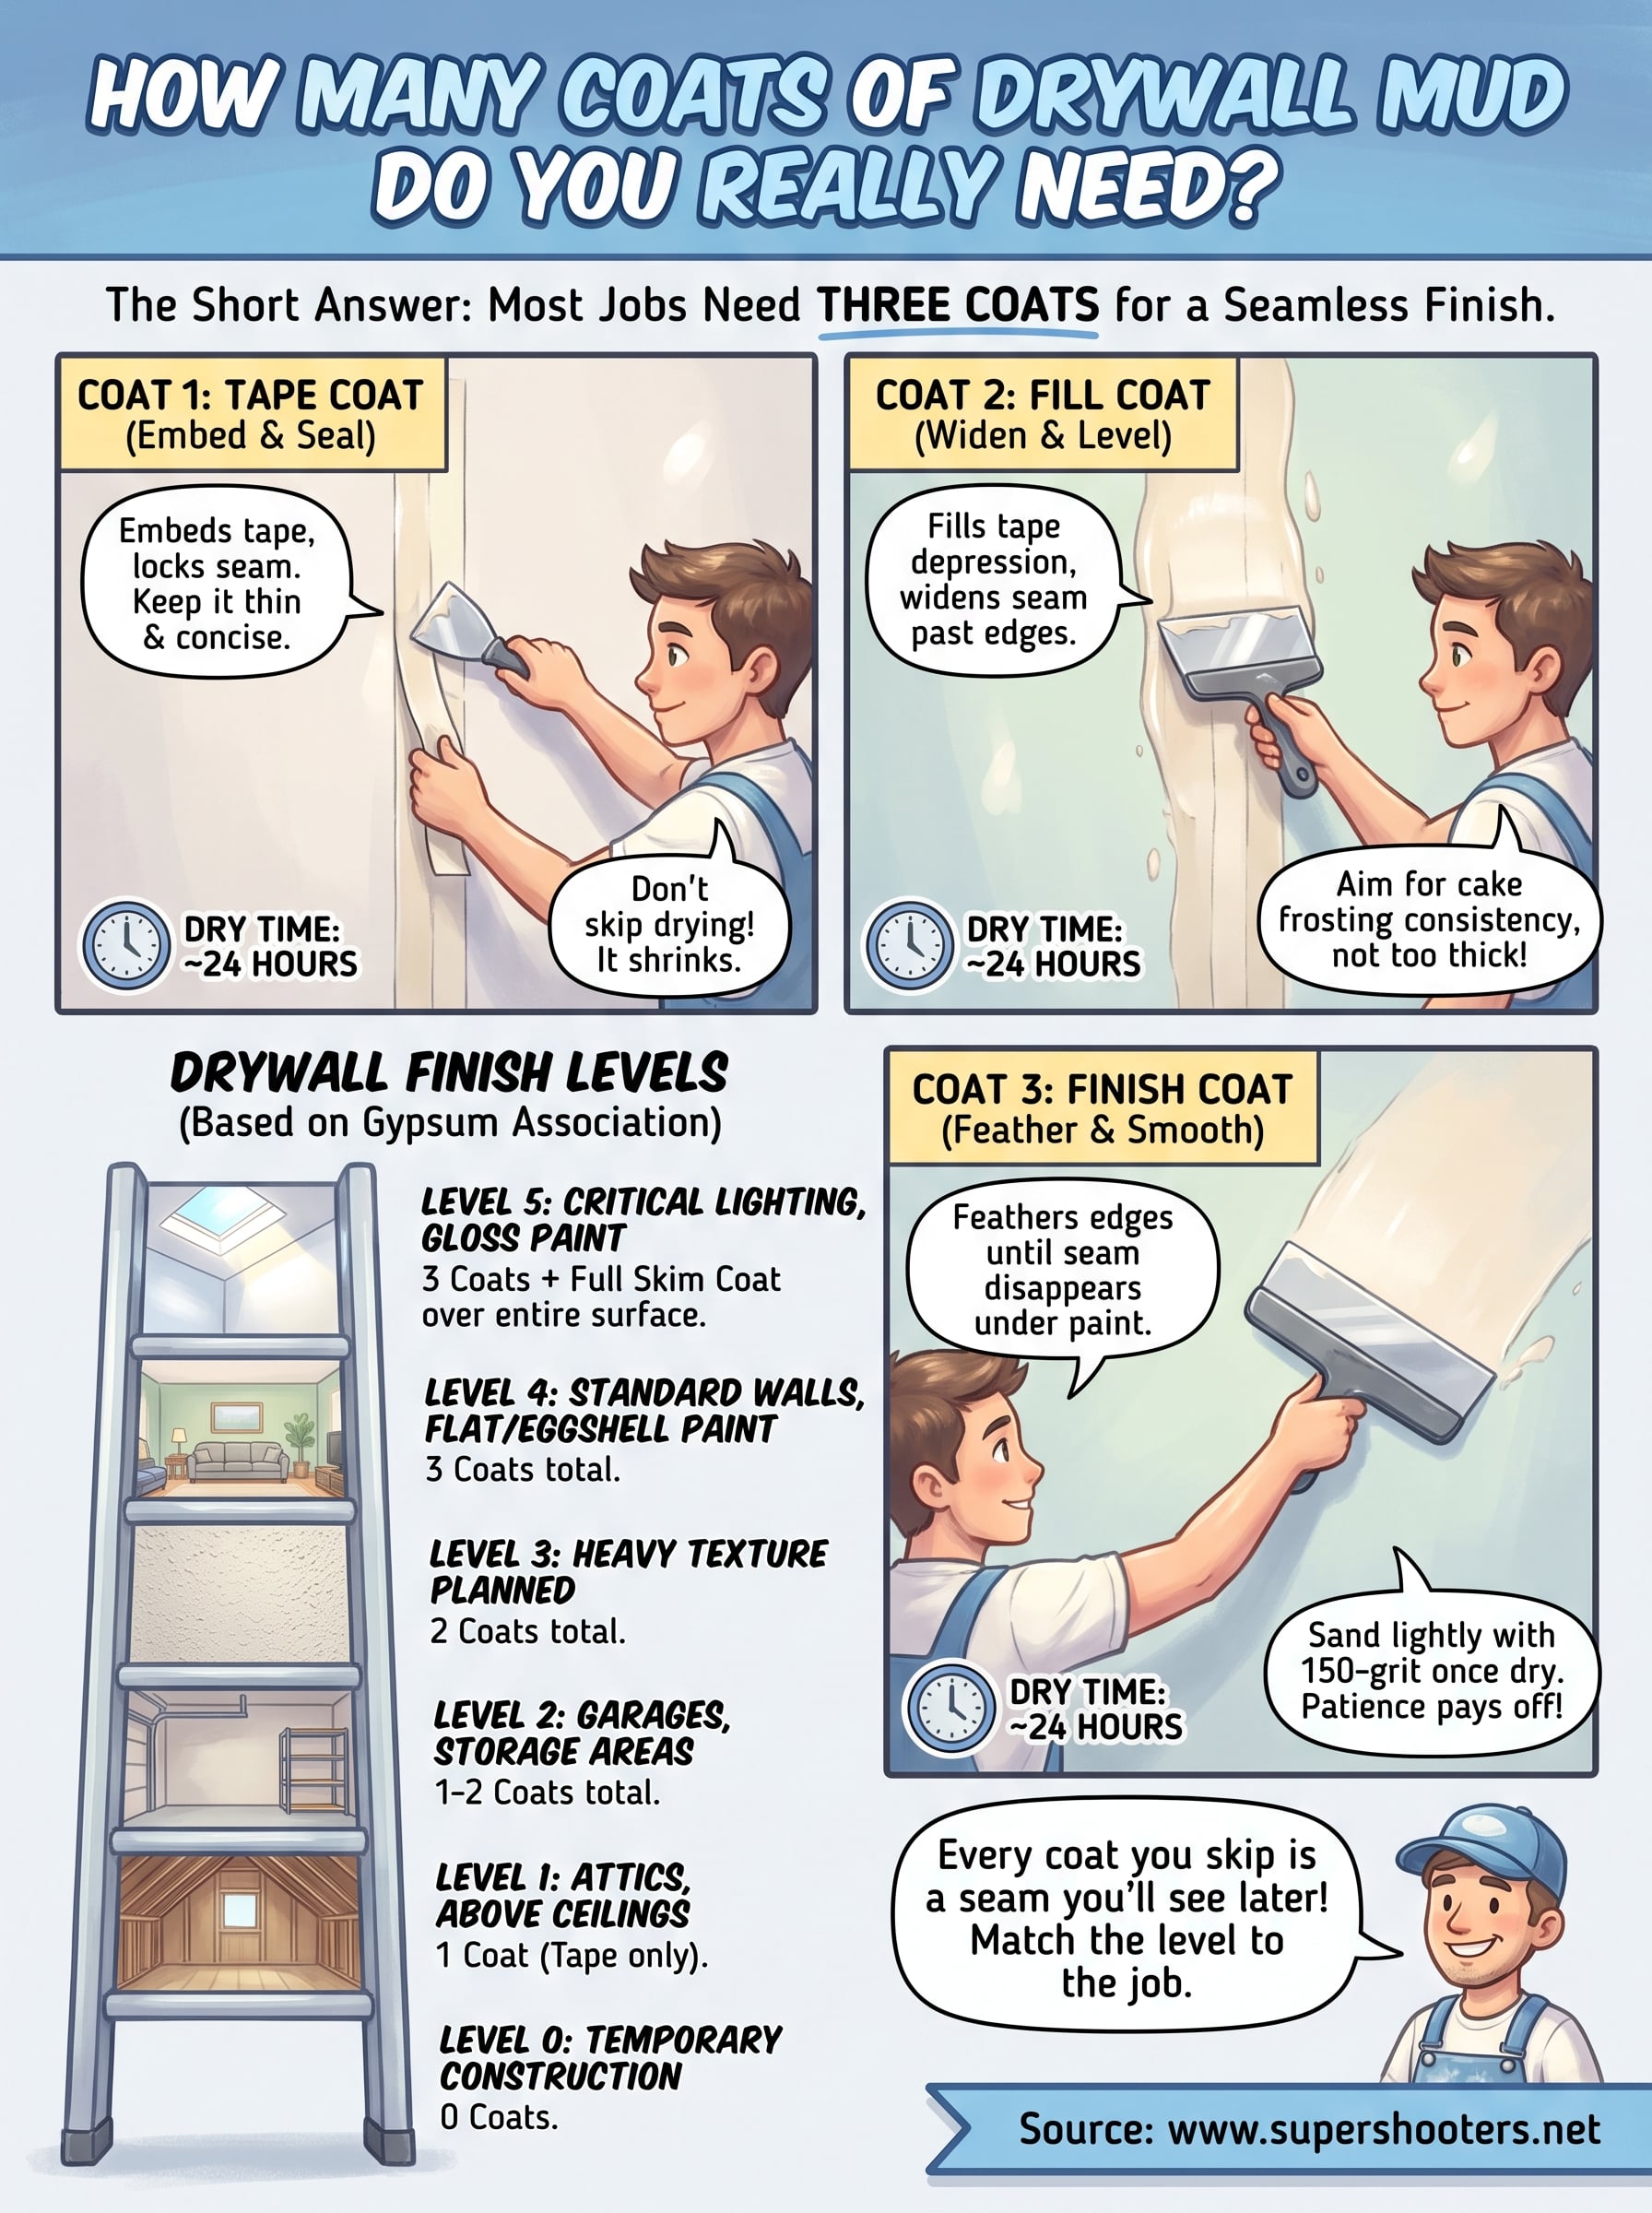
Each coat of mud does a different job, and skipping one shows up later no matter how good your sanding is. The first coat embeds the tape and locks the seam so it won't crack when the house settles. The second coat fills the low spots the tape created and widens the seam so it blends into the surrounding drywall. The third coat feathers everything out until the seam disappears under a coat of paint. Treat these as one step and you'll end up with a ridge you can feel with your palm, even if it looks fine under normal light.

Homeowners often assume more mud in one pass saves time, but thick single coats shrink and crack as they dry. Mud shrinks as the water in it evaporates, and a heavy coat applied all at once dries unevenly, pulling away from the tape at the edges. That's why professional finishers build up thin, wide layers instead of one thick one. The Gypsum Association, which sets national standards for drywall finishing, recommends progressively wider coats specifically to control this shrinkage and keep the joint flat ( https://www.gypsum.org).

Every coat you skip on drywall mud is a seam you'll see later under paint or bright light.

What too few coats looks like

Cut a corner at two coats and the tape line usually still shows once the wall is primed, especially under raking light from a window or lamp. Visible seams are the most common complaint we hear from homeowners who tried to finish drywall themselves on a tight weekend. The tape edge sits slightly higher than the surrounding wall, and paint doesn't hide a ridge, it highlights it. Ceilings are worse, since overhead light rakes across the surface and exposes every imperfection a wall might get away with.

Why drying time between coats matters as much as the count

Rushing dry time causes more finish problems than skipping a coat outright. Standard joint compound needs roughly 24 hours to dry fully at normal room temperature and humidity, and applying the next coat over damp mud traps moisture that later causes cracking or peeling. Quick-setting compounds cut that wait to a few hours, but they're harder to sand smooth and less forgiving for beginners. Either way, the clock resets with every coat, so a three-coat job realistically spans two to three days once you factor in sanding between each pass.

How coat count and purpose line up

Coat Purpose Typical dry time
1st (tape coat) Embeds tape, seals the joint 24 hours
2nd (fill coat) Fills tape depression, widens seam 24 hours
3rd (finish coat) Feathers edges, smooths for paint 24 hours
4th (optional) Extra pass on Level 5 finishes or bad lighting 12 to 24 hours

Getting this sequence right is less about talent and more about patience. Rushed jobs almost always trace back to someone skipping a drying window or trying to finish a seam in two coats instead of three, and it's the reason so many DIY drywall repairs need a redo within a year.

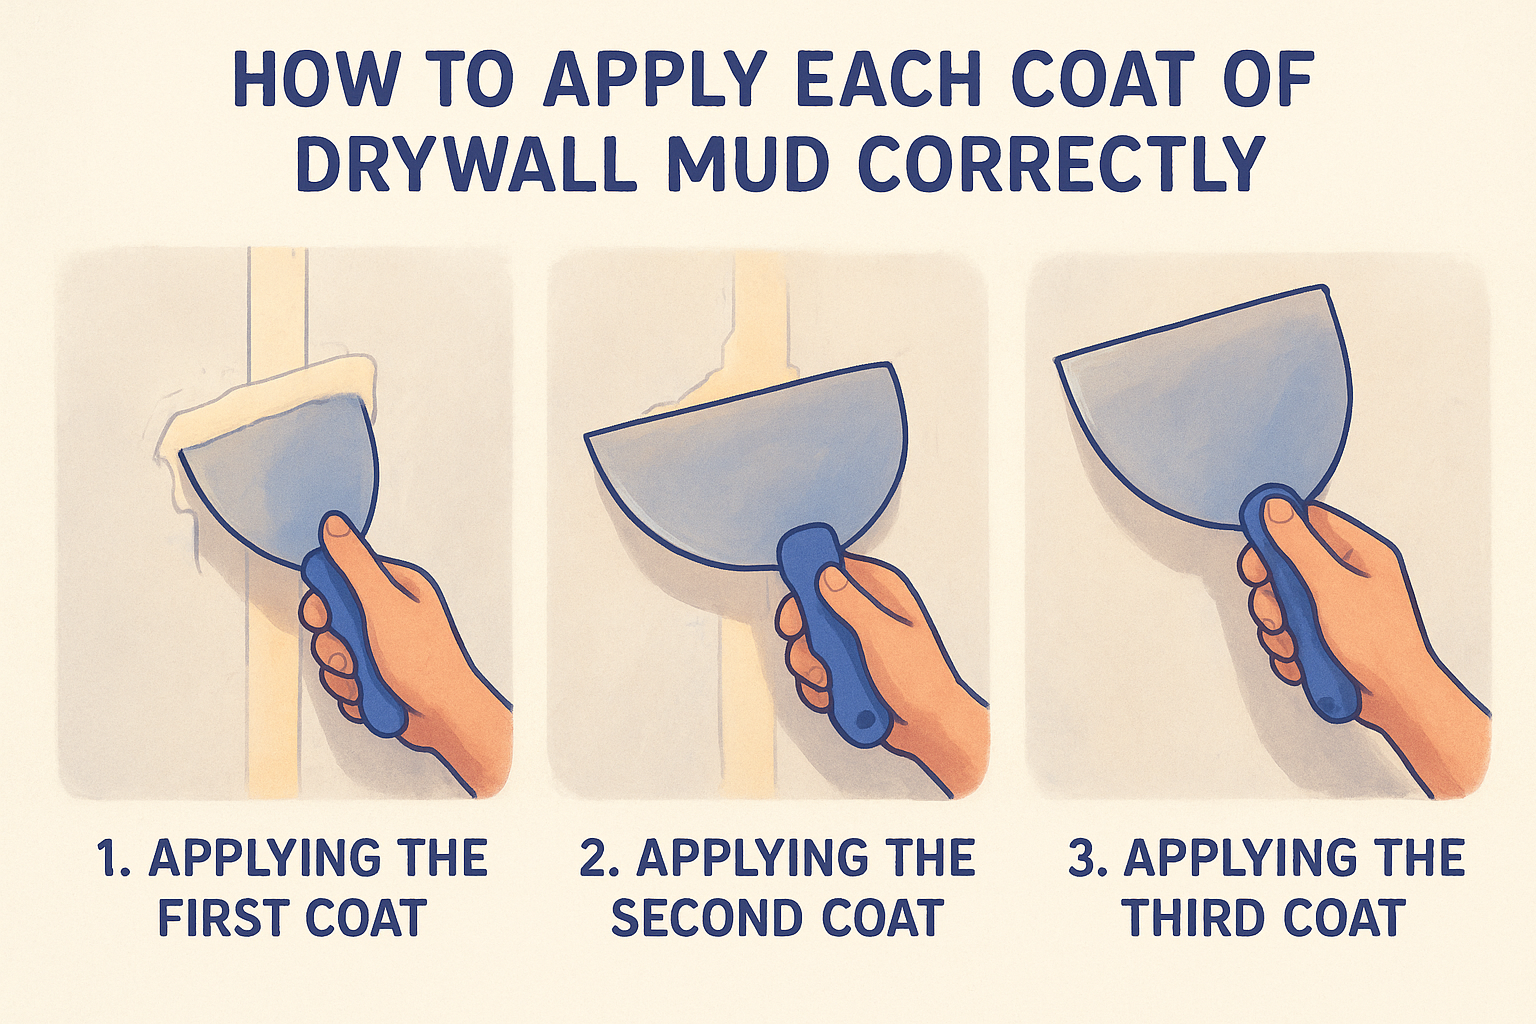
How to apply each coat of drywall mud correctly

Getting the technique right matters as much as knowing how many coats of drywall mud to apply. Each pass has its own knife width, pressure, and drying expectation, and mixing up the order is how a lot of DIY jobs end up looking patched instead of finished. Here's how the three coats break down in practice, plus the tools that make each one go smoother.

Applying the first coat (embedding)

Start with a 4 to 6 inch knife and press firmly enough to squeeze mud through the tape without stripping it off the wall. Paper tape works better than mesh for this step because it resists stretching and won't bubble under the second coat. Load a thin layer, set the tape into it, then scrape a second thin layer over the top just enough to cover the tape's texture. Leave the surface slightly concave here. A flat first coat leaves no room for the next layer to sit level with the wall.

Applying the second coat (filling)

Switch to an 8 to 10 inch knife for this pass, since you're widening the seam beyond what the tape covers. Fill coats need to feather out past the edges of the first coat by an inch or two on each side, so the buildup tapers instead of stopping abruptly. Work in one direction with steady pressure, and scrape off any ridges immediately rather than waiting for them to dry. Check the seam with a straightedge or your palm before moving on. Any high spot now will still be there after the third coat.

Applying the third coat (finishing)

Move up to a 10 to 12 inch knife and use it almost like a squeegee, spreading a thin skim coat that blends the seam into the surrounding drywall. Finish coats shouldn't add much thickness; their job is to hide the transition line, not build up material. Feather the edges wide enough that a hand run across the wall feels no bump at all. Sand lightly with 150-grit paper once dry, using a sanding pole for ceilings so you're not straining to reach every seam. Skip that final feather and the seam reappears the moment you roll on primer.

Coats needed for each drywall finish level

Not every wall needs the same number of coats, and that's where drywall finish levels come in. The Gypsum Association publishes six standard levels, numbered 0 through 5, that spell out exactly how much mud and sanding a wall needs based on what's going over it. A garage wall behind shelving doesn't need the same treatment as a living room wall lit by a skylight, and building codes and paint manufacturers both reference these levels when specifying prep work.

The finish level tells you the coat count before you ever pick up a knife.

The five levels explained

Each level builds on the one before it, adding coats, tape, and sanding as the visual demands increase. Skipping straight to Level 5 on a closet wall wastes time and mud, while stopping at Level 3 in a hallway with can lights will leave every seam visible.

Level Typical use Coats of mud Skim coat over whole surface
0 Temporary construction, no finish planned 0 No
1 Attics, plenum spaces above ceilings 1 (tape coat only) No
2 Garages, storage areas, tile backer 1-2 No
3 Walls with heavy texture planned 2 No
4 Standard walls with flat or eggshell paint 3 No
5 Glossy paint, skylights, critical lighting 3 plus full skim Yes

Matching the level to your project

Quick jobs like a closet or garage rarely need more than two coats , since Level 2 or 3 finishes tolerate minor imperfections that texture or storage will hide anyway. Rooms with large windows, recessed lighting, or glossy paint push you toward Level 5 , where a thin skim coat covers the entire surface, not just the seams, to eliminate any texture difference between the mud and the paper face of the drywall. Sacramento Valley homes with vaulted ceilings and skylights almost always call for this level, since raking light exposes flaws that would go unnoticed in a shaded hallway. Choosing the wrong level upfront is a common reason homeowners redo work they thought was finished.

Common mudding mistakes that ruin a smooth finish

Most bad drywall finishes trace back to a handful of repeatable mistakes, not bad luck. Knowing these patterns helps you spot trouble before you've sanded through three coats and painted over a wall you'll have to redo. Here's what actually goes wrong on jobs we get called to fix.

Sanding too soon or too aggressively

Sanding damp mud tears it instead of smoothing it, and you end up gouging the tape underneath. Wet spots feel spongy under sandpaper instead of powdery, so if your sanding block is clogging fast, stop and give it more time. On the other end, aggressive sanding on a dry coat can cut through the paper face of the drywall itself, which creates a fuzzy patch that no amount of extra mud will hide cleanly.

Sanding before mud fully dries just moves the problem to your next coat.

Mixing mud too thick or too thin

Joint compound straight from the bucket is usually too thick for finish coats and needs a splash of water to loosen it. Thick mud drags under the knife and leaves ridges, while over-thinned mud shrinks more as it dries and can crack along the seam. Aim for a consistency close to cake frosting, not paste and not soup.

Skipping the feather edge

A lot of DIY seams look fine up close but show a hard line a foot back, because the mud stops abruptly instead of tapering into the wall. Feathering takes patience with the wider knives on coats two and three, and rushing this step is the single most common reason a finished wall still shows the seam under paint.

Ignoring corners and butt joints

Inside corners and butt joints (where two drywall ends meet without a tapered edge) behave differently than a standard tapered seam and need their own technique. Butt joints especially tend to bulge if you don't feather them wide enough, since there's no factory taper to hide the buildup. Treating every seam the same way is how a wall ends up with one visibly proud joint among a dozen flat ones.

Working in bad lighting

Finishing a wall under a single overhead bulb hides flaws that show up the moment you add a lamp or window light later. Raking light from an angle is the real test, so check your work with a portable light held sideways against the wall before calling any coat finished.

When to call a professional drywall finisher

Some jobs are worth doing yourself, and some aren't, especially once you factor in the time a proper three-coat job takes. Skill and schedule both matter here: if you're finishing your first wall, expect the learning curve to cost you an extra coat or two before you get a feel for feathering. A pro who's mudded thousands of seams reads the wall differently, knowing where a joint needs an extra pass before the mistake shows up under paint.

A rushed DIY finish often costs more to redo than hiring a pro from the start.

Signs the job is beyond a weekend project

Certain situations tip the scale toward calling in help rather than grinding through another coat on your own. Watch for these:

  • Ceilings with popcorn texture or suspected asbestos , where disturbing the material without proper handling creates a health risk
  • Vaulted ceilings or walls near skylights , where raking light exposes every flaw and a Level 5 finish is non-negotiable
  • Large water-damaged areas , where mud alone won't fix warped or crumbling drywall underneath
  • Multiple butt joints or inside corners that keep bulging no matter how wide you feather them
  • A deadline , since a rushed three-coat job with skipped dry time almost always needs redoing later

What a professional finisher brings to the job

Experienced crews carry the tools and timing down to a routine, which is why a job that takes a homeowner a week gets finished in a day or two. Consistent technique across every seam in a room is hard to match without years of practice, and a pro knows exactly how thin to feather a coat so it disappears under primer instead of showing a shadow line. They also carry the equipment for texture matching and asbestos-safe removal, both areas where a mistake costs far more than the original repair.

Our crew at Super Shooters has finished drywall across the Sacramento Valley for over 30 years, and we still find ourselves called back to fix DIY jobs that looked fine until the paint went on. If your project involves popcorn ceilings, water damage, or a finish level higher than a hallway needs, it's worth a free estimate before you commit a weekend to it.

Getting a Wall Finish That Lasts

Three coats, full drying time, and a sanding pass between each one gets you a wall that holds up under paint and bright light. Rushing any of these steps is the fastest way to end up redoing work you already spent a weekend on, and it's the most common callback we see. Match your coat count to the finish level the room actually needs, whether that's a quick two-coat garage wall or a full Level 5 skim under skylights, and you'll avoid both wasted mud and wasted time.

If you'd rather skip the sanding dust and the second attempt, our crew handles this daily across the Sacramento Valley. We've finished thousands of seams over 30 years and know exactly how a wall should feel before it's ready for paint. Get a free drywall repair estimate and let us handle the coats, the drying, and the sanding for you.

Recent Posts

By cinchweb July 8, 2026
Learn how to tape drywall corners like a pro: prep tools, bed and feather coats, fix cracks, and get smooth finishes step by step.
By cinchweb July 7, 2026
Find the best options for asbestos ceiling testing near me. Compare professional inspector costs, DIY kits, and accredited labs to safely test your home.
By cinchweb July 7, 2026
Learn how to prep a room for painting with this step-by-step checklist. Master cleaning, patching, and taping techniques for a professional finish.
By cinchweb July 5, 2026
Repair holes and cracks with these professional tips on how to patch ceiling drywall. Master mudding and texture matching for a seamless, invisible finish.
By cinchweb July 4, 2026
Stop before you scrape. Learn how to test ceiling for asbestos safely with our step-by-step guide on DIY sampling, lab analysis, and protective gear.
By cinchweb July 3, 2026
Master how to apply drywall mud for perfectly smooth walls. Learn professional techniques for mixing, feathering edges, and finishing seams like a pro.
By cinchweb July 2, 2026
Learn how to mix drywall mud for a smooth, professional finish. Master the right ratios and consistencies for every coat to save time on sanding.
By cinchweb July 1, 2026
Learn what is drywall mud, its uses, and how to choose the right type. Discover the differences between mud, spackle, and plaster for a seamless finish.
By cinchweb June 30, 2026
Master drywall installation for beginners with our guide. Learn how to hang panels, tape seams, and apply a smooth finish for professional-looking walls.
Show More