June 28, 2026
7 Drywall Installation Tips To Hang Sheetrock Like A Pro
Hanging drywall looks straightforward until you're standing in a room with sagging seams, visible screw pops, and joints that won't sit flat. Most problems people run into aren't caused by lack of effort, they come from missing a few critical drywall installation tips that professionals pick up after years of repetition. The difference between a clean, solid wall and one that shows every mistake usually comes down to technique and preparation , not expensive tools.
At Super Shooters, we've completed over 10,000 drywall projects across the Sacramento Valley, everything from full new-construction hangs to single-room repairs and garage finishes. Our crew members have been doing this work for 30+ years, and the patterns we see in DIY attempts (and even some contractor work) tend to repeat. Wrong fastener spacing, bad staggering, poor cutouts , the same handful of mistakes account for most of the callbacks.
Whether you're tackling a bedroom remodel yourself or just want to understand what quality installation looks like before hiring it out, these seven tips will help you hang sheetrock the right way . Each one comes from hands-on experience, not textbook theory, the kind of knowledge that only comes from thousands of completed projects .
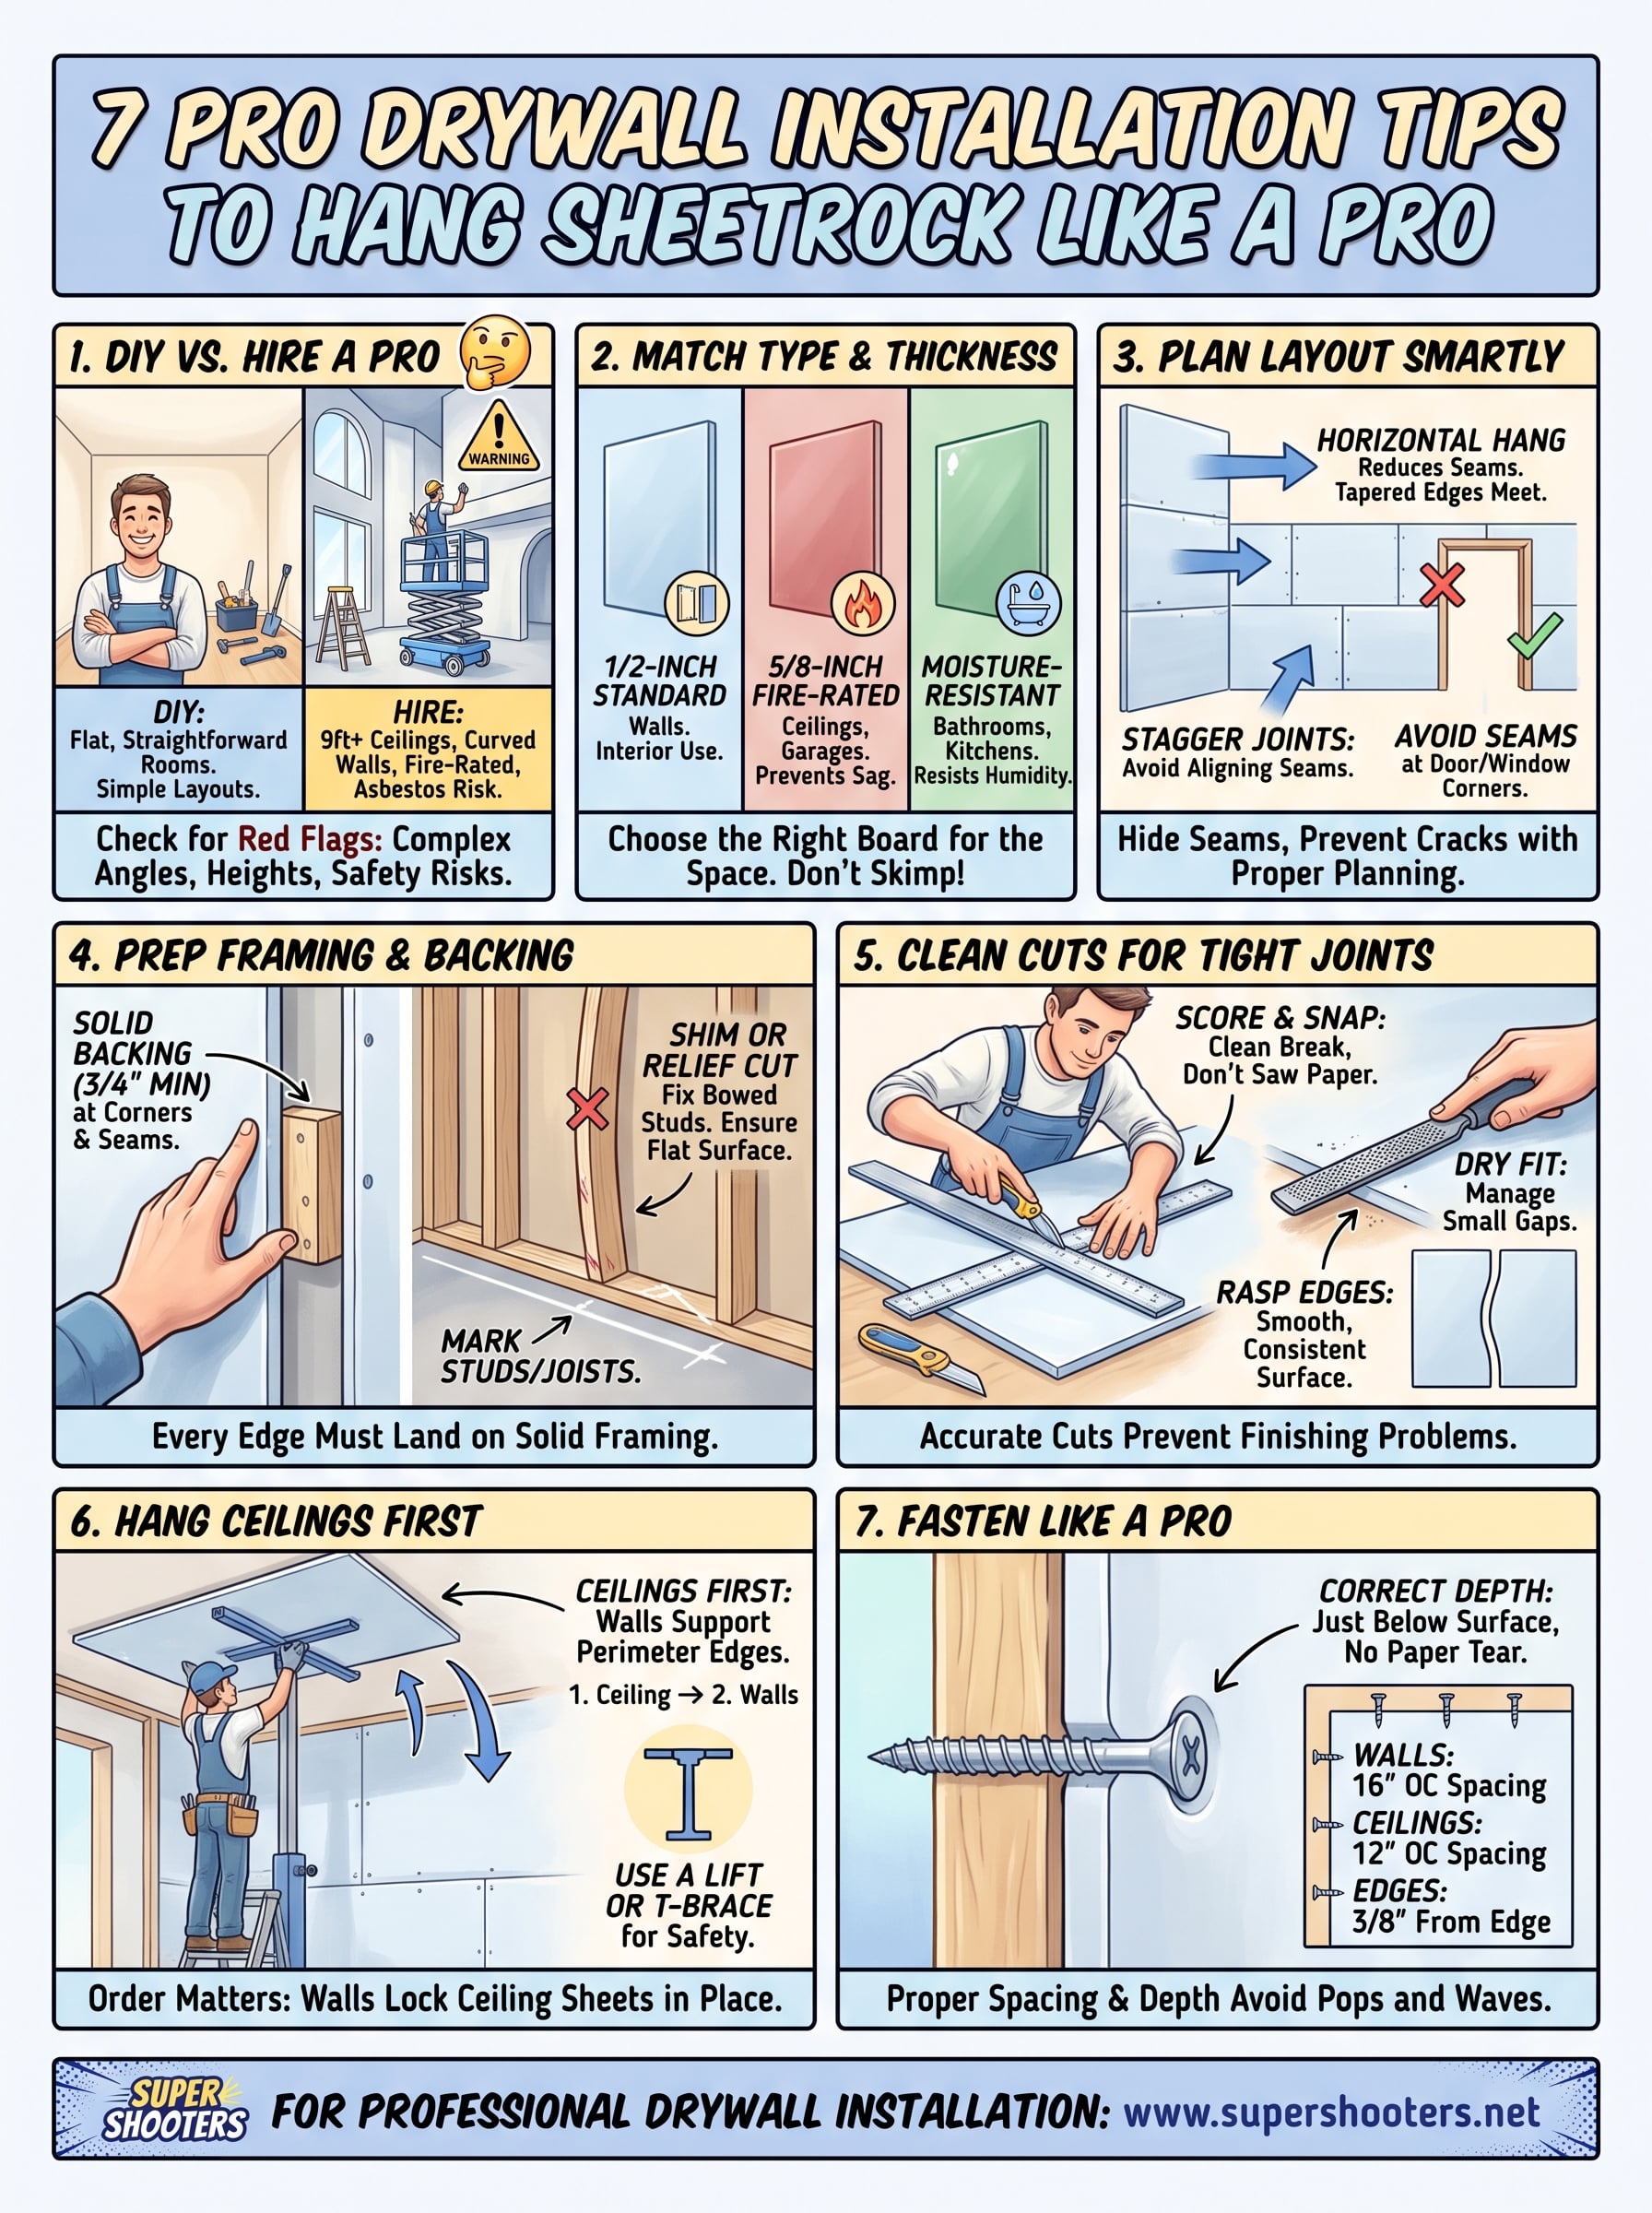
1. Decide DIY vs hire a pro for tricky rooms
Not every drywall project makes sense as a DIY job. Flat, straightforward rooms like square bedrooms or garages with accessible framing are solid candidates for a motivated homeowner. But rooms with cathedral ceilings, curved walls, or fire-rated assemblies push quickly into contractor territory, especially if you don't have the right equipment or a reliable helper on hand.
How to spot jobs that need a contractor
Some rooms signal immediately that they need professional hands. If you're working with ceiling heights above 9 feet , you'll need a drywall lift and proper staging, and one slip means a heavy sheet damaging your walls or landing on you. Complex angles, vaulted ceilings, and rooms requiring 5/8-inch fire-rated board throughout are situations where the cost of errors, both financially and physically, adds up faster than most homeowners expect.
Hire a contractor for any room where a single mistake would force you to tear out finished work or redo adjacent trades like electrical or plumbing.
What to check before you hang the first sheet
Before you commit to DIY, walk the room carefully and note anything that could slow you down or create risk. Check whether your framing is plumb, straight, and on a consistent layout , because hanging drywall over bowed or twisted studs creates waves that show through paint no matter how well you finish the joints.
Also confirm you have enough clearance to maneuver full 4x8 or 4x12 sheets through doorways and hallways without gouging corners. These drywall installation tips apply whether you're doing the work yourself or supervising a crew, because knowing what to look for early keeps the project moving without costly surprises.
Safety and code issues to consider
Older homes add complexity that goes well beyond technique. Homes built before 1978 may contain asbestos in existing ceiling or wall materials, and disturbing those materials without proper testing and licensed abatement is both a health risk and a legal liability. Local building codes also dictate fire ratings, fastener schedules, and moisture barriers in specific rooms, so confirm your permit requirements before the first sheet goes up.
2. Match drywall type and thickness to the space
Grabbing whatever's on sale at the hardware store is one of the most common drywall installation tips people skip entirely. The right board type and thickness directly affect how the finished wall performs, and choosing the wrong product for the room leads to sagging ceilings, mold growth , and failed inspections that cost far more to fix than the initial price difference.
Common drywall sizes and when to use them
Standard drywall comes in 4x8, 4x10, and 4x12 foot lengths , and the right choice depends on your ceiling height and wall run. Longer sheets reduce the total number of seams, which means less taping, less finishing labor, and fewer potential cracks down the road. Match your sheet length to your wall height to eliminate unnecessary horizontal butt joints wherever you can.
- 4x8 sheets work for standard 8-foot ceilings
- 4x10 sheets fit 9 and 10-foot walls cleanly
- 4x12 sheets eliminate mid-wall seams on taller walls
Choosing 1/2-inch vs 5/8-inch for walls and ceilings
Half-inch drywall handles most interior wall applications without issue. Switch to 5/8-inch board for ceilings, garage walls, and any fire-rated assembly , since the added thickness prevents sag and satisfies local code requirements in those situations.
Never hang 1/2-inch board on a ceiling with framing spaced wider than 16 inches on center, because sag becomes visible within months.
Picking moisture and mold-resistant boards
Bathrooms, laundry rooms, and kitchens require moisture-resistant or mold-resistant drywall , often sold as greenboard or purple board depending on the manufacturer. These products feature treated gypsum cores and specialized face paper that resist humidity in lower-splash areas without needing a full tile backer. Standard drywall in those spaces absorbs moisture and deteriorates faster than most homeowners expect.
3. Plan your layout to hide seams and prevent cracks
Layout planning is where most DIYers lose ground before a single sheet goes up. A poor seam plan creates cracks at predictable stress points, and no amount of taping compound fixes a joint placed directly over a structural weak spot. Thinking through your layout first saves you hours of repair work later.
Hang direction and seam placement rules
Hang ceiling sheets perpendicular to the joists to maximize structural support and reduce sag. On walls, running sheets horizontally cuts the total length of seams and keeps tapered edges facing each other at the same height around the room, which makes finishing far cleaner.
Vertical hanging on walls increases the number of butt joints, which are the hardest seams to finish flush, so keep sheets horizontal whenever your framing layout allows it.
Stagger joints and align tapered edges correctly
Stagger vertical seams by at least one stud bay between adjacent rows so no two seams land on the same framing member. Tapered edges should always meet tapered edges, giving you a recessed channel that holds tape and compound without creating a ridge that telegraphs through paint.
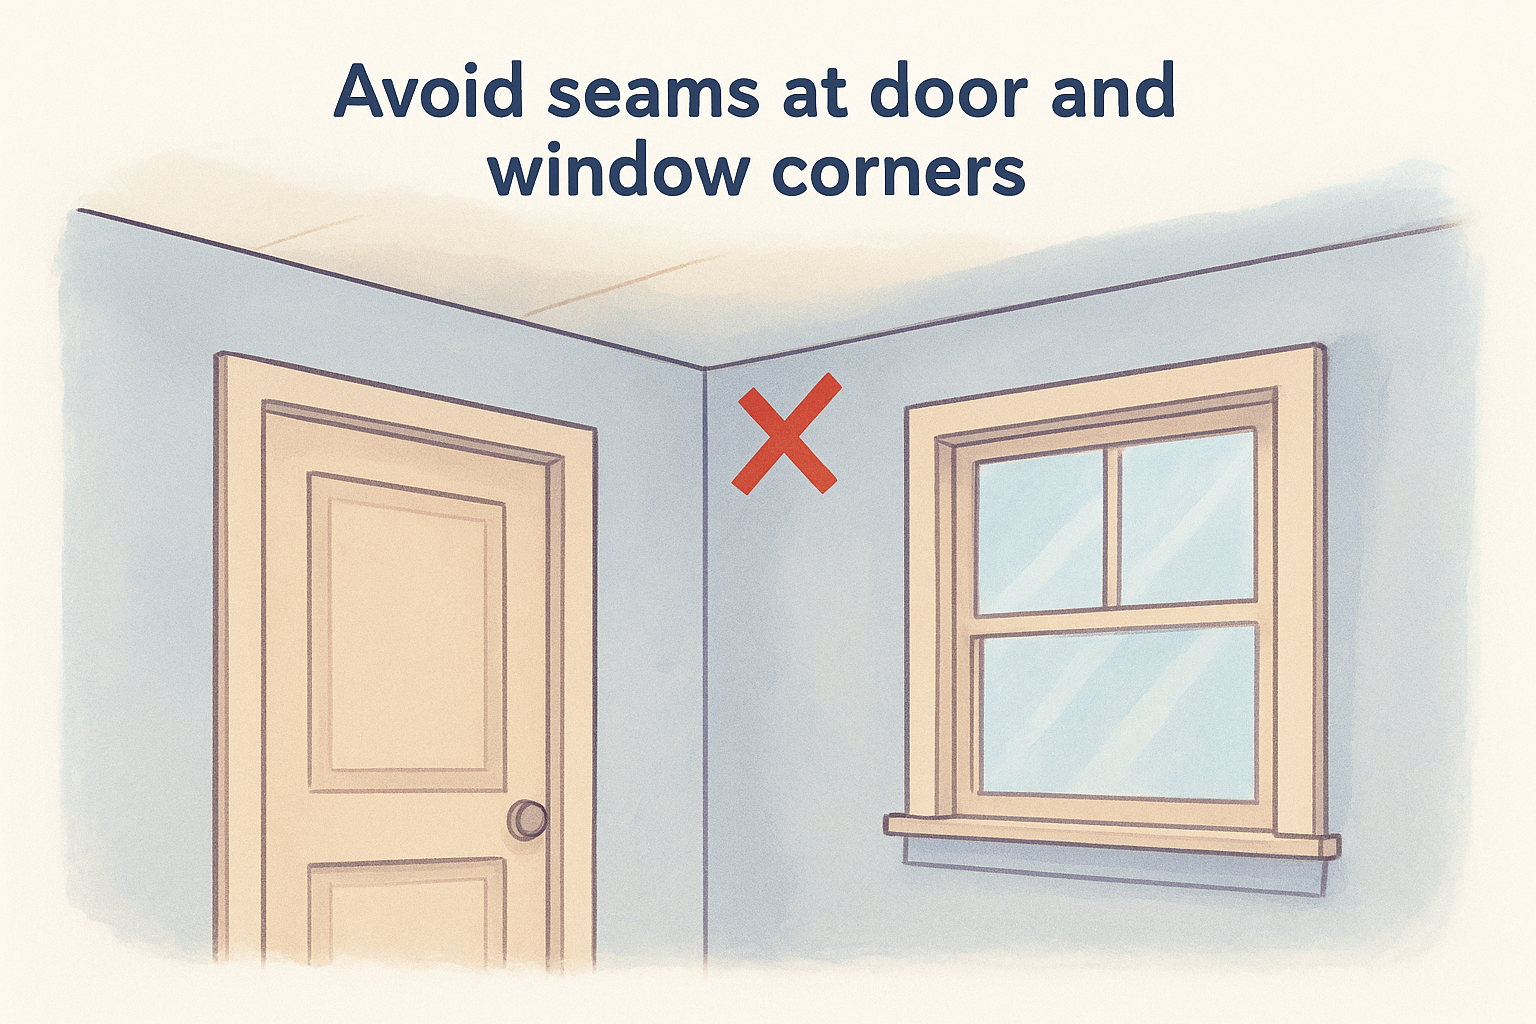
Avoid seams at door and window corners
One of the most practical drywall installation tips is to never land a seam at the corner of a door or window rough opening. Those areas experience constant movement and stress from daily use, and any seam placed there will crack through the finish coat within months regardless of how well you tape it.
4. Prep framing and backing so every edge lands solid
Good framing prep is one of the most overlooked drywall installation tips in the entire process. Every sheet edge needs solid backing behind it, and every stud needs to be straight and on layout before you pick up the first sheet. Skipping this step turns a straightforward hang into a finishing nightmare.
Finding missing backing at corners and seams
Backing problems show up most often at inside corners, butt joints, and ceiling-wall intersections . Before you hang anything, walk the framing and confirm that every sheet edge will land on at least 3/4 inch of solid wood or metal . Add blocking between studs wherever a seam falls in open air.
A seam with no backing behind it will flex, crack, and pull apart no matter how well you tape it.
Fixing bowed studs and uneven framing before drywall
Bowed studs create waves and high spots that show through paint and make taping nearly impossible. Sight down each stud at floor level and mark any that push past a 1/8-inch variance across the wall run.
Shim low spots and cut relief kerfs into the center of bowed studs to let them flex back into line. Driving a fastener into a bowed stud just transfers the problem directly to your finished wall surface.
Marking studs and joists for fast, straight fastening
Snap chalk lines or mark the floor and ceiling plates before the drywall goes up so you know exactly where each framing member sits once it's covered. Use these marks to label:
- Stud centers on the floor plate with an X
- Joist positions on the wall top plate for ceiling work
- Any doubled framing or headers that shift the standard layout
Clear marks keep you driving fasteners into solid framing instead of guessing and leaving loose screws that pop through paint months later.
5. Cut and fit sheets cleanly for tight joints
Sloppy cuts create gaps that compound won't bridge and edges that tear tape months after finishing. Every drywall installation tip about seam quality starts with accurate, clean cuts before the sheet ever touches the wall.
Score, snap, and trim without wrecking the paper face
Mark your line with a utility knife and a T-square , scoring firmly through the face paper and into the gypsum core. Snap the sheet away from you, fold it, and slice the back paper clean. Never saw through the face paper when you can avoid it, since sawing tears the fibers and leaves a ragged edge that won't sit flat against an adjacent sheet.
One firm score beats three shallow passes, so apply consistent pressure on the first stroke.
Using a rasp or plane to clean cut edges
A drywall rasp or Surform plane removes high spots and fuzz from cut edges in seconds. Run it at a slight angle to knock down crumbled gypsum and expose a tight, consistent surface.
Check the edge by feel and sight before you commit to hanging, because a rough cut edge that seats poorly creates a visible ridge no amount of compound will hide.
Dry fitting and managing small gaps the right way
Dry fit each sheet before driving a single fastener so you catch problems while adjustment is still easy . Handle gaps based on their size:
- Under 1/4 inch: fill with setting-type compound
- Wider than 1/4 inch: cut and fasten a scrap filler strip before taping
6. Hang ceilings first and support sheets safely
Ceiling work comes first in any room, and for good reason. One of the most reliable drywall installation tips is to finish the ceiling before the walls , because wall sheets installed afterward lock the ceiling's perimeter edges and prevent gaps from opening up over time.
Order of operations for ceilings and walls
Hang ceiling sheets first, then work down the walls. Hanging walls first leaves unsupported ceiling edges that crack with seasonal movement. Wall sheets installed after the ceiling carry that perimeter load , producing tighter seams that hold through paint without tape failure. This sequence also gives you cleaner inside corners at the ceiling-wall junction, since you set the ceiling plane first and cut wall sheets to meet it precisely.
Using a drywall lift, T-brace, or helper effectively
A rented drywall lift is the safest tool for ceiling work, holding sheets firm against the joists while you fasten without rushing. If a lift isn't available, a T-brace cut slightly taller than your ceiling height wedges the sheet in place and keeps your hands free for the drill.

Never hold a full ceiling sheet overhead without support, because fatigue sets in fast and a dropped sheet damages edges and anyone working below.
Handling heavy sheets without damaging corners
Carry sheets on edge rather than flat to prevent flex and corner damage during transport. Protect cut corners and tapered edges using these steps:
- Pad the bottom edge with scrap before leaning sheets against a wall
- Use foot pedals or sheet lifters to raise panels from the floor to the wall without dragging paper across rough framing
7. Fasten like a pro to avoid screw pops and waves
Screw placement is one of the most critical drywall installation tips that directly affects how your finished walls hold up over time. Wrong screw depth or spacing produces pops and waves that show through paint and require grinding, patching, and repainting to fix properly.
Screw spacing, patterns, and edge distances
On walls, space screws every 16 inches along each stud and keep fasteners at least 3/8 inch from all sheet edges to prevent the paper from tearing and the gypsum from crumbling. On ceilings, tighten that spacing to 12 inches on center because the added weight and sag risk demand more fastener contact with the framing. Use this pattern as your baseline:
- Walls: 16 inches on center along field studs
- Ceilings: 12 inches on center along every joist
- All edges: minimum 3/8 inch from the sheet perimeter
Setting screw depth without tearing face paper
Drive each screw until the head sits just below the surface in a slight dimple , deep enough to hold compound but not so deep that it tears the face paper. A torn paper face loses its grip on the gypsum and creates a weak point that pops outward as temperatures shift.
Set your drill's clutch to a consistent torque setting before you start fastening so every screw lands at the same depth automatically.
Checking for proud fasteners and missed framing
Run your hand flat across each sheet after fastening to feel for any screw head sitting above the surface. A proud fastener telegraphs through tape and compound, so reset it immediately rather than burying it under finish coats. Also press firmly on each sheet to confirm it sits tight against framing, since loose areas flex and crack along the tape lines no matter how well you finish them.
Next steps
These seven drywall installation tips cover the decisions and techniques that separate clean, lasting work from walls that need constant patching. You now know how to pick the right board, plan seams, prep framing, cut cleanly, hang ceilings first, and drive fasteners correctly . Each tip builds on the last, so skipping any step creates problems that surface after the paint dries.
Putting all of this together takes practice, and some projects simply demand more than a weekend and a rented lift can provide. Vaulted ceilings, fire-rated assemblies, asbestos-containing materials, and large open spaces are all situations where professional installation saves you time, money, and frustration. If your project falls into that category, or if you want the job done right the first time, the Super Shooters team is ready to help. Reach out today and get a free in-home estimate from a crew that has completed professional drywall installation across the Sacramento Valley for over 30 years.
Recent Posts