April 30, 2026
How To Install Drywall: Step-By-Step For Walls & Ceilings
Learning how to install drywall is one of those projects that looks straightforward until you're standing in a room holding a 4x8 sheet over your head, wondering where things went sideways. The truth is, hanging drywall is physically demanding and detail-oriented work, but it's absolutely something a motivated DIYer can handle with the right guidance and preparation .
At Super Shooters, we've completed over 10,000 drywall and ceiling projects across the Sacramento Valley in our 30+ years of business. That experience has taught us exactly where homeowners run into trouble and what separates a clean, professional-looking result from a frustrating mess. We built this guide to share that hands-on knowledge with you directly.
Below, you'll find a complete step-by-step walkthrough covering tools, materials, cutting techniques, fastening methods, and tips for both walls and ceilings . Whether you're finishing a garage, renovating a bedroom, or tackling an ADU addition, this guide will walk you through each stage of the process. And if you reach a point where you'd rather hand the project off to a pro , we're always here to help.
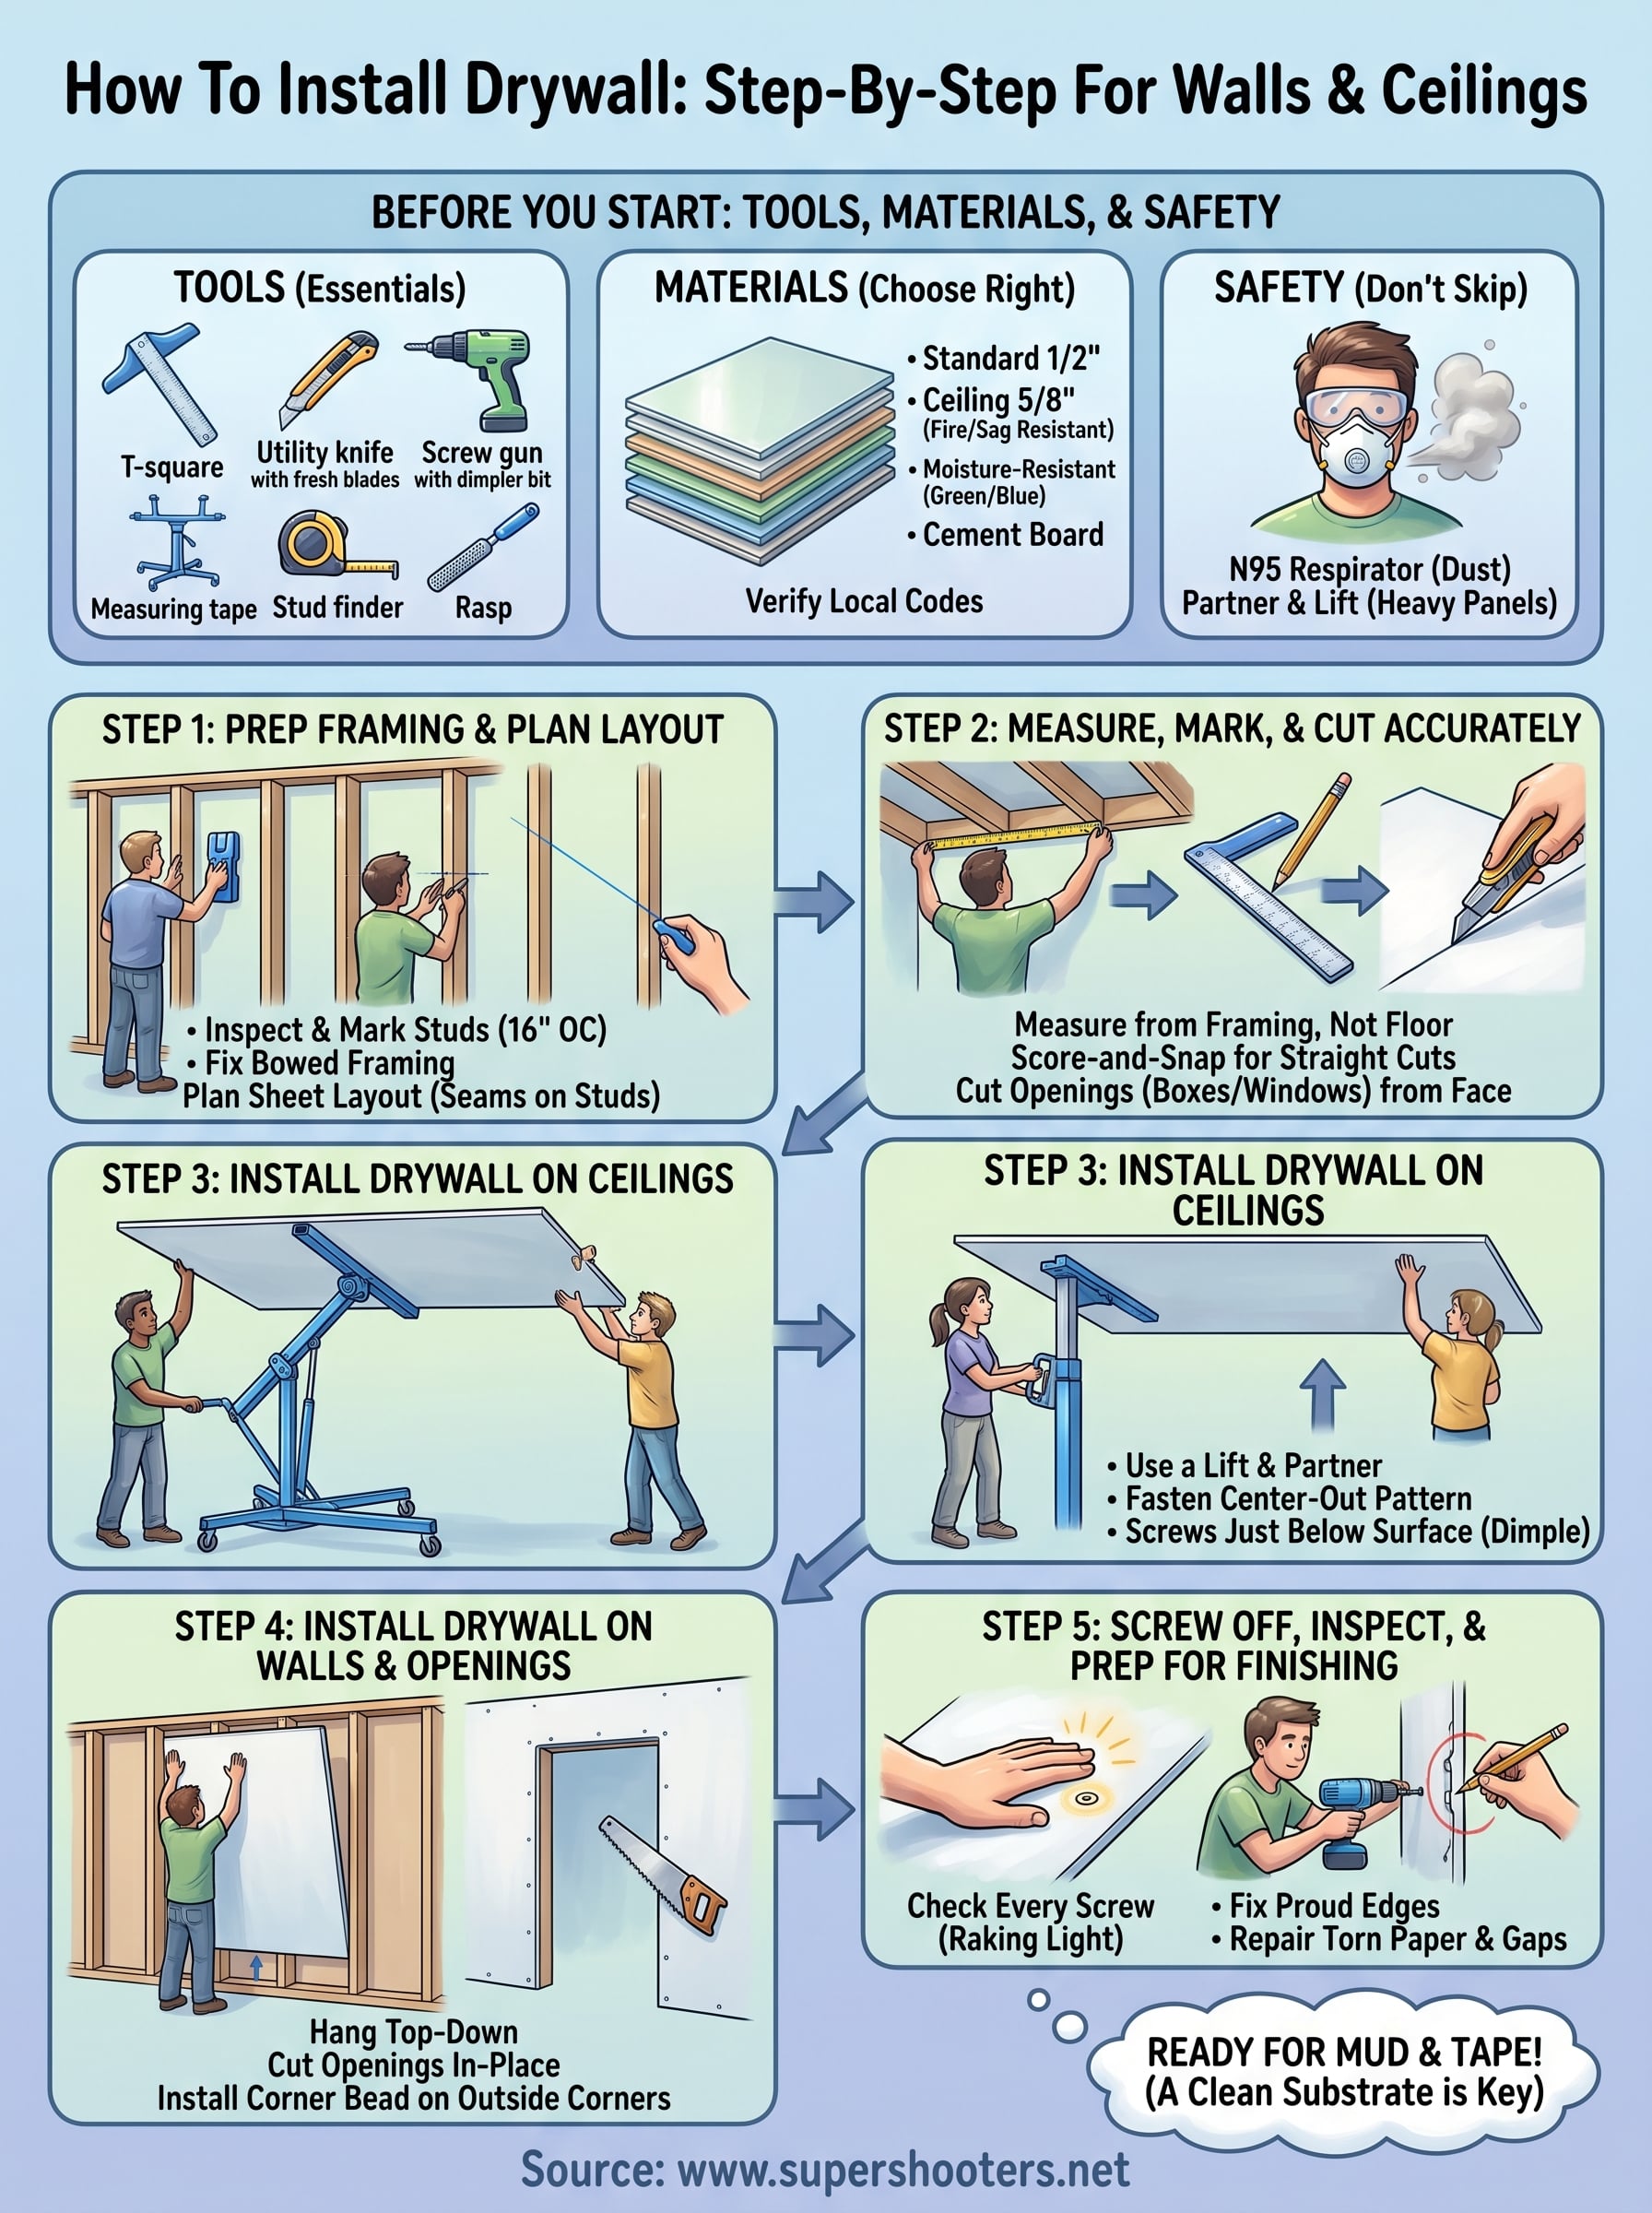
Before you start: tools, materials, and safety
Getting your setup right before you touch a single sheet is what separates a smooth project from a frustrating one. When you're learning how to install drywall , having every tool and material ready from the start saves you multiple hardware store runs and prevents costly mid-project stops. Spend the time upfront to gather everything covered below, and your actual installation will go significantly faster.
Tools you'll need
You don't need a truck full of specialty gear, but a specific set of tools will make the work cleaner, faster, and less physically punishing. A drywall lift is highly recommended for ceiling work, and most equipment rental stores carry them for a reasonable daily or weekend rate. For walls, a T-square, utility knife, and dedicated screw gun with a dimpler bit are non-negotiable if you want consistent results.
Here's the full tool list to have ready before you start:
- 48-inch T-square
- Utility knife with fresh blades
- Drywall screw gun or drill with a dimpler bit
- Measuring tape (25-foot minimum)
- Chalk line
- Stud finder
- Drywall rasp or surform tool
- Drywall lift (rental recommended for ceilings)
- Work lights for low-visibility areas
- Pry bar for tight fitting
- Pencil or marker
- Safety glasses and respirator
Choosing the right drywall
Not all drywall panels are the same, and picking the wrong type for your application will cause real problems down the line. Standard 1/2-inch drywall handles most interior walls, but moisture-resistant panels or cement board are required in bathrooms and other wet areas. For ceilings, 5/8-inch panels reduce sag over long spans and provide better fire resistance, which many local building codes also require.
Always verify your local building code requirements for panel type and thickness before purchasing materials, since specifications vary by application and jurisdiction.
Use this table as a quick reference when selecting panels:
| Drywall Type | Thickness | Best Use |
|---|---|---|
| Standard | 1/2 inch | Interior walls |
| Lightweight | 1/2 inch | Walls, easier single-person handling |
| Ceiling | 5/8 inch | Ceilings, fire-rated assemblies |
| Moisture-resistant | 1/2 inch | Bathrooms, kitchens |
| Cement board | 1/2 inch | Tile substrates, high-moisture zones |
Beyond panel type, factor in sheet length when ordering. Standard 8-foot sheets work in most rooms, but 9-foot or 10-foot sheets reduce horizontal seams in taller rooms, which cuts your finishing time later. Order 10-15% extra to account for cuts and damaged edges during delivery or handling.
Safety basics you shouldn't skip
Drywall cutting generates fine gypsum dust that irritates your eyes and lungs with repeated exposure. Always wear a properly fitted N95 respirator or better when cutting, breaking, or sanding panels. Standard paper dust masks don't filter the fine particles that go airborne during scoring and snapping, so don't substitute them here.
Panel weight is also a serious physical hazard that catches a lot of first-time installers off guard. A standard 4x8 sheet of 1/2-inch drywall weighs around 54 pounds , and 5/8-inch ceiling panels push closer to 70 pounds per sheet. Work with a partner whenever you're moving or lifting panels, use a panel cart to transport sheets across the room, and never attempt to hold ceiling sheets overhead without a lift. Your back will pay for that shortcut long after the project is done.
Step 1. Prep framing and plan sheet layout
Solid framing is the foundation of any clean drywall installation. Before you hang a single panel, you need to inspect every stud and joist in the area you're covering and map out exactly how your sheets will lay across the structure. Skipping this step is one of the most common reasons DIY installs end up with wavy walls, cracked seams, and panels that won't stay flat no matter how much mud you apply.
Check your framing first
Run a stud finder across every wall and ceiling surface you plan to cover, then mark each stud location with a pencil line at the top and bottom of the wall. Standard framing places studs 16 inches on center , but older homes sometimes vary, and you need to confirm exactly where every framing member sits before you lay out your panels. Hanging a sheet without verified stud positions means your screws may miss the wood entirely, leaving a panel that flexes and cracks at every seam.
Once you've marked the studs, look closely for framing problems that will telegraph through the finished surface. Bowed, twisted, or crowned studs create visible bumps in finished walls that no amount of finishing work can fully hide. Use a long straightedge or your T-square to check for flatness across adjacent studs. If a stud is bowed outward by more than 1/4 inch, either plane it down or sister a straight piece of lumber tightly alongside it before you proceed.
Fix framing problems at this stage, because correcting a bulging stud behind finished drywall is a far larger job than addressing it while the framing is still fully exposed.
Plan your sheet layout
Your layout plan determines where seams fall and how much waste you generate , both of which directly affect your finishing time and material cost. The non-negotiable rule is that every seam must land on a framing member. A seam that falls in open air between studs will crack under normal seasonal movement, and no tape or compound will prevent it long term.
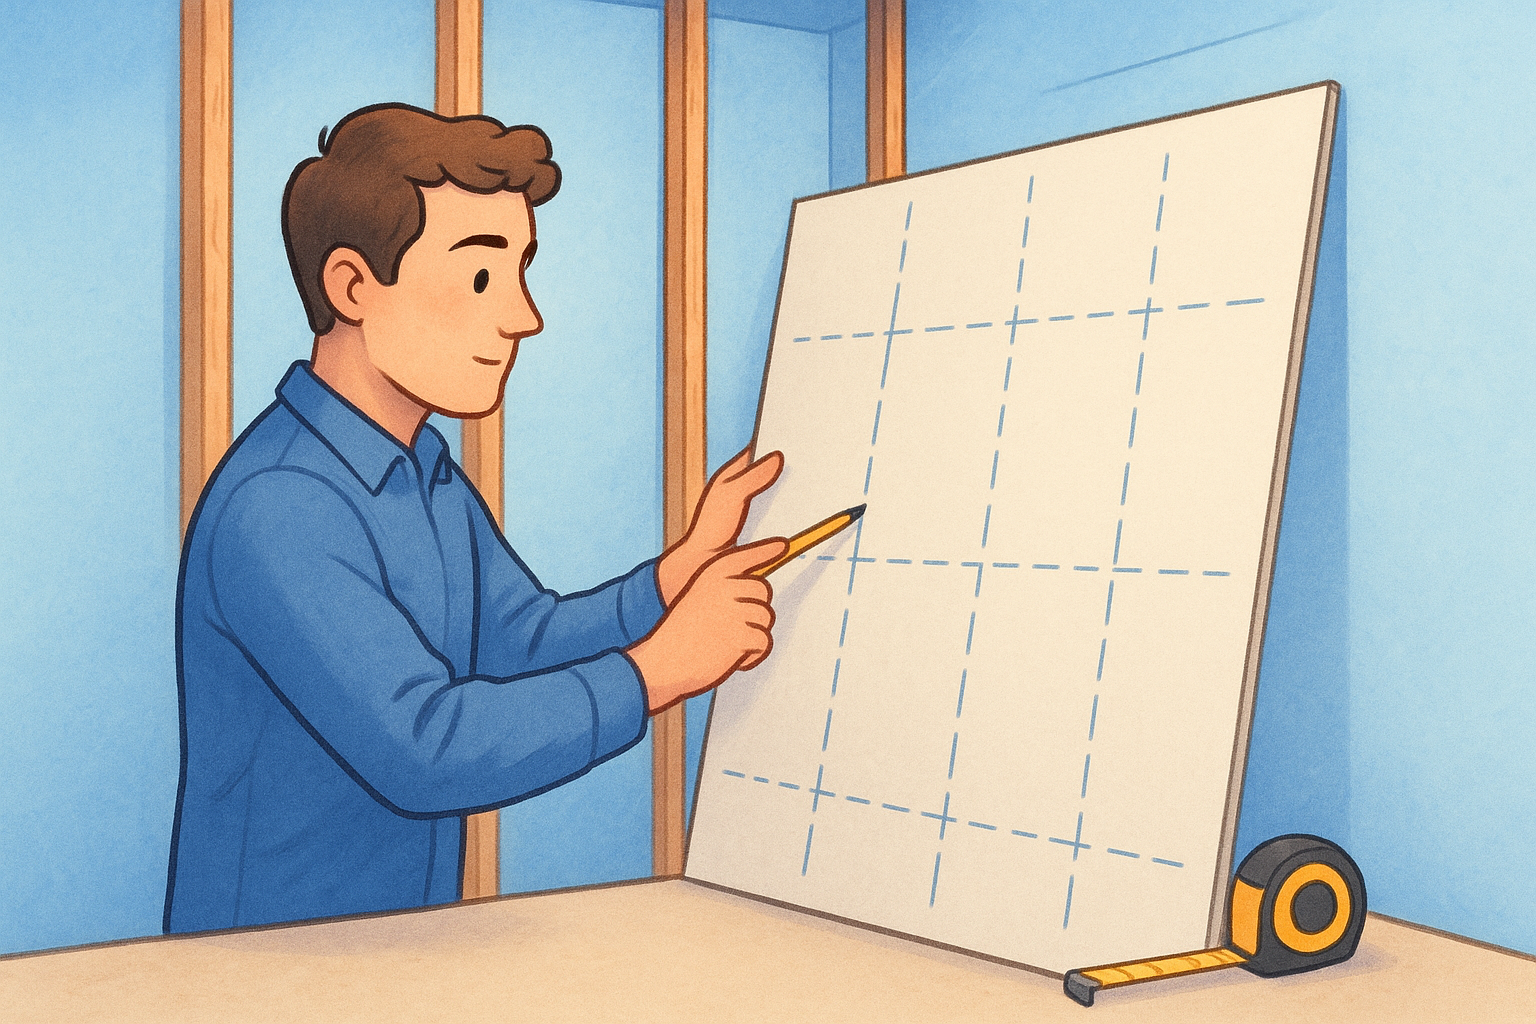
When you're working out how to install drywall on walls, start hanging from the top of the wall and work downward so the upper sheet carries the structural load and the lower sheet butts tightly against it. On ceilings, plan your first row from the center of the room outward, so that any cut pieces fall at the perimeter edges where trim or molding will conceal them. Mark your stud lines across the full height of the wall with a chalk line before you pick up a single sheet, so you always know exactly where to drive screws without guessing.
Step 2. Measure, mark, and cut drywall accurately
Accurate measuring and cutting keeps your seams tight and your panels flat against the framing. Sloppy cuts leave gaps that require excessive compound to fill, which adds drying time and increases the risk of cracked seams down the road. Every measurement you take from the framing translates directly to a line on your panel, so getting this step right pays off all the way through the finishing process.
Measure from the framing, not the floor
Floors and ceilings are rarely perfectly level, which means measuring from the floor to determine panel height will give you inaccurate cuts that leave visible gaps at your seams. Instead, measure directly between framing members to get the exact dimension you need, then transfer that measurement to your panel with a pencil mark at both ends. Connect the two marks using your 48-inch T-square to create a clean, straight cut line before you score anything.
Measure every cut piece independently rather than assuming repeated pieces are identical, since framing dimensions shift slightly across a room.
When learning how to install drywall efficiently, build the habit of marking your cut line and then double-checking the measurement against the framing before scoring. A few extra seconds of verification here prevents wasted panels and unnecessary material costs.
Score and snap for straight cuts
Straight cuts are the most common cuts you'll make throughout the project, and the score-and-snap method handles them quickly. Set your T-square firmly against the panel edge , score firmly along the pencil line with a sharp utility knife in a single confident pass, then snap the panel away from you. The gypsum core will break cleanly along the scored line every time, as long as your blade is fresh.
After the panel snaps, fold the paper backing flat and cut it with your knife in one clean stroke. Run a drywall rasp along the cut edge to remove any rough gypsum before you fit the panel into position, since ragged edges prevent solid seam contact and cause cracking after compound dries.
Cut openings for outlets and switches
Electrical box openings need accuracy because any gap larger than the cover plate will remain visible after finishing. Measure the box position from the nearest stud , transfer both the horizontal and vertical dimensions to the panel face, then mark all four corners and connect them into a clean rectangle. Use a drywall saw or oscillating multi-tool to cut along your lines from the face side of the panel to prevent blowout on the finished surface.
Step 3. Install drywall on ceilings
Ceiling installation is the most physically demanding part of learning how to install drywall , and it's where most DIYers make mistakes that compound through every stage that follows. Unlike walls, ceiling panels have no floor to rest against while you position them, which means every second the panel is in the air, it's fighting gravity and your patience at the same time. Getting your setup right before you lift a single sheet is the only way to make this stage manageable and safe.
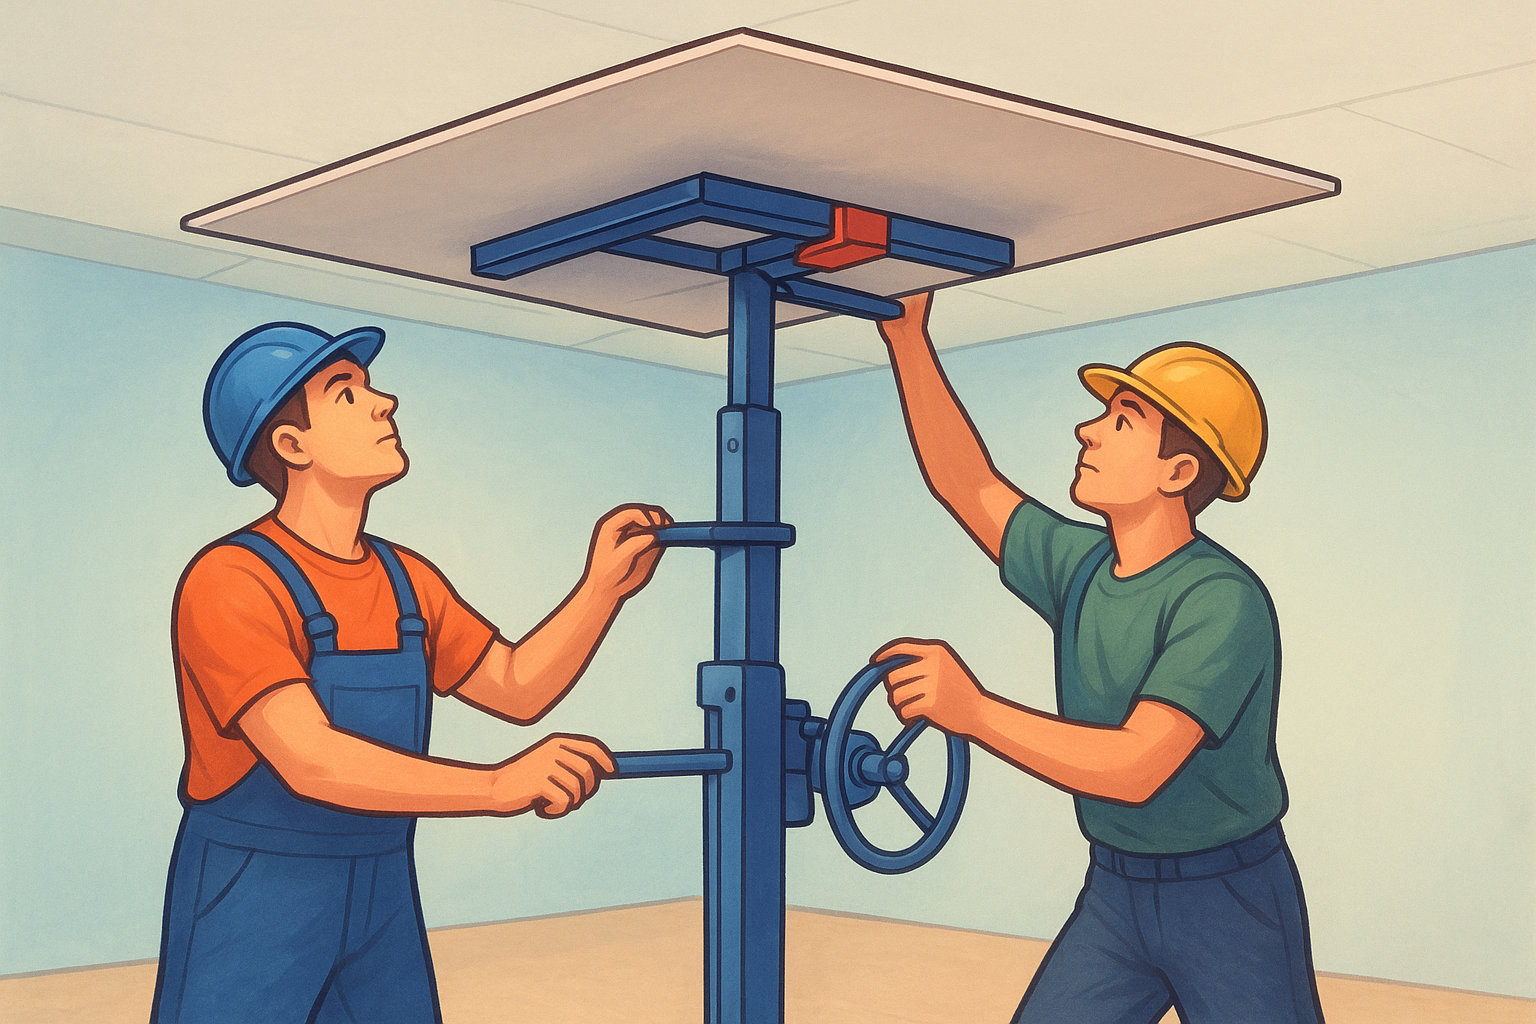
Set up your lift and work with a partner
A drywall lift is not optional for ceiling work unless you want injuries and damaged panels. Rent one from your local equipment rental store before your installation day so it's ready when you start. Load the panel onto the lift cradle with the finished face pointing downward , crank the lift until the panel presses firmly against the joists, then position it according to your layout plan before you drive a single screw.
Never attempt to hold ceiling panels overhead by hand without mechanical support, since even a short hold will tire your arms enough to cause misalignment and unsafe drops.
Even with a lift handling the weight, a second person on-site is essential for guiding panels into position, checking alignment against your chalk lines, and catching any shift before the panel is fastened. Assign one person to operate the lift and one to manage alignment and initial fastening so both tasks happen simultaneously and efficiently.
Fasten ceiling panels in the right pattern
Starting from one end of the room, position your first panel tight against the wall on one side and aligned along your chalk line. Drive the first screw near the center of the panel into a joist to anchor it, then work outward toward the edges, spacing screws every 12 inches along each joist the panel crosses. Never start at a corner and work toward the center, since that method traps tension in the panel and causes bowing.
Keep every screw head just below the panel surface without breaking the paper face. A properly driven screw creates a slight dimple roughly 1/16 inch below the surface , which gives you enough depth for compound to cover it cleanly. Run your hand across each panel section before moving the lift to the next position to catch any raised screws that will create problems during finishing.
Step 4. Install drywall on walls and openings
Wall installation moves faster than ceiling work, but it still requires deliberate sequencing to avoid seam problems that show up after paint. Start from a corner and work across the wall in one direction , always keeping your seams aligned with framing members. Knowing how to install drywall on walls correctly means understanding that the order you hang panels directly affects how tight your seams fit and how cleanly your corners close.
Hang wall panels from the top down
Position your first panel against the ceiling and hold it tight against the framing before driving any screws. The top sheet carries the load and the bottom sheet butts underneath it, so starting at the top locks in your reference point for the entire wall. Drive your first screw into the nearest stud near the center of the panel to anchor it, then work outward, spacing screws every 16 inches along each stud the panel crosses.
Keep the top panel pressed firmly against the ceiling drywall as you fasten it, since any gap at that seam requires extra compound and creates a visible shadow line after painting.
Your bottom row of panels should fit snugly against the floor with a 1/2-inch gap left at the base , since baseboards will cover that gap and the clearance prevents moisture wicking from the slab. Use a pry bar and a scrap piece of wood to lever the lower panel up tight against the upper panel before fastening, which keeps the horizontal seam tight and even across the full width of the wall.
Handle doors, windows, and corner openings
Never cut panels to fit exactly around a door or window opening before you hang them. Instead, hang the full sheet over the opening and cut out the rough opening afterward using a drywall saw or oscillating multi-tool . This approach keeps your seams properly aligned with the framing and reduces the total number of seam joints you need to tape and finish later.
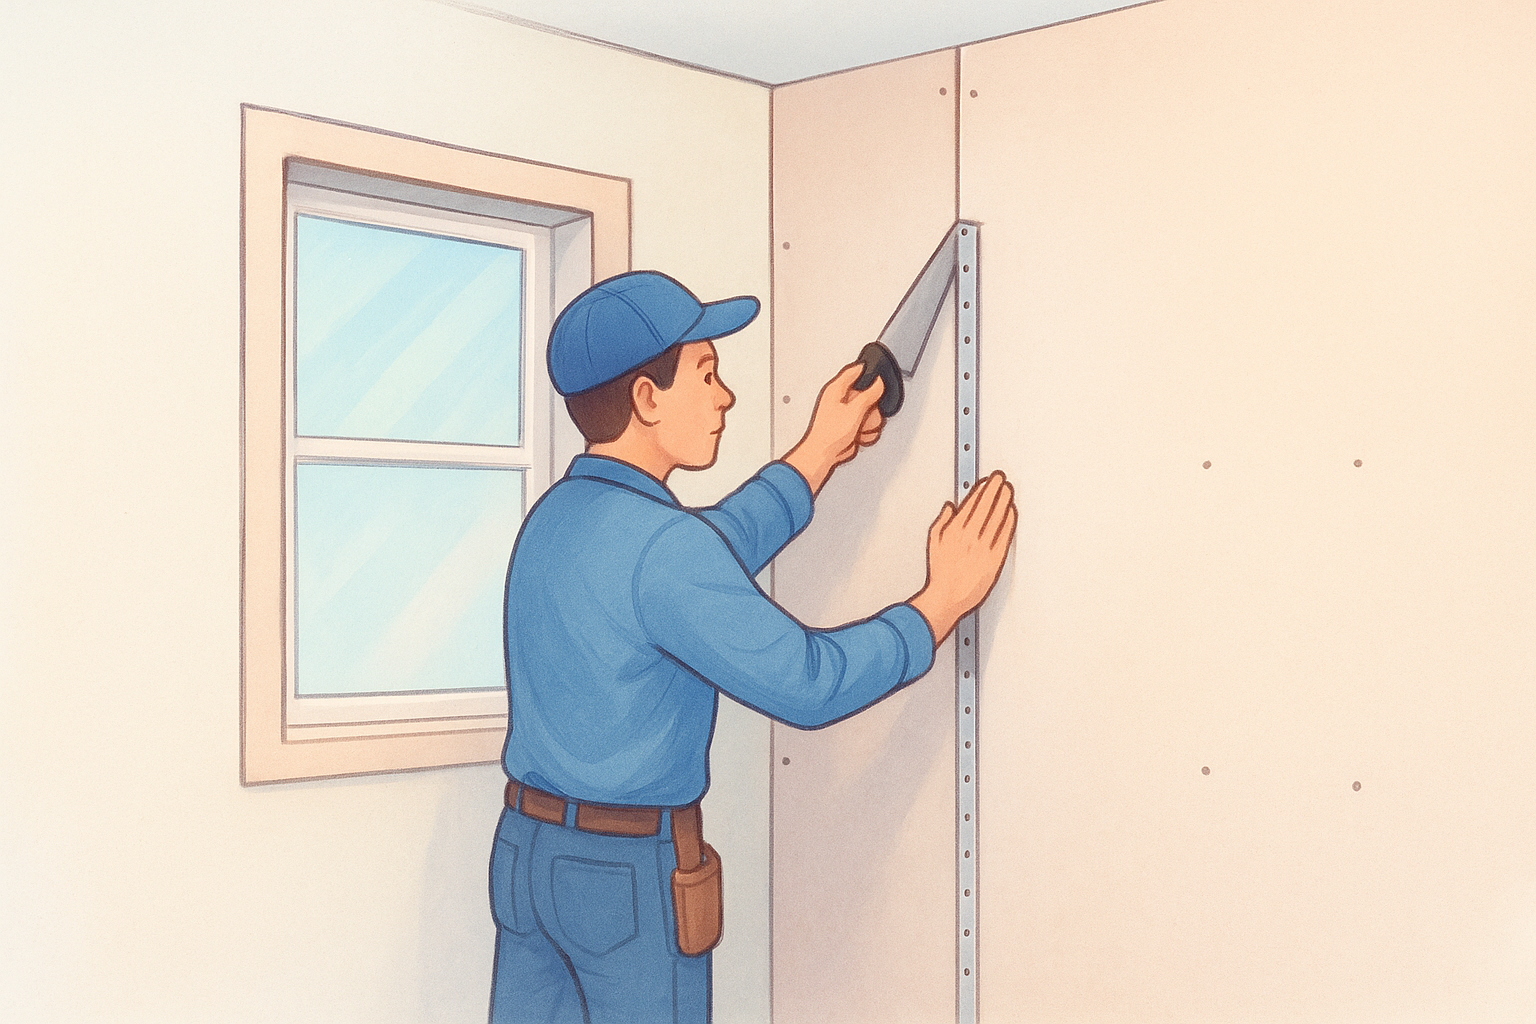
For inside corners , butt the first panel into the corner and then overlap it with the adjacent wall panel on top. For outside corners, install metal corner bead over the exposed edges before any compound goes on, which protects the corner from impact damage and gives you a straight guide edge for feathering compound cleanly. Check every corner with a straightedge before moving on to confirm the panels sit flat against the framing without any bow or gap.
Step 5. Screw off, inspect, and prep for finishing
Once all your panels are hung, your job is not done. This final inspection step determines whether your finishing work goes smoothly or turns into a series of frustrating repairs. Before any compound touches the wall, you need to go over every square foot of your installation and correct the problems that compound cannot fix on its own. Skipping this step when learning how to install drywall is the fastest way to ruin an otherwise solid installation.
Check every screw across every panel
Run your hand slowly across each panel in a grid pattern, pressing lightly as you go. Your palm is sensitive enough to detect any raised screw head that your eyes might miss under normal lighting. Every screw that hasn't been driven deep enough will telegraph through your compound layer and show up as a visible bump after paint dries.
A headlamp held parallel to the wall surface casts raking light that reveals raised screws, popped edges, and surface damage that flat overhead lighting completely hides.
Use your screw gun to drive any raised screws until they sit roughly 1/16 inch below the panel surface without breaking the paper face. If a screw spins without biting, the tip has missed the framing. Drive a second screw 2 inches away from the first to catch solid wood, then circle the failed screw with a pencil so you remember to fill that hole with compound later.
Inspect seams, edges, and damaged paper
Walk every seam line and run your hand along the full length of each joint to check for panel edges that sit proud of the neighboring sheet . A seam where one panel sits higher than the other creates a ridge that requires excessive compound to flatten, which adds drying time and increases the risk of cracked joints . Use a flat blade screwdriver to press any slightly proud edges back into alignment before compound locks the problem in place.
Look specifically for these common issues before you stop your inspection:
- Torn paper facing from overdriven screws or rough handling (circle each spot with a pencil and apply compound filler before taping)
- Cracked panel corners near cut edges that didn't seat flush against framing
- Visible gaps at seams wider than 1/8 inch that require backing material or additional framing before any compound goes on
Address every item on that list before you open your first bucket of joint compound. A clean, flat substrate is the only foundation that produces a smooth, professional finish.
Ready for mud and tape
You've completed the hardest physical part of learning how to install drywall . Every panel is hung, every screw is set correctly, and every seam sits flat against solid framing. What comes next is taping, mudding, and sanding , which transforms a room full of raw panels into smooth, paint-ready surfaces. Take your time moving into that phase, because compound applied over a poorly prepped substrate will crack and shrink no matter how carefully you apply it.
If the installation work itself felt like more than you wanted to take on, or if you're looking at a ceiling project and want it done right the first time, our team at Super Shooters has handled over 10,000 drywall and ceiling jobs across the Sacramento Valley. We bring 30 years of hands-on experience to every project. Get a free drywall estimate from Super Shooters and we'll take it from there.
Recent Posts