May 3, 2026
Ceiling Drywall: How To Hang Drywall On Ceiling Like A Pro
Hanging drywall on walls is one thing. Hanging it overhead, fighting gravity the entire time, is a completely different challenge. If you're trying to figure out how to hang drywall on ceiling surfaces yourself, you're probably already realizing that this job demands more planning, more muscle, and more precision than most DIY projects. A single 4×8 sheet of half-inch drywall weighs around 52 pounds, and you need to hold it flush against joists while driving screws, often on a ladder. It's doable, but only if you know what you're getting into before you start.
At Super Shooters, we've installed and repaired ceilings across the Sacramento Valley for over 30 years , that's more than 10,000 completed projects. Our crews hang ceiling drywall daily, so we know exactly where DIYers run into trouble: sagging panels, missed joists, visible seams, and screws that pop within months. We also know that some homeowners genuinely enjoy tackling this work themselves , and we respect that. This guide is built from the same knowledge our team uses on the job.
Below, you'll find a step-by-step walkthrough covering everything from measuring and cutting panels to fastening them solo without a drywall lift. We'll cover joist orientation, screw spacing, staggering seams, and the common mistakes that turn a weekend project into a costly redo. Whether you're finishing a garage, renovating a bedroom, or wrapping up an ADU, this guide will help you get clean, professional results on your ceiling.
Before you start: tools, drywall, and safety
Walking into a ceiling drywall project without the right setup is how you end up with crooked panels, stripped screws, and a sore neck by noon. Before you learn how to hang drywall on ceiling surfaces the right way, you need to gather the correct tools , select the right panel type, and put basic safety measures in place. Skipping any part of this prep phase creates problems that show up later, when the joint compound is dry and you can't easily fix anything.
The right tools for the job
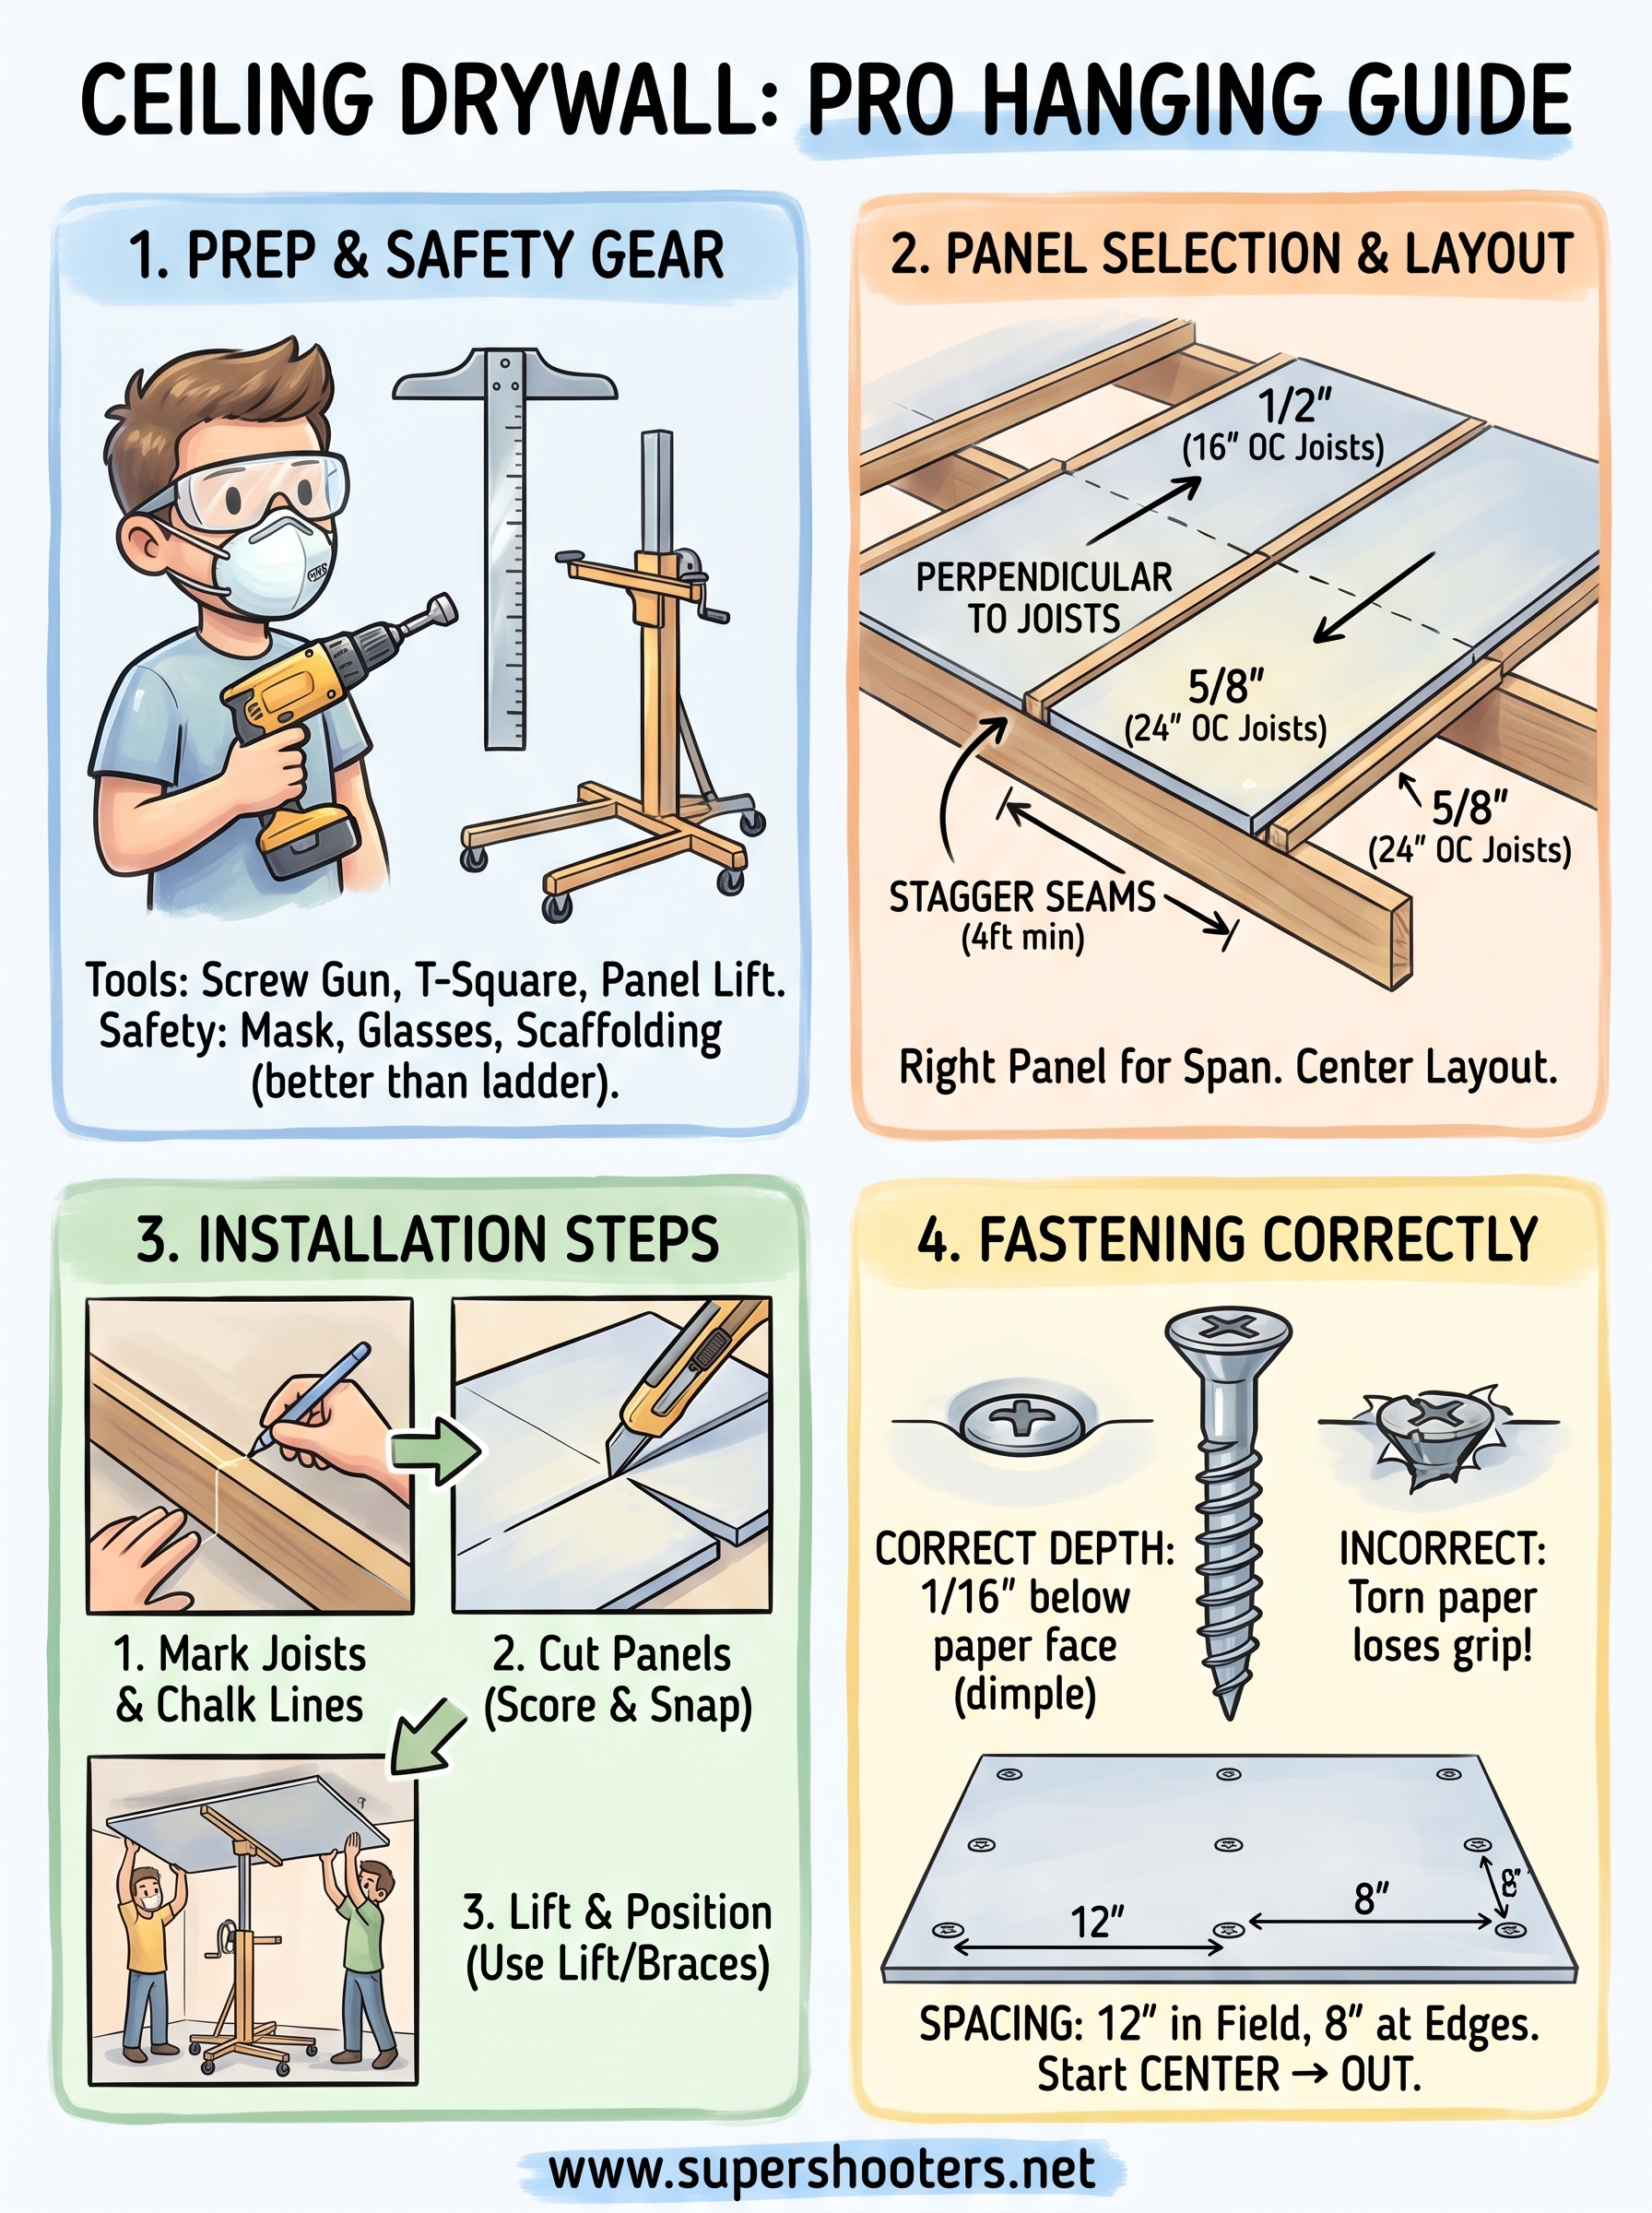
Your tool list for a ceiling job is longer than it is for walls, because you're working against gravity the entire time. You'll need a drywall screw gun rather than a standard drill, since it drives screws to a consistent depth without breaking the paper face of the panel. A 4-foot T-square lets you score clean cuts across the full width of a sheet, and a chalk line helps you snap reference marks along joists so your screw rows stay straight.
If you're hanging ceiling drywall without a lift, a rented panel jack or a pair of adjustable T-braces changes everything. Trying to muscle 52-pound sheets overhead solo without one causes injuries and poor installs.
Here's a complete checklist of what to have ready before you touch a single panel:
- Drywall screw gun with a dimpler bit set
- 1-5/8" coarse-thread drywall screws (for half-inch panels into wood joists)
- 4-foot T-square
- Chalk line and chalk
- Utility knife with extra blades
- Tape measure and pencil
- Drywall panel lift or two adjustable T-braces
- Safety glasses and N95 dust mask
- Sturdy scaffolding or pump jacks (preferable over a single ladder)
Choosing the right drywall panels
Panel selection matters more on ceilings than on walls, because ceiling panels bear their own weight over time without any wall behind them for support. Standard half-inch drywall works fine in most rooms with joists spaced 16 inches on center. If your joists are 24 inches on center , you need 5/8-inch panels. They're heavier to handle, but their stiffer core resists the gradual sag that thinner panels develop over a wider span.
Moisture is the other factor to consider. Bathrooms, laundry rooms, and basements require moisture-resistant or mold-resistant drywall. Regular drywall in a damp space absorbs humidity over time and can sag or grow mold behind the finish coat. Check the conditions in the room before you purchase materials, not after you've already hung everything.
Safety basics you can't skip
Ceiling work puts your neck, shoulders, and back under serious strain, and that's before you factor in the risk of dropping a heavy panel or losing your footing. Set up scaffolding or pump jacks instead of balancing on a single ladder while holding a sheet overhead. Scaffolding keeps both hands free and gives you a stable, consistent working height, which also improves your screw lines and reduces fatigue.
Protect your eyes and lungs from the start. Drywall dust is a fine silica hazard, and older homes may have asbestos in existing ceiling texture layers. If you're removing any old ceiling material before hanging new panels, have it tested first. The EPA provides guidance on identifying and safely managing asbestos-containing materials in residential settings. Cutting into an asbestos ceiling without containment creates a serious health hazard for everyone in the building.
Step 1. Plan the layout and mark joists
Good layout planning determines whether your finished ceiling looks tight and professional or whether you end up with seams that crack and gaps that are hard to hide. Before you lift a single panel, you need to know exactly where every sheet will land, which direction it will run, and where each joist sits across the entire ceiling . This step takes about 30 minutes and saves hours of rework later.
Orient your sheets perpendicular to joists
When learning how to hang drywall on ceiling surfaces, one of the first decisions you'll make is which direction to run the panels. Always hang sheets perpendicular to the joists , not parallel. Running sheets across the joists means each panel crosses multiple framing members, which distributes weight more evenly and creates stronger connections at each screw point. Parallel runs often land seams on a single joist with no neighboring support, which leads to visible cracking along the tape line after finishing.
Stagger your end joints by at least 4 feet from row to row so no two adjacent sheets share a butt seam on the same joist.
Starting from the center of the room rather than a wall also improves your results. When you center the layout , any cut pieces at the edges of the ceiling land symmetrically on both sides, which looks cleaner and makes taping those edges much easier.
Find and mark every joist before you lift a panel
Use a stud finder to locate each joist, then confirm each location by driving a finish nail through the existing ceiling or subfloor area above. Joists in residential framing are typically spaced 16 inches on center , but older homes vary. Measure each bay yourself rather than assuming consistent spacing throughout the room.
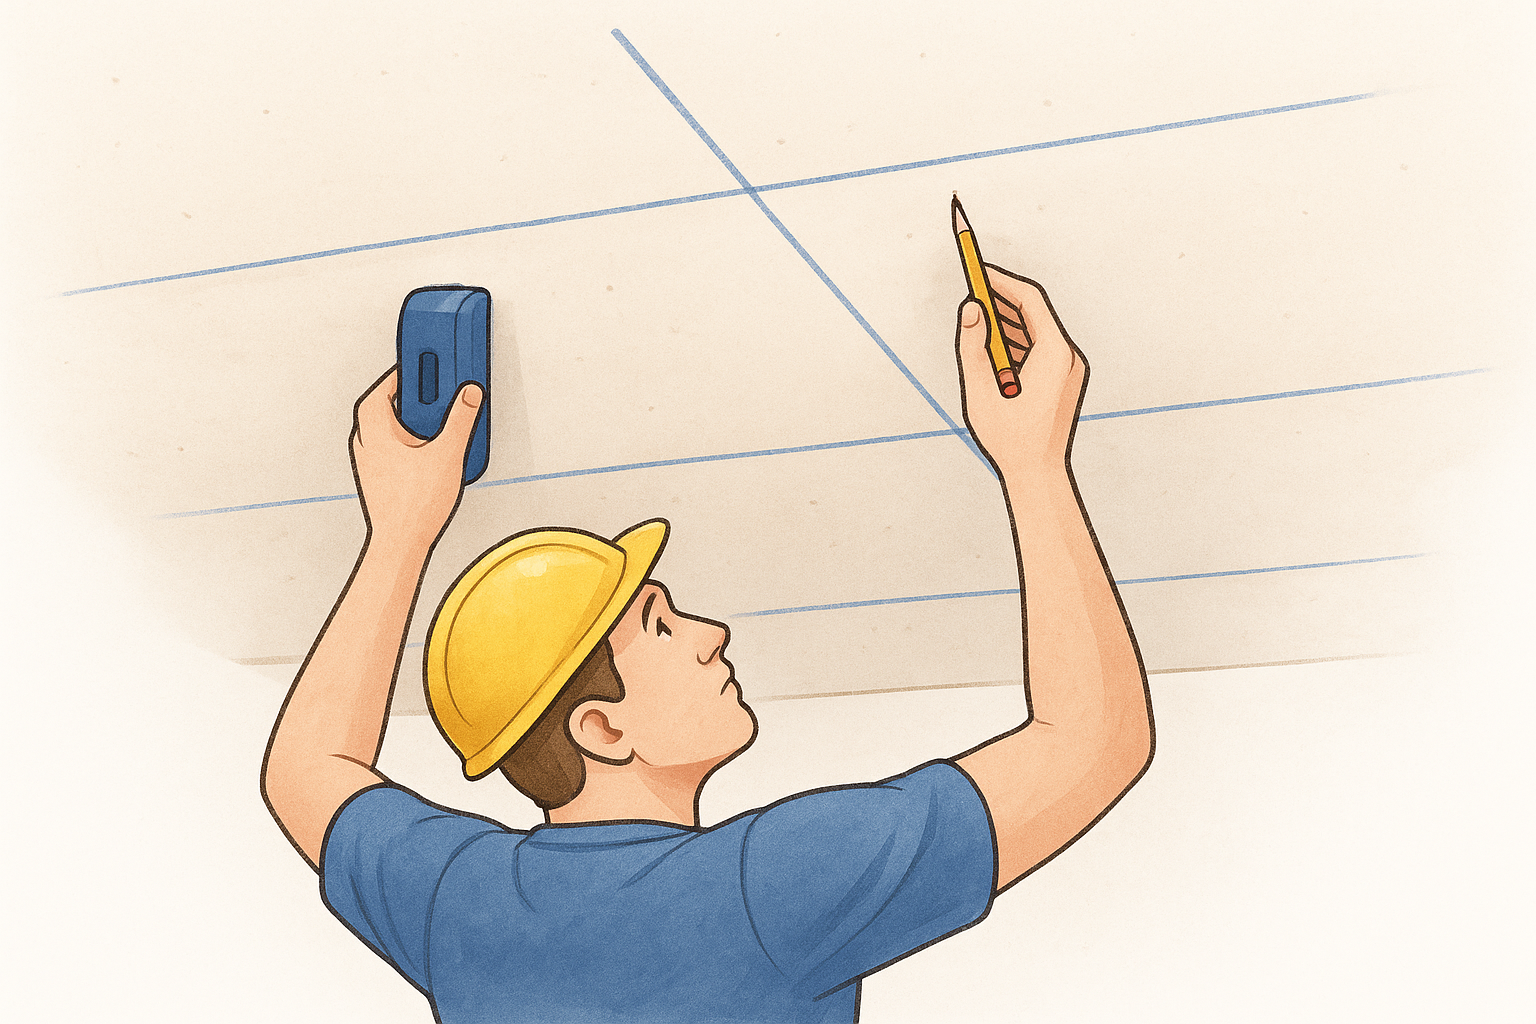
Once you've confirmed every joist position, snap chalk lines across the full length of the ceiling at each joist. These lines stay visible even after you press a panel against the ceiling, giving you clear targets for your screw rows. Without chalk lines, you'll be guessing joist locations while holding a heavy panel overhead, which leads to missed fasteners and panels that pull loose or sag within months.
Step 2. Cut sheets and prep openings
Cutting drywall is straightforward once you understand the basic method, but ceiling work demands extra precision because gaps and jagged edges are far harder to hide overhead than on a wall. Every panel you cut should fit within 1/4 inch of its target dimension before you lift it into position. Trying to trim a panel that's already pressed against the ceiling wastes time and risks damage to the sheet.
Score, snap, and clean the edge
The standard drywall cut uses a score-and-snap method rather than a saw. Measure and mark your cut line with a pencil, then run a utility knife along a T-square to score through the paper face and into the gypsum core. Apply firm, consistent pressure in a single pass. Then snap the sheet away from the scored face by bending it backward at the cut line until the core breaks cleanly. Finish by slicing through the paper backing on the opposite side.
Here's the score-and-snap sequence step by step:
- Measure the required dimension and mark both ends of the cut line
- Align your T-square with both marks and score firmly along the full line
- Snap the panel backward until the gypsum core breaks
- Cut through the remaining paper face with a utility knife
- Smooth the cut edge with a drywall rasp or coarse sandpaper to remove loose gypsum
A ragged cut edge left unsmoothed creates a visible ridge once taped and finished, so always clean your cuts before hanging.
Cut and mark openings for fixtures
Any light fixtures, recessed cans, or junction boxes in the ceiling need to be cut out before the panel goes up, not after. Measure the position of each box from the nearest wall, transfer those measurements to the panel face, and use a drywall jab saw to cut the opening. Cut slightly inside your line at first, then expand the opening by small increments for a snug fit around the box.
When learning how to hang drywall on ceiling spaces with multiple fixtures, mark every opening on the floor beside each panel before lifting anything. This keeps your cuts organized and prevents you from confusing which panel belongs in which position once you're working overhead.
Step 3. Lift and hang the first sheets
This is the hardest part of learning how to hang drywall on ceiling surfaces: getting a full-sized panel pressed flat against the framing and holding it there while you drive screws. Plan this step before you pick up a sheet. Know exactly which panel goes where , have your screw gun clipped to your belt, and make sure your T-braces or lift is already set to the correct height before the panel leaves the floor.
Position your T-braces or panel lift
Set your panel lift or T-braces at the right height before touching the sheet. A panel lift adjusts to ceiling height with a crank handle, which lets one person raise a full sheet without any assistance. If you're using T-braces, cut them from 2x4 lumber so they stand about 1/4 inch taller than your ceiling height. That slight tension is what keeps the panel pinned against the joists while you fasten it.
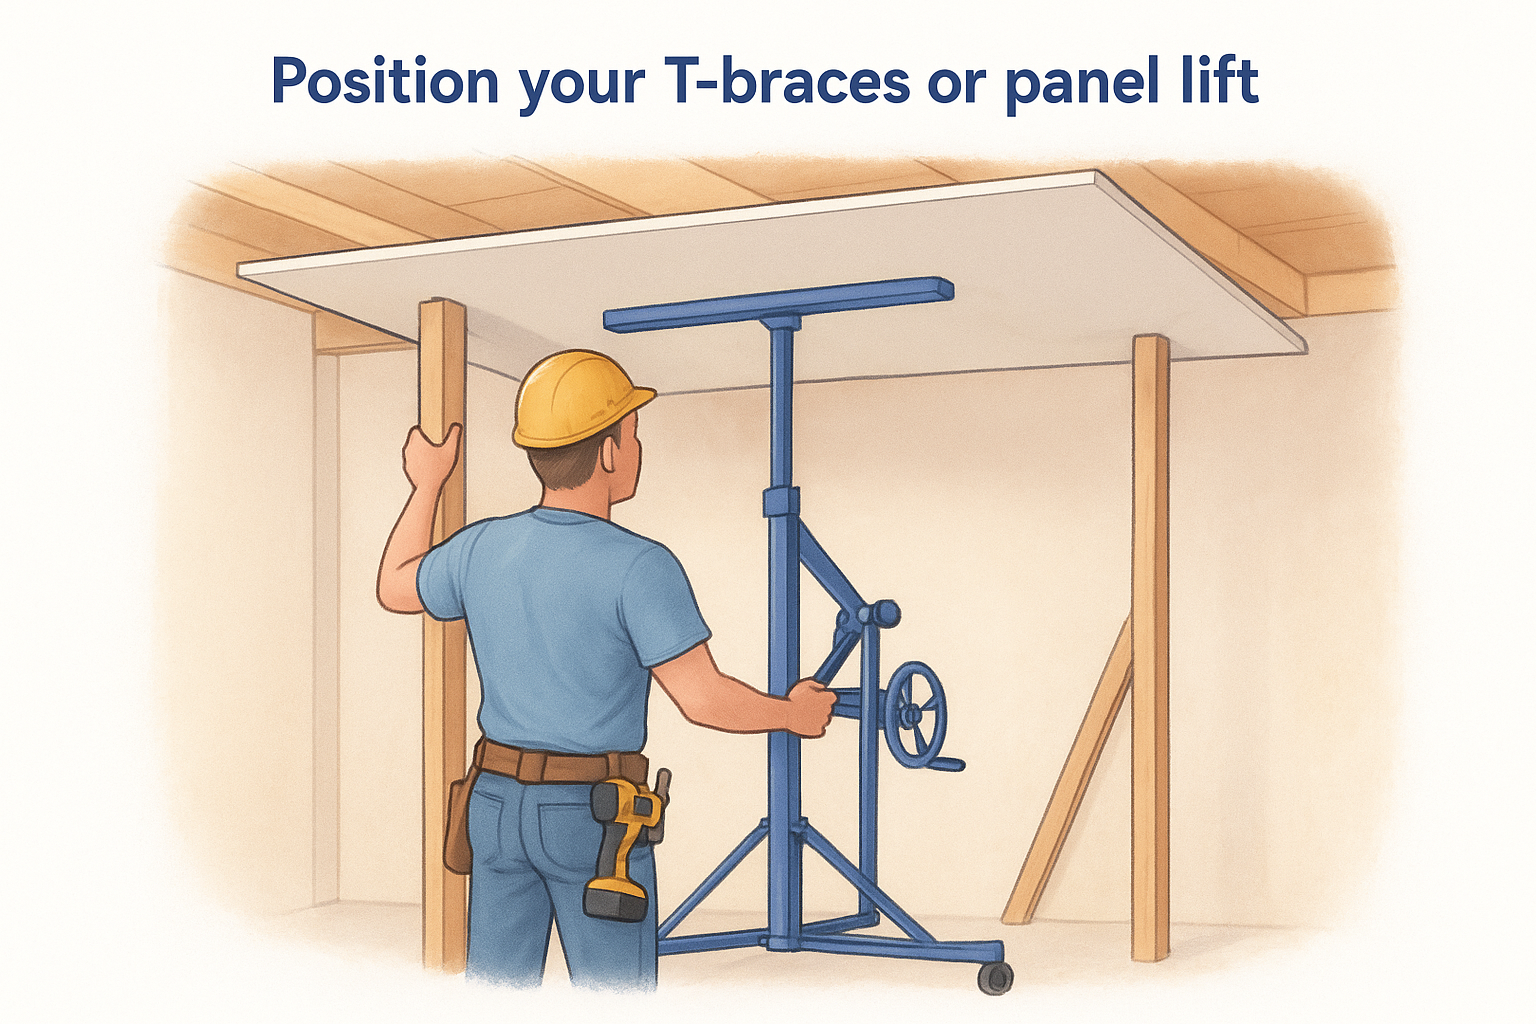
Two T-braces placed roughly 16 inches from each end of the sheet provide enough support to keep the panel stable while you work across it with the screw gun.
Position your braces on either side of the room before you lift. Once the panel is overhead, you don't want to be repositioning props with one hand while the other holds the sheet in place. If you're working solo, a rented drywall lift from a local equipment supplier will save your back and give you far more control than improvised bracing.
Set the first panel and check your position
Start in a corner and work outward toward the center of the ceiling. Lift the first panel onto your T-braces or crank it into position with the lift, keeping the long edge tight against your chalk line. Before you drive a single screw, verify that the panel spans at least three joists and that the end of the sheet lands at the center of a joist so the next panel has room to share that framing member.
Check the panel for gaps along the framing before fastening. Run your hand along the back edge to feel whether the sheet sits flush against each joist. Any panel that rocks or leaves a visible gap at the framing will telegraph through your finished surface once the paint dries.
Step 4. Screw off correctly and avoid defects
The screwing pattern and depth are what separate a ceiling that holds for decades from one that pops fasteners and shows visible dimples within a year. Knowing how to hang drywall on ceiling panels correctly means treating the fastening stage as the step that locks in your quality for good . Rush it, and every flaw becomes permanent once the joint compound dries.
Drive screws to the right depth
Every screw needs to sit just below the paper face without tearing through it. That slight dimple is exactly what joint compound fills cleanly. Set your screw gun's clutch depth so the bit stops automatically when the screw head sits about 1/16 inch below the surface . Too shallow and the head creates a bump you can't tape over without a visible ridge. Too deep and you've torn the paper, which means the fastener loses its grip in the gypsum core and will eventually push back out through the paint.
A stripped or paper-torn screw provides almost no holding strength - drive a fresh screw about 2 inches away from the failed one, then fill both dimples with compound.
Test your clutch setting on a scrap piece before you touch your panels. Drive three screws and press each head with your fingertip. You want a slight, consistent depression , not a crumbled crater in the surface paper.
Follow the correct spacing pattern
Screw spacing on ceiling panels runs tighter than on walls because the panels carry their own weight against gravity with no wall behind them for backup. Along each field joist (any joist that doesn't fall on a panel seam), drive screws every 12 inches . Along the perimeter edges where two panels meet at a shared joist, tighten that spacing to every 8 inches. Keep every screw at least 3/8 inch from the panel edge to avoid crumbling the gypsum core as you drive.
| Location | Screw spacing |
|---|---|
| Panel field (interior joists) | Every 12 inches |
| Panel edges (at seams) | Every 8 inches |
| Minimum distance from edge | 3/8 inch |
Start fastening from the center of each panel and work outward toward the edges. This approach pushes out any slight bow in the sheet and keeps it flush against the joists as you go. Fastening from an edge inward traps tension in the panel and can cause a subtle buckle that telegraphs right through your finished surface once the paint dries.
You're ready to hang a clean ceiling
You now have everything you need to know about how to hang drywall on ceiling surfaces the right way: the right panels, the correct perpendicular orientation, clean cuts before the sheet goes up, and a screw pattern that holds for decades. Follow the steps in this guide in order, and you'll avoid the most common mistakes that send DIYers back to the hardware store for a second round of supplies.
Ceiling drywall rewards careful prep and patient execution . Mark your joists before lifting anything, cut your panels to fit on the ground, support every sheet fully before you drive a single screw, and fasten from the center out. Those four habits separate a tight, professional ceiling from one that shows cracks and pops within a year.
If this project feels bigger than you expected, the team at Super Shooters Acoustic Removal & Drywall offers free in-home estimates with no upfront payment required.
Recent Posts