May 7, 2026
How To Finish Drywall Step-By-Step For Paint-Ready Walls
Hanging drywall is the easy part. Knowing how to finish drywall , taping joints, applying mud, and sanding everything smooth, is where most DIY projects either come together or fall apart. A bad finish shows through every coat of paint, and once you see it, you can't unsee it. The good news: the process isn't complicated , but it does require patience, the right tools, and a clear understanding of each step.
At Super Shooters, we've finished drywall on over 10,000 projects across the Sacramento Valley in our 30+ years of business. Our crews tape, mud, and sand walls every single day. That hands-on experience is exactly what shaped this guide, we're walking you through the same process our team follows to get paint-ready walls that actually look professional.
Below, you'll find a complete step-by-step breakdown covering everything from your first coat of joint compound to your final sanding pass. Whether you're finishing a garage, patching a repair, or wrapping up a remodel, this guide gives you a clear path from raw seams to smooth, finished surfaces. And if you'd rather skip the dust and leave it to a pro, we're always a phone call away .
What you need before you start
Getting the right tools and materials together before you start will save you multiple trips to the hardware store and keep your work moving. Finishing drywall is a multi-step process that spans several days, with different tools and compounds used at different stages. Walking through your checklist now prevents you from stopping mid-coat because you're missing a critical piece of equipment .
Tools for taping and mudding
You don't need a van full of professional gear to finish drywall well, but a few specific tools make an enormous difference in the quality of your result. A 6-inch and a 10-inch drywall knife are the two most used tools in this entire process. The 6-inch handles tight spots and the taping coat, while the 10-inch (or 12-inch) is what you'll reach for on fill and finish coats to feather compound wide and flat across the surface.
Here's the core tool list:
- 6-inch drywall knife (taping coat and detail work)
- 10-inch or 12-inch drywall knife (fill and finish coats)
- 4-inch knife or corner tool (inside corners)
- Drywall mud pan (holds compound while you work)
- Drill with a paddle mixer attachment (for thinning compound)
- Sanding pole with swivel head
- 120-grit and 220-grit sanding screens or sandpaper
- Shop vacuum for dust cleanup between coats
Compounds, tape, and finishing materials
The materials you choose directly affect how your finish turns out. For most projects, you'll use all-purpose joint compound for taping and fill coats, then switch to a lightweight finishing compound for the final coat. Finishing compound sands more easily and shrinks less, which matters when you're chasing a truly flat, paint-ready surface.
Using pre-mixed compound straight from the bucket without checking or adjusting consistency is one of the most common mistakes in how to finish drywall. The right texture makes every coat easier to apply and helps it dry faster and flatter.
Your materials checklist:
- Pre-mixed all-purpose joint compound (taping and fill coats)
- Lightweight finishing compound (final coat)
- Paper drywall tape (flat seams and inside corners)
- Fiberglass mesh tape (repairs or butt joints, optional)
- Metal or vinyl corner bead (outside corners)
- Drywall screws (to secure any loose panels before you start)
- Drywall primer (applied after final sanding, before paint)
Safety and workspace prep
Before you open a single bucket, protect your floors and adjacent surfaces with plastic sheeting or drop cloths. Joint compound splashes, and dried mud is frustrating to scrape off hardwood, tile, or baseboards. You'll also want a dust mask rated N95 or higher for the sanding stages, since drywall dust is fine enough to stay airborne long after you've stopped moving.
Set up strong, raking light across your work surface before applying any compound. A work lamp held at a low angle reveals bumps, ridges, and tool marks that overhead lighting hides completely . Catching those problems while the mud is still wet is simple. Finding them after you've primed and painted is a full repair job. A few minutes of setup before you start saves hours of rework at the end.
Step 1. Prep drywall so joints finish flat
Prep is the step most people skip, and it's why their finish coats look rough. Before you touch a bucket of compound, you need to inspect every panel and fastener across the entire surface. A few minutes of prep work here prevents raised bumps, peeling tape, and cracked mud from showing up after you've already invested hours into the finish process. This is the foundation of how to finish drywall correctly, and a weak foundation makes every step after it harder.
Set screws and fix fastener problems
Every screw in your drywall needs to sit just below the surface of the paper without breaking through it. Run your hand across the panels and press firmly. If you feel a screw head that catches your palm or a popped nail that protrudes above the surface, it will telegraph through your mud coat no matter how carefully you apply it. Drive any protruding fasteners down with a drywall screw gun or a drill set to the correct clutch depth. The goal is a slight dimple in the paper , not a torn-through hole.
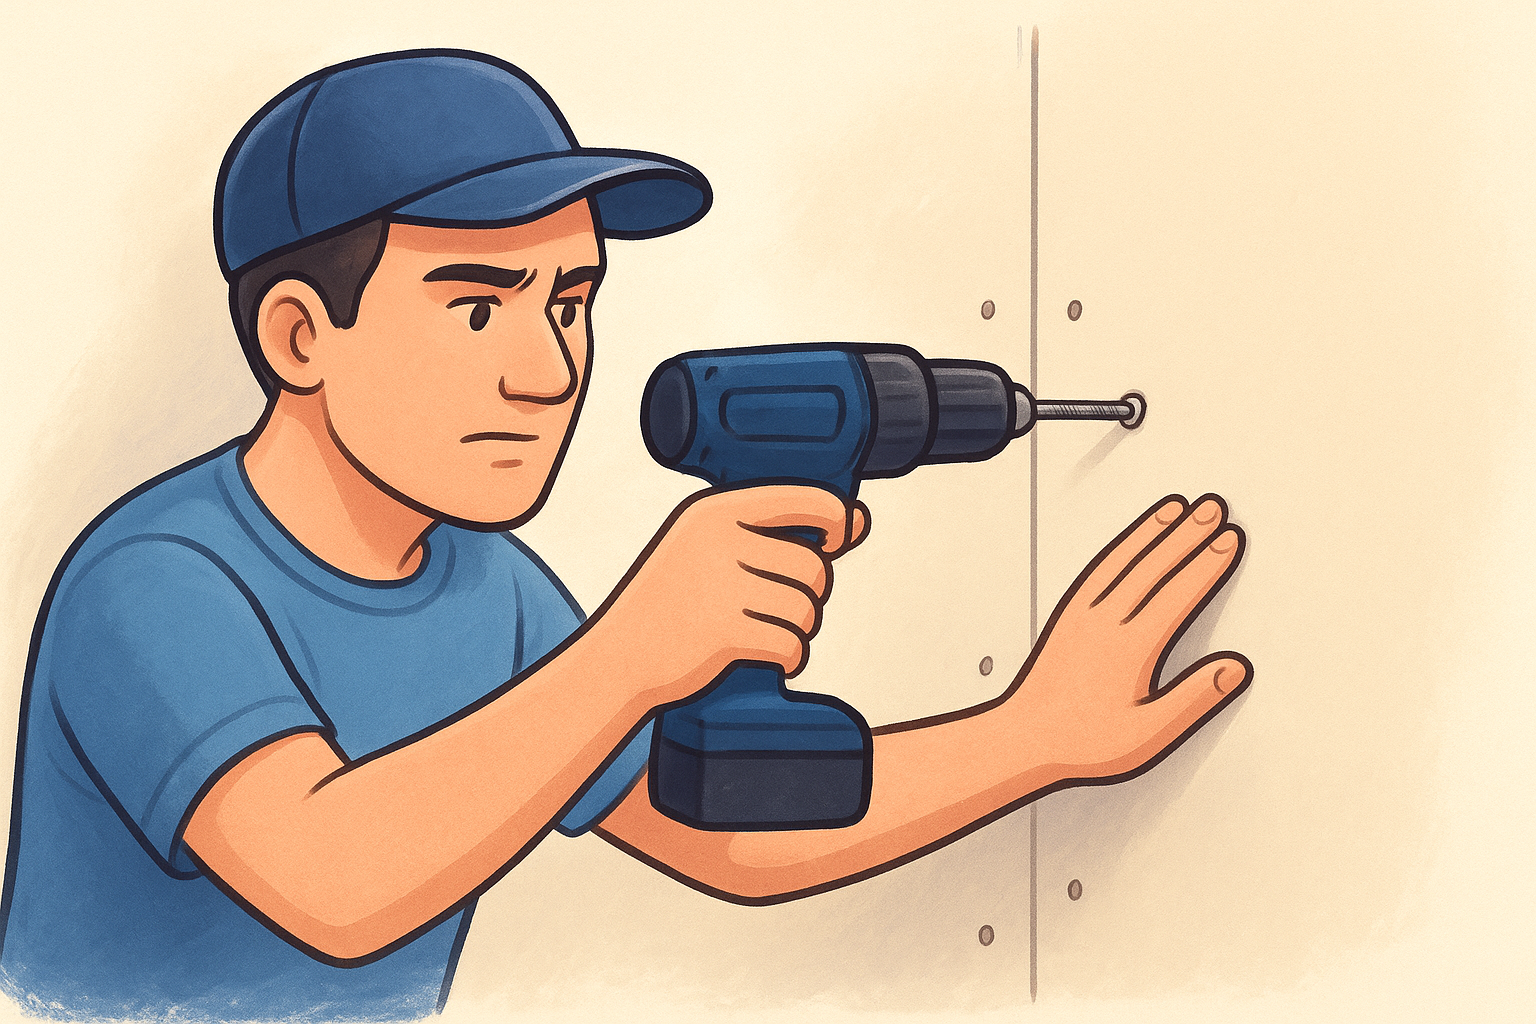
If a screw tears through the paper face, drive a second screw 2 inches above or below it into the same stud, then leave the torn screw in place so it doesn't pull the panel away from the framing.
Check panel edges and cut problem areas
Walk the entire surface and look for raised paper edges, gaps wider than 1/4 inch between panels, and any areas where the panels flex when pressed . Wide gaps don't fill cleanly with a single tape coat; anything over 1/4 inch needs a setting-type compound packed in first and allowed to harden before you tape over it. Raised paper edges tear up when you drag a knife across them and create ridges that are nearly impossible to feather flat.
Use a utility knife to cut down any raised paper fibers or loose face paper before you apply any compound. Lightly sand high spots on the panel surface with 80-grit sandpaper if needed, then dust off the panel completely. A clean, flat, fully-fastened surface gives your tape and mud something solid to bond to from the first coat forward.
Step 2. Mix compound to the right consistency
Compound consistency is one of the most overlooked factors in how to finish drywall, and it affects every coat you apply. Pre-mixed joint compound comes out of the bucket too thick for most applications , and forcing stiff mud across a seam tears the tape and leaves tool marks that take extra coats to fix. Before you load your pan, take a few minutes to get the texture right for the specific coat you're applying.
How to test consistency before you coat
The standard test is simple: scoop some compound onto your 6-inch knife and hold it horizontally. Good working consistency means the mud clings to the blade without dropping off, but slides off cleanly when you tip the knife. If it falls off in a blob, it's too thin. If you have to scrape it off, it's too thick. Add water a small amount at a time and mix thoroughly using a drill with a paddle mixer to bring it to the right texture.
Never add more than a few tablespoons of water at a time. Over-thinned compound shrinks more as it dries and increases the risk of cracking at the seams.
Use this quick reference for consistency by coat:
| Coat | Consistency | What it should do |
|---|---|---|
| Taping coat | Peanut butter | Hold tape firmly against the seam without sliding |
| Fill coat | Thick yogurt | Spread wider without dragging or lifting the tape below |
| Finish coat | Mayonnaise | Feather thin and flat across a wide area |
Adjusting compound for each coat
Each coat in the finishing process has a different job , which means the compound needs a slightly different consistency each time. Your taping coat needs to be thick enough to bed the tape firmly and hold it flat. Your fill coat goes on a bit looser so you can spread edges wider across the wall without pulling the tape layer underneath it.
For the finish coat, thin the compound down to a smooth, almost creamy texture. This lets you apply it thin and wide, which is what makes seams disappear before paint goes on. Clean your paddle and bucket walls between batches, because dried chunks of old compound mixed into fresh mud drag lines through your finish and force you into extra sanding.
Step 3. Tape seams and corners with the first coat
The taping coat is your foundation, and everything you apply on top depends on how well the tape bonds here. This coat has one critical job : press tape into wet compound firmly enough that no air pockets remain underneath it. Air bubbles under tape crack as the compound dries and force you to cut out and re-tape that section, which adds a full day to your project. Learning how to finish drywall correctly starts with getting this coat right the first time.
Taping flat seams
Start by loading your 6-inch knife with enough compound to cover a 2- to 3-foot section of seam at a time. Spread a thin, even layer directly over the joint, just enough to fully seat the tape. Cut a length of paper tape , center it over the seam, and press it in with your fingers along the full run before you touch it with your knife. Once it's positioned, drag your knife firmly from the center outward in both directions, squeezing excess compound out from under the tape. The tape should sit flat with no bubbles, and a thin skim of compound should show through the face of the paper.
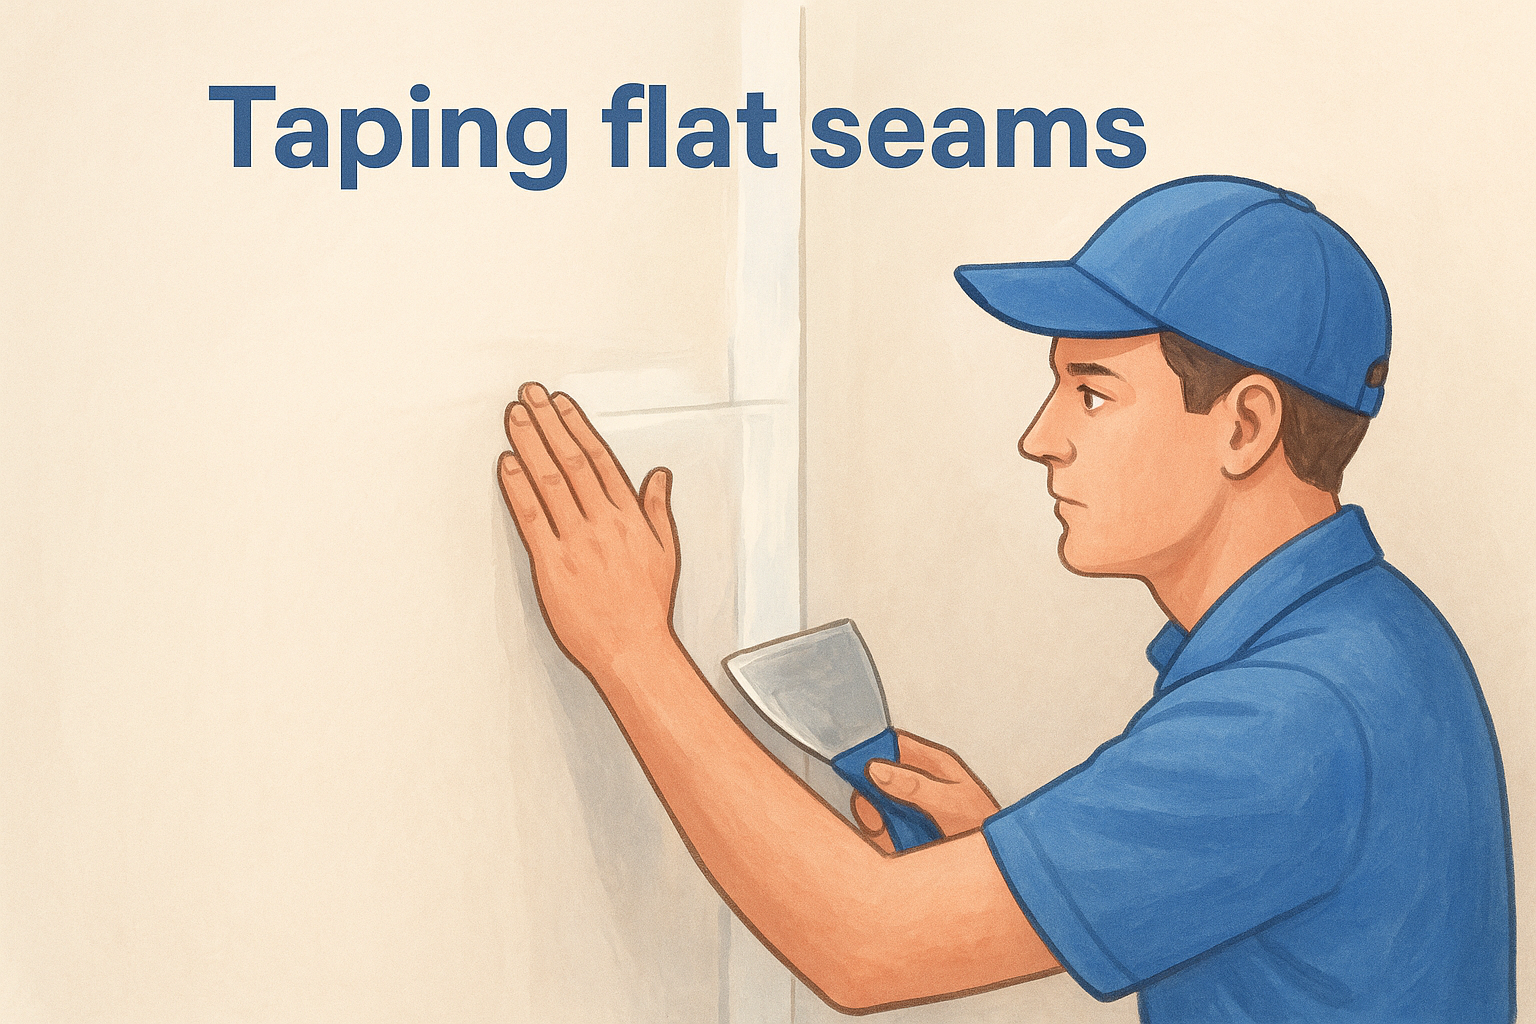
If the tape wrinkles or slides during application, your compound is too thin. Scrape it off, adjust your mix, and re-apply before it starts to set.
Follow this sequence for every flat seam:
- Apply a thin bed coat directly over the joint
- Center and press paper tape by hand along the full length
- Embed tape with firm knife strokes working from the center outward
- Remove excess compound from the edges with a clean pass
- Let dry completely, typically 24 hours, before moving to the fill coat
Handling inside and outside corners
Inside corners need a different approach than flat seams. Cut your paper tape to length, fold it along the center crease, and press it into the corner by hand. Apply compound to one side at a time , letting each side firm up slightly before you smooth the opposite side. Trying to tool both sides at once while wet drags the tape out of alignment and leaves a wavy, uneven corner.
Outside corners get metal or vinyl corner bead instead of tape. Fasten the bead tightly against the drywall edge with screws spaced every 8 inches , then apply compound over it with your 6-inch knife, feathering out onto the flat panel surface with each pass.
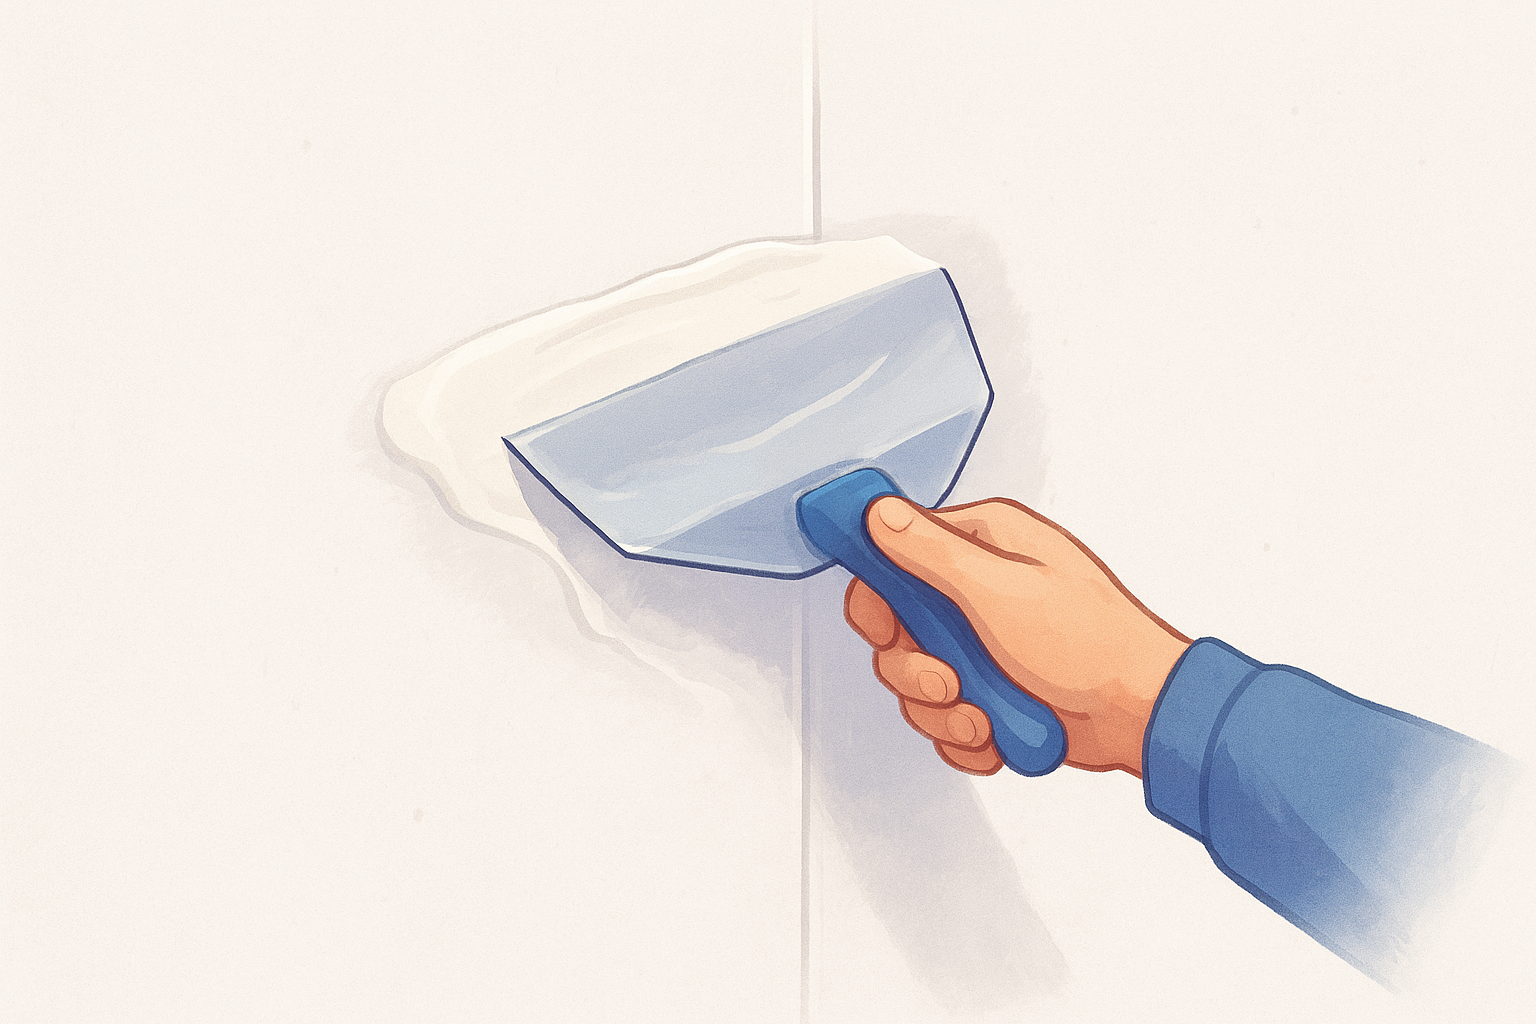
Step 4. Apply the fill coat to hide tape
The fill coat is where the tape starts to disappear. Your taping coat locked the paper in place ; this coat builds enough compound over it to eliminate the visible ridge the tape creates on the wall. Switch from your 6-inch knife to your 10-inch or 12-inch knife for this step. The wider blade lets you spread compound further from the centerline of the seam, which is exactly what creates the gradual, flat transition that makes a seam invisible once paint goes on.
Widening your knife and your passes
Load your wide knife and apply compound directly over the dried taping coat , starting from the center of the seam and spreading outward in smooth, even strokes. Your goal is to cover the tape fully while feathering the compound edges at least 6 to 8 inches wide on each side. Pressing too hard at the edges lifts compound rather than spreading it, so reduce pressure as your knife moves toward the outer edge of each pass.
The fill coat is not meant to be perfectly smooth at this stage. Its job is coverage and width, not a glass-flat surface. Chasing perfection here wastes time that sanding handles better.
Work in sections of 3 to 4 feet, apply compound, then clean your knife and make a light finishing stroke to knock down any ridges before you move on. A single clean pass at the end of each section prevents thick lines from drying in place and requiring heavy sanding later. Let this coat dry completely before touching it, at least 24 hours in normal conditions or longer in cooler, humid rooms.
Handling butt joints and problem spots
Butt joints, where two factory-cut ends of drywall meet, are the most difficult part of how to finish drywall because neither edge is tapered. These joints require a wider fill coat than tapered seams, spread 12 inches or more from center on each side, to keep the compound thin enough that it doesn't create a visible hump. Apply two thin fill coats on butt joints rather than one thick pass, letting each dry fully between applications.
Check every seam for air bubbles or lifted tape edges after the fill coat dries. Press any lifted edges down and spot-fill them with a thin skim of compound before moving forward.
Step 5. Apply the finish coat and feather wide
The finish coat is the final layer of compound you'll apply before sanding, and it's the most important one for achieving paint-ready walls . Where fill coats build thickness and coverage, the finish coat's job is to eliminate any remaining ridges, lines, or texture left by your previous passes. Thin it down to a smooth, creamy consistency before you load your knife, because thick compound dragged across a wall at this stage dries with tool marks baked in.
Feathering compound across a wide area
This is the coat where your 12-inch knife earns its place in your hand. Load it lightly, apply compound starting over the center of the seam, and push outward in long, steady strokes. Your edges should extend at least 10 to 12 inches on each side of the seam centerline. The wider you feather, the more gradual the transition from panel surface to compound, and gradual transitions disappear under paint where abrupt ones don't.
The most common mistake at this stage of how to finish drywall is applying the finish coat too thick in the center while trying to get the edges thin. Apply less compound than you think you need, spread it wide, and let the feathered edge do the work.
Use firm, consistent pressure through the middle of each stroke and reduce pressure gradually as your knife approaches the outer edge. Lifting the knife at the very end of each pass prevents a thick buildup line from forming at the edge of your compound. Once you've covered a section, make one clean pass with a nearly-empty knife to knock down any ridges before moving to the next area.
Checking your work before it dries
Set up your raking work light close to the wall surface before the finish coat sets. Shine it at a low angle across the surface and look for ridges, thin spots, or areas where the compound appears uneven. Any problem areas you spot while the mud is still workable can be corrected with a single light stroke. Waiting until the compound dries locks those issues in and sends you back to sanding more aggressively than you'd like.
Step 6. Sand, spot-fix, and prime for paint
Sanding is where the final quality of your work either holds up or reveals every flaw you didn't catch earlier. This step closes out the process of how to finish drywall, and rushing it produces walls that look fine in dim light but show every ridge and lap mark the moment sunlight hits them. Give yourself enough time to sand in stages, inspect carefully, and apply primer before you declare the walls ready.
Sand the finish coat smooth
Wait until your finish coat is completely dry and uniformly white before you touch it with sandpaper. Any gray or dark patches mean moisture is still present, and sanding wet compound tears the surface instead of smoothing it. Attach a 120-grit sanding screen to your pole sander and work in long, overlapping strokes across each seam. Keep the pole at a low angle to the wall so the screen removes high spots without digging into the compound surface underneath.
Sand with the lightest pressure that still removes ridges. Pressing hard on a pole sander cuts through finish compound quickly and can expose the tape below, which forces you to apply another full coat before priming.
Follow this sequence for sanding each section:
- Start with 120-grit to knock down ridges and lap marks
- Switch to 220-grit for a final light pass over the entire surface
- Wipe the wall down with a dry microfiber cloth to remove dust before inspecting
- Set up your raking light and scan each seam from multiple angles
Spot-fix before priming
After your first sanding pass, hold your work lamp at a low angle across every seam and corner. Low-angle light reveals shallow scratches, thin areas, and any spots where compound didn't fully cover the tape. Mix a small batch of finish compound thinned to a smooth consistency and skim it over any problem areas with your 6-inch knife. Let each spot-fix dry completely, then sand it lightly with 220-grit before moving forward.
Prime the walls before paint goes on
Priming is not optional. Unprimed joint compound is porous and absorbs paint unevenly, creating dull spots called "flashing" that appear after the first coat of paint dries. Roll a PVA drywall primer across all finished surfaces using a 3/8-inch nap roller, cut in at the edges with a brush, and let it dry fully according to the manufacturer's instructions. Once the primer is dry, run your hand across the surface and sand any raised fibers lightly with 220-grit before your finish paint goes on.
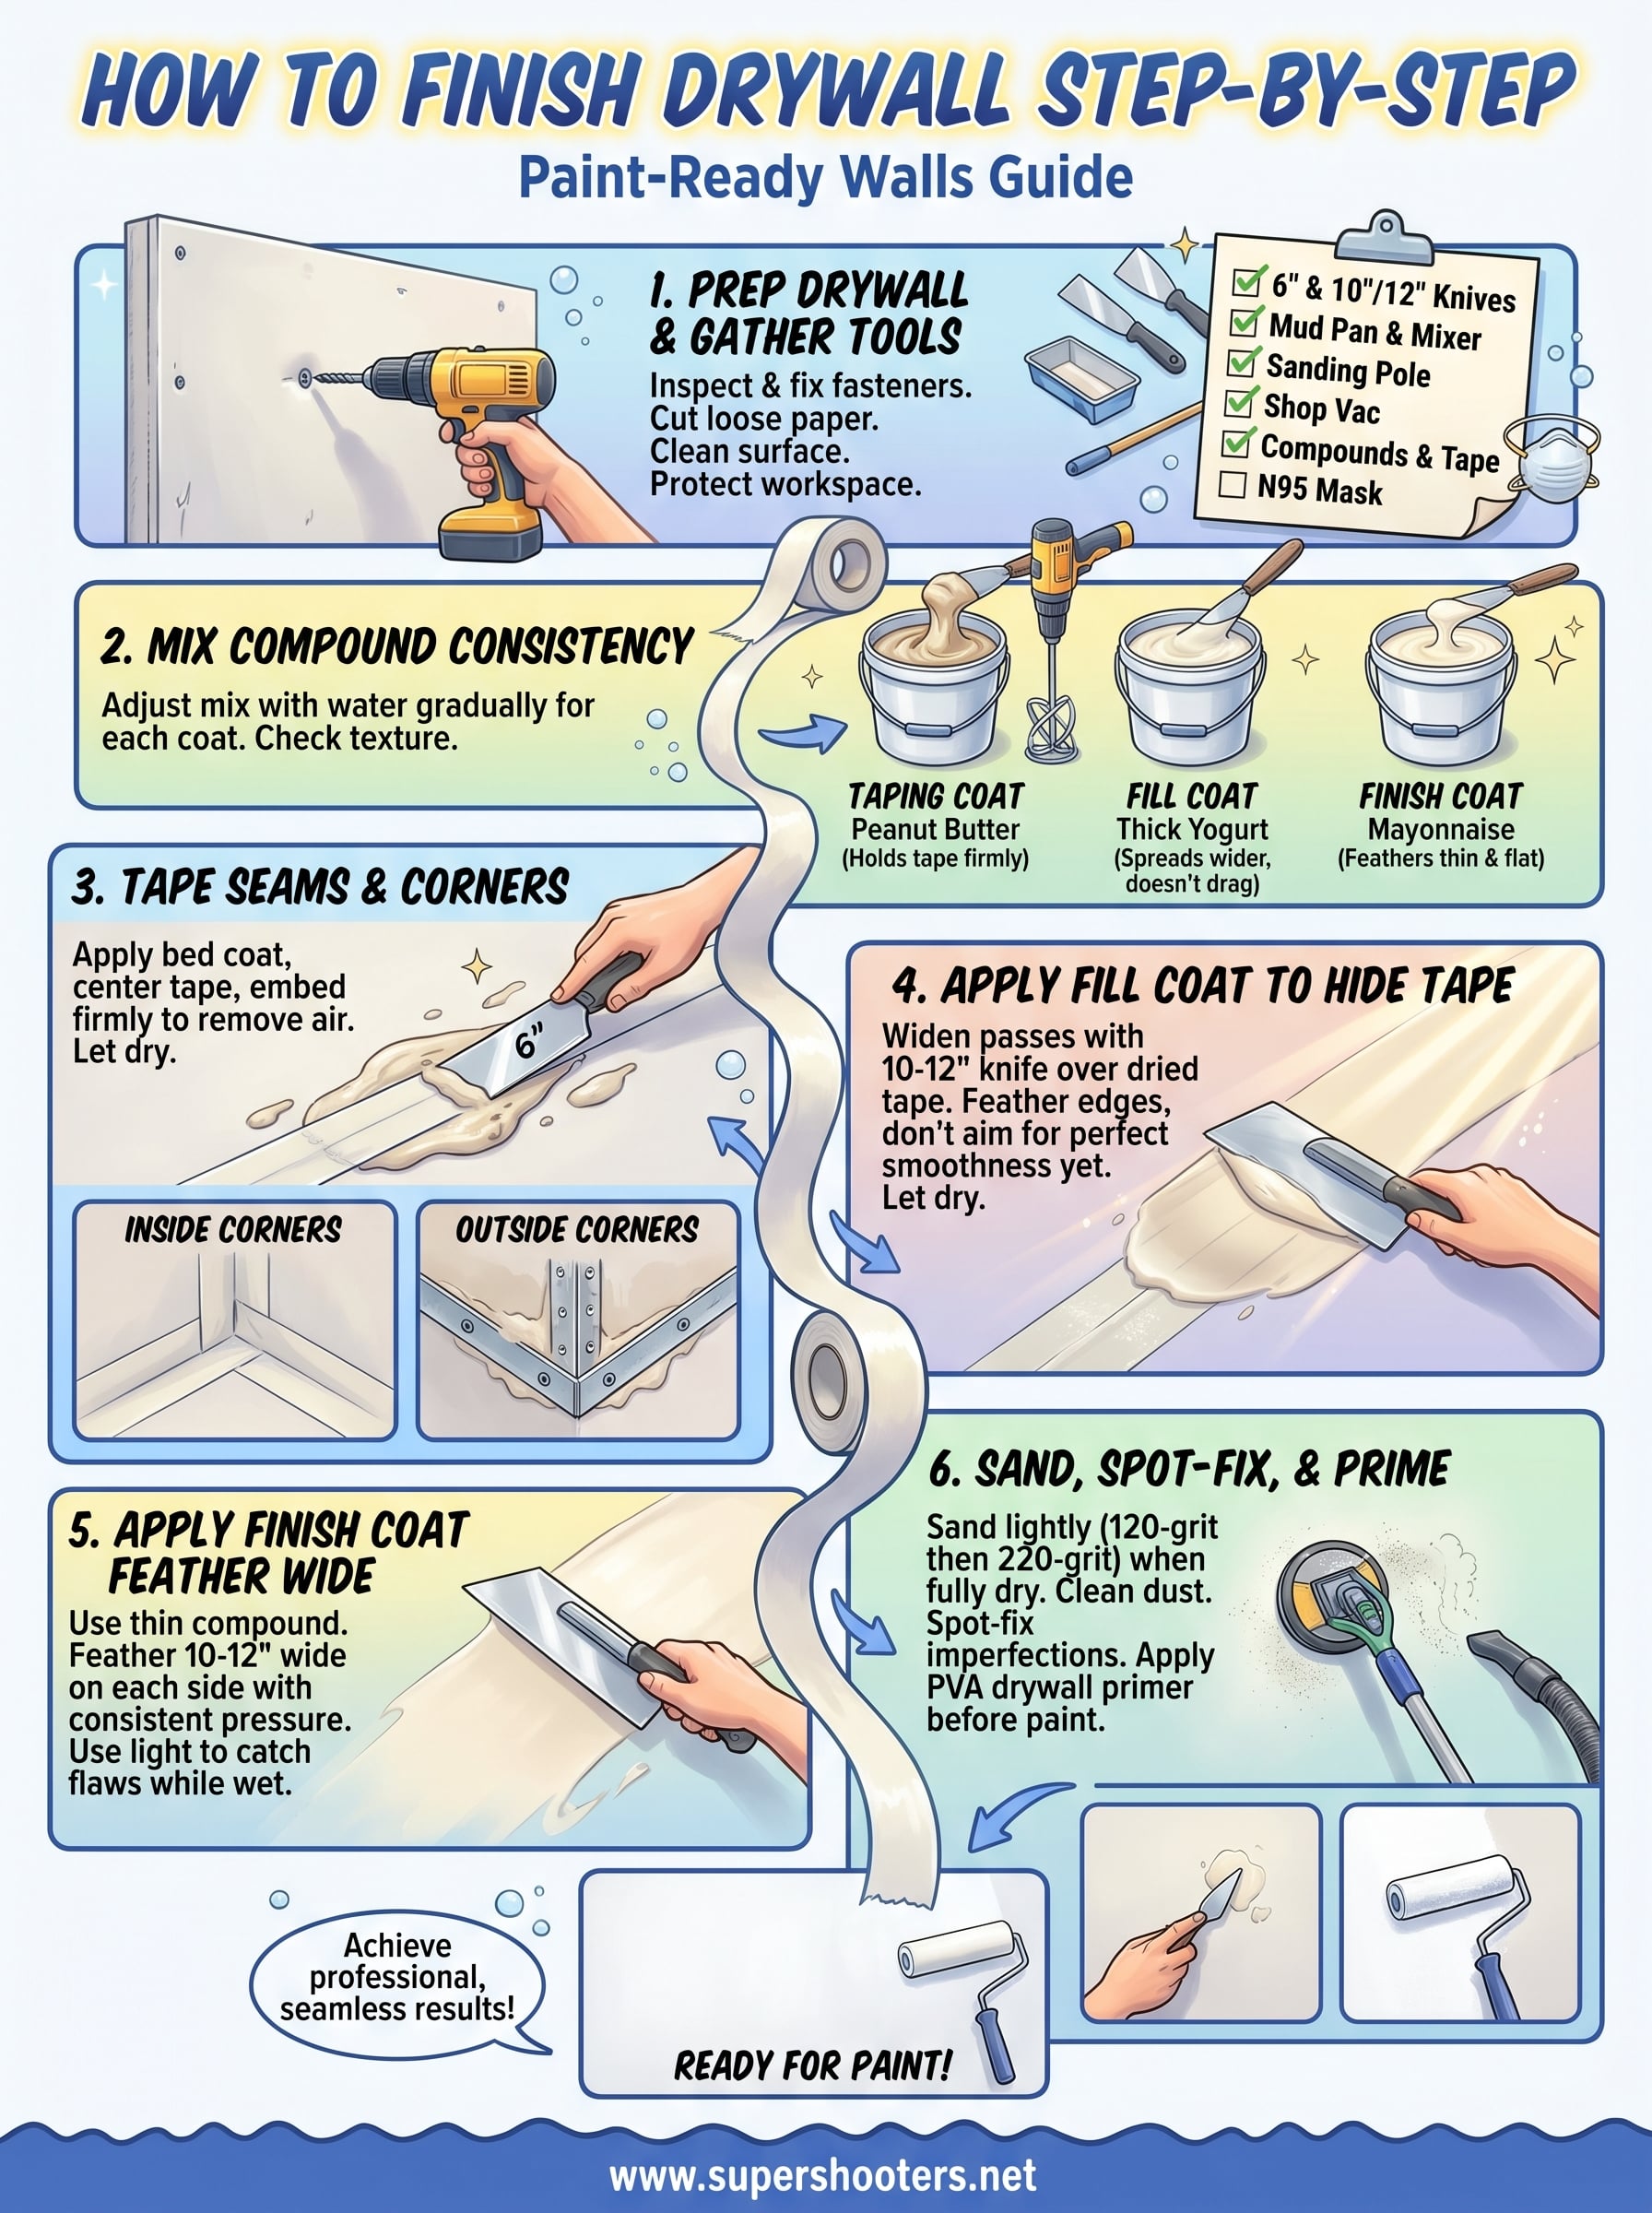
Your walls are ready for paint
At this point, you've worked through every stage of how to finish drywall, from prepping fasteners and mixing compound to taping seams, building fill coats, feathering the finish wide, and sanding everything smooth. Your walls are primed and ready for the first coat of paint. That sequence, done in the right order with enough drying time between coats, is exactly what separates a professional-looking result from one that shows every flaw through the paint.
If your project turned out bigger than expected, or you'd rather hand it off to a crew that finishes drywall every single day, Super Shooters is ready to help. Our team has completed over 10,000 projects across the Sacramento Valley, and we back every job with our Super Shield warranty. Reach out for a free in-home estimate and get your walls done right the first time.
Recent Posts