Share this article

August 27, 2026

How to Patch Drywall with Tape: Step-by-Step Guide

You've got a hole or crack in your drywall, and every video you watch shows a different method. Some skip tape entirely and just slap on joint compound. Others swear by mesh. That confusion is exactly why so many DIY patches crack again within a few months. Patching drywall with tape isn't complicated once you understand what the tape actually does: it bridges the gap and gives the compound something to grip so the repair doesn't flex and split along the seam.

If you're wondering whether tape is necessary or which type to use, here's the short answer: for anything bigger than a small nail hole, yes, and the choice between paper tape and mesh tape depends on the size and location of the damage. Paper tape is stronger for corners and larger repairs; mesh is faster and more forgiving for beginners.

In this guide, we'll walk through step-by-step application , from prepping the hole to feathering out the final coat, based on techniques we use daily on real Sacramento Valley homes. By the end, you'll know exactly how to get a smooth, invisible patch that holds up long-term.

Why tape matters for a crack-free drywall patch

What tape actually does

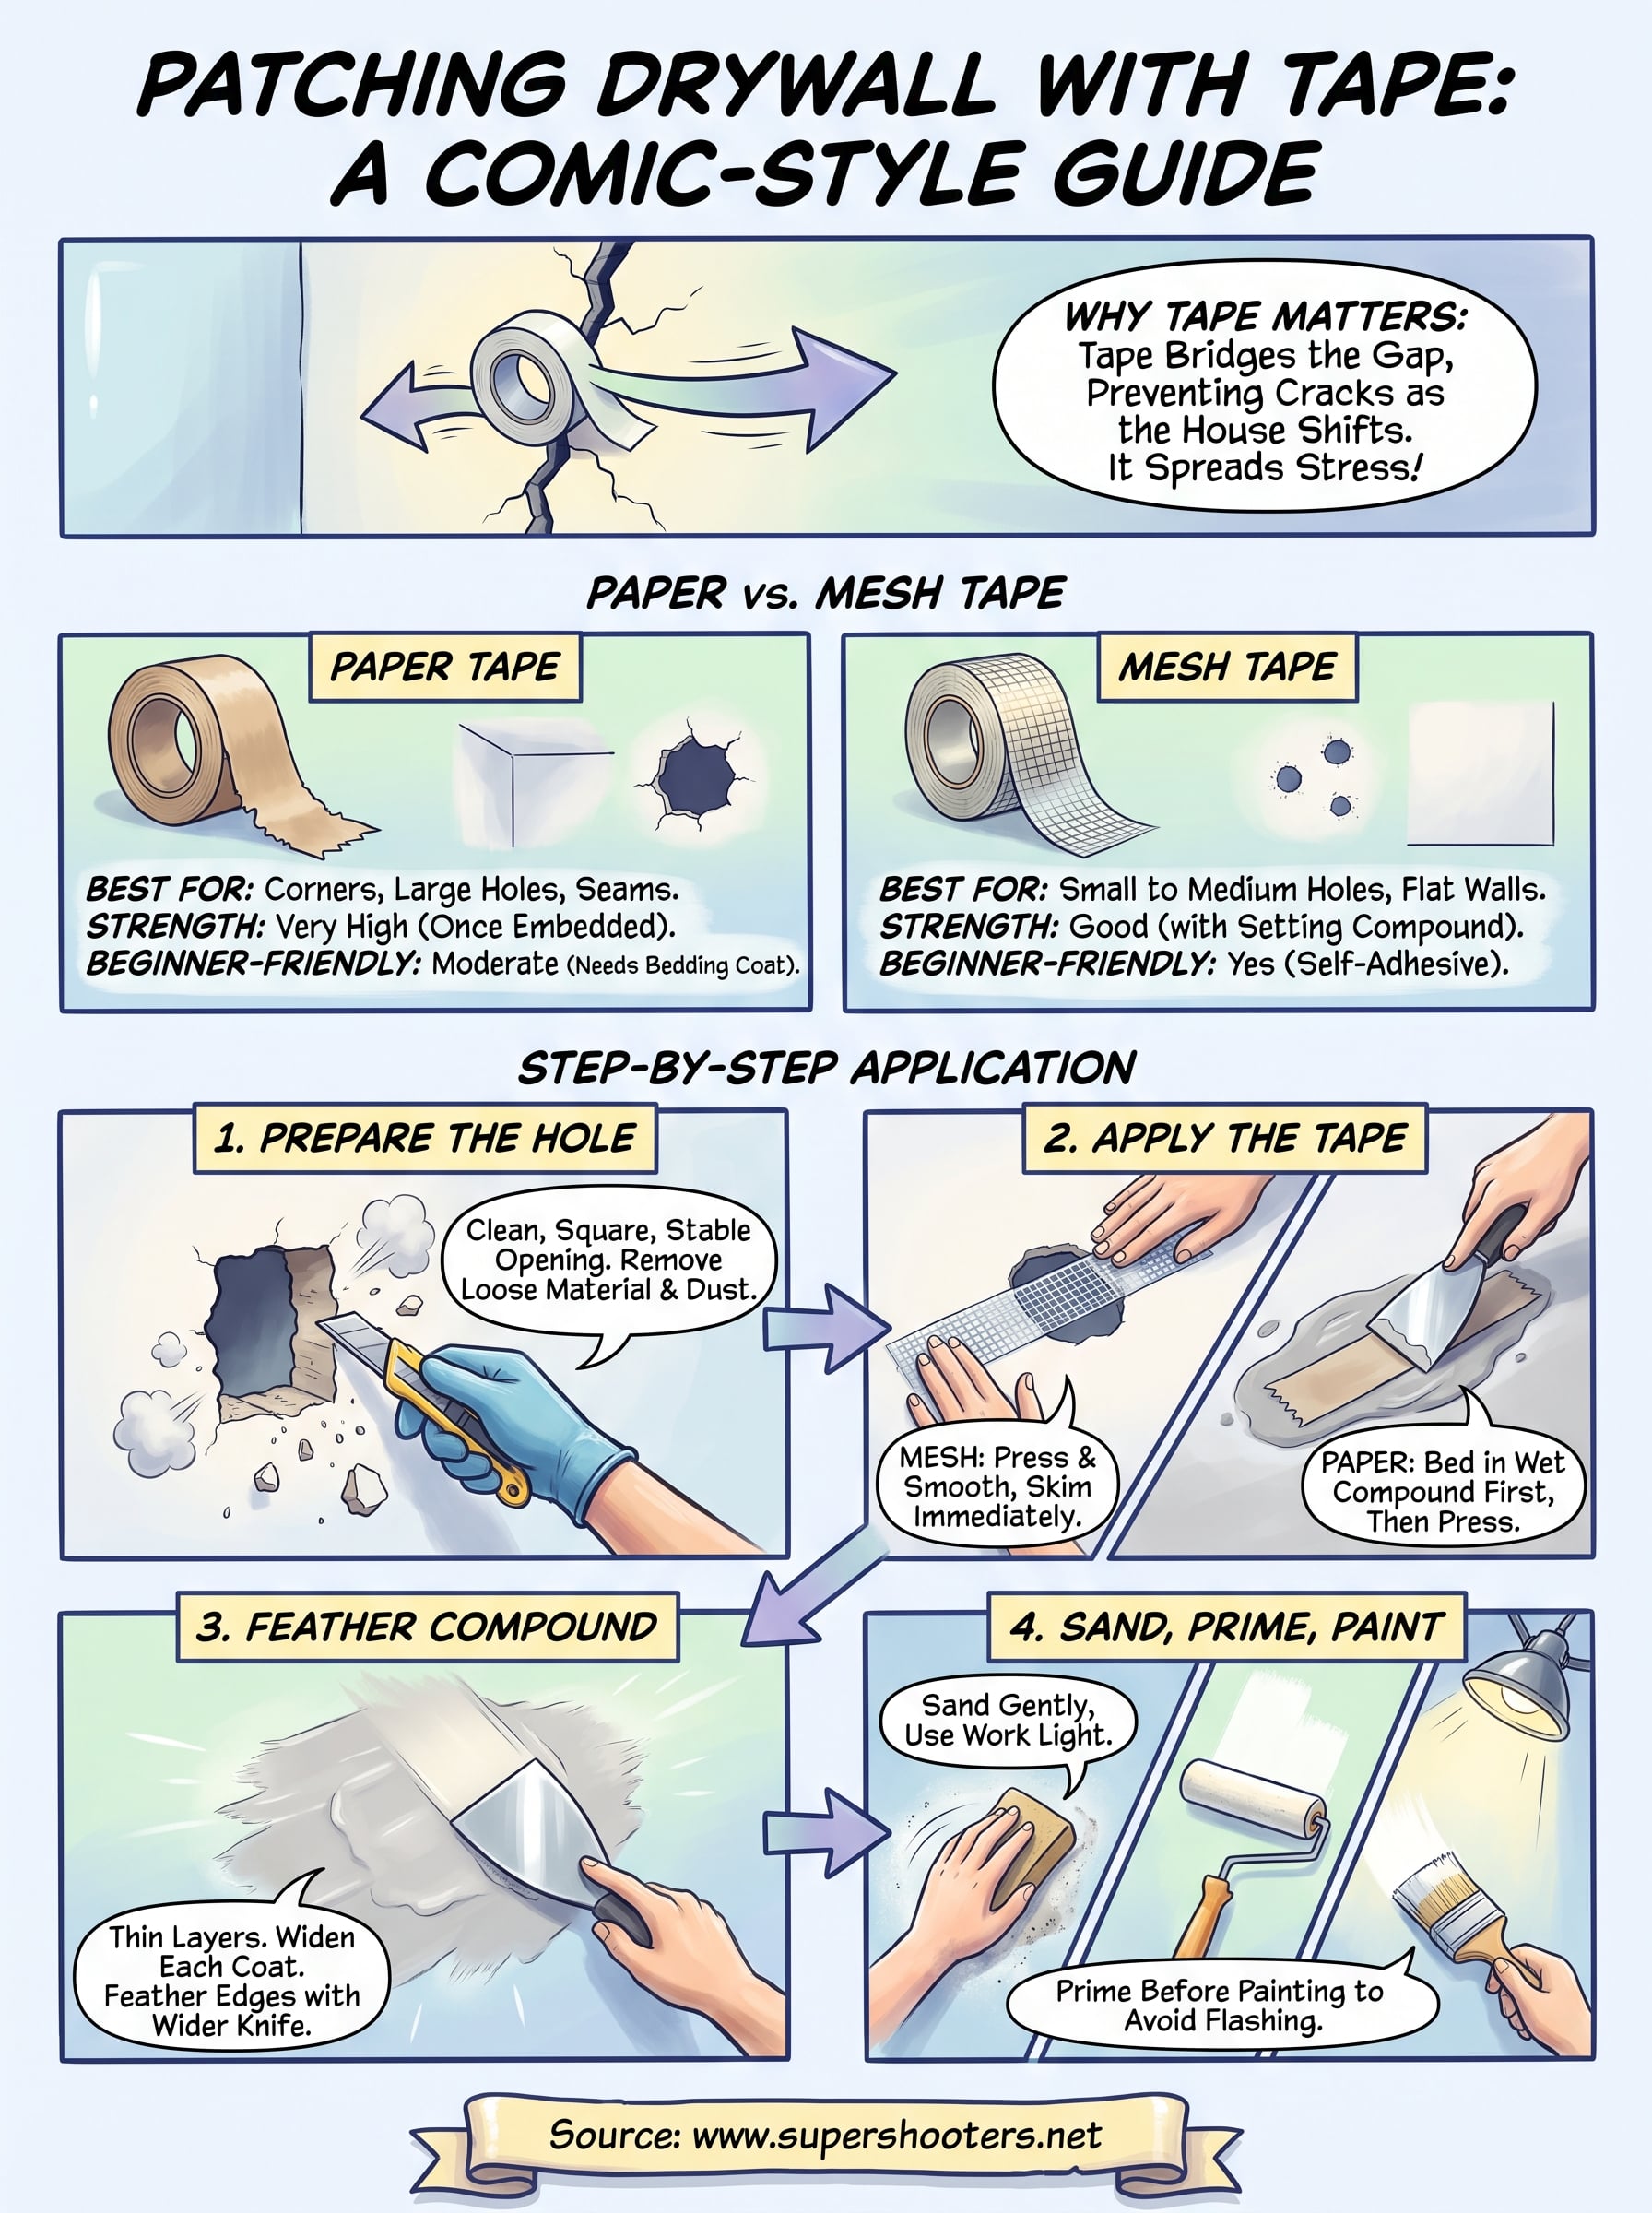
Every drywall patch fails for the same reason: joint compound alone can't span a gap wider than an inch or two without cracking as the house shifts. Drywall patching tape reinforces the seam, holding both edges of the repair together while the compound cures around it and spreading stress across the whole patch instead of concentrating it along one thin line, which is the whole point of taping drywall. Skip the tape, and you're asking compound to act like glue and armor at the same time, a job it was never built for.

Tape doesn't hide the repair, it's what keeps the repair from reappearing.

Small dings and single nail holes can usually get away without reinforcement because there's nothing wide enough to flex. But once you're patching drywall with tape for anything from a doorknob-sized hole to a running crack, skipping this step means you'll likely see a hairline seam telegraph right through fresh paint within a season. That's especially true here in the Sacramento Valley, where summer heat and winter humidity swings put constant stress on wall seams, and older homes with settling foundations see even more movement. If cracks keep returning no matter how you patch them, that's usually a sign of structural settling rather than a bad repair job, and it's worth having our drywall repair team take a look.

Paper tape vs. mesh tape

Choosing between paper tape and mesh tape comes down to the size of the repair and how much control you have over your first coat of compound. Paper tape is stronger once embedded and holds up better on inside corners, but it requires a base coat of compound underneath before you press it in, which takes more technique. Mesh tape is self-adhesive and forgiving for beginners, though it's not as strong on its own and needs a setting-type compound rather than lightweight all-purpose mud to really hold.

Tape Type Best For Strength Beginner-Friendly Compound Needed
Paper tape Corners, large holes, seams Very high once embedded Moderate learning curve Any joint compound
Mesh tape Small to medium holes, flat walls Good, needs setting compound Yes, self-adhesive Setting-type compound

For most homeowners patching a single hole, mesh tape gets the job done faster. For anything near a corner or larger than a dinner plate, paper tape gives you a stronger, flatter result in the long run.

Step 1. Prepare the damaged area

Before you even think about how to use drywall tape to patch a hole , you need a clean, stable opening to work with. Ragged edges, loose paper facing, and crumbling gypsum all sabotage adhesion no matter how good your tape or compound is. Cut away any damaged material with a drywall saw until you reach solid edges, and knock off loose debris with a stiff brush or your fingers.

Cutting and cleaning the hole

Grab a utility knife or drywall saw, two of the drywall repair tools worth owning, and square off the hole into a clean rectangle or circle, whichever matches your patch piece. Irregular shapes make it harder to size tape correctly and leave weak spots where compound has nothing solid to bond to. Vacuum the area and wipe down the surrounding wall with a damp cloth to remove dust, since even a thin film of drywall dust will weaken the tape's grip.

A clean edge is half the repair, no tape sticks well to loose paper or crumbling gypsum.

Backing for larger holes

For anything wider than about four inches, you'll need backing before tape goes anywhere near the wall. Here's the quick checklist we use on job sites:

  • Cut a drywall patch slightly larger than the hole
  • Insert a scrap of plywood or a commercial backer board behind the opening
  • Screw the backer to the surrounding drywall, not just the patch
  • Set the patch flush with the surrounding surface, no proud edges
  • Check with a straightedge before moving to tape

Skipping backing on a large hole means your tape has nothing rigid underneath it, and the patch will flex and crack again within weeks.

Step 2. Choose and apply the drywall tape

Once your hole is clean and backed, it's time to get the tape on. This is the step most DIYers rush, but rushing here is exactly why patches fail later. Patching tape drywall work goes fastest when you've already decided which type you're using, or picked up a patching kit sized to your hole, and cut everything to length before you touch any compound.

Applying mesh tape

Mesh tape is self-adhesive, so you just peel and press it directly over the seam or hole, centering it so it overlaps solid drywall by at least an inch on every side. Smooth it flat with your fingers or a taping knife to knock out air bubbles, then run a thin layer of setting-type compound over it right away since mesh alone offers no strength until compound locks into its grid.

Applying paper tape

Paper tape needs a different approach. Spread a thin bed of joint compound over the seam first, about 1/8 inch thick, then press the tape into it and use your knife to squeeze out excess compound and air from underneath, working from the center outward. Leave a thin skim coat over the tape once it's embedded so it doesn't dry out and lift.

Tape that isn't fully embedded in compound will bubble, crack, and telegraph through paint no matter how careful your finish coats are.

Quick reference checklist

  • Cut tape a few inches longer than the repair on each side
  • Center it over the seam or patch, overlapping solid wall by 1 inch
  • Mesh: press and smooth, then skim coat immediately
  • Paper: bed in wet compound first, then press and smooth
  • Check for trapped air bubbles before moving on

Get this step right and the rest of the repair, the sanding, priming, and paint, goes smoothly.

Step 3. Apply and feather the joint compound

With the tape embedded, the next job is building the patch out until it's invisible against the surrounding wall. Never try to fill a hole or seam in one thick pass. Joint compound shrinks slightly as it dries, and a heavy single coat almost always cracks or sags before it cures. Work in thin layers instead, letting each one dry fully before you add the next, and know how many coats of mud the job really needs.

Building up thin coats

First coat goes on just thick enough to cover the tape and lock it in place, roughly 1/16 to 1/8 inch. Grab a 6-inch taping knife for this pass and hold it at a low angle, dragging compound across the tape in one direction to avoid dragging it back up. Once that coat dries, usually 24 hours for standard compound or a few hours for setting-type mud, switch to a wider 10 or 12-inch knife for the second coat. That wider blade is what starts the feathering process, spreading compound thinner and thinner as you move away from the center of the repair.

A patch that's invisible under raking light was built in thin layers, not one thick swipe.

Feathering the edges

Getting a seamless finish means widening each coat past the last one so the edges taper down to nothing against the wall. Here's the sequence that works on almost every repair:

  • Coat 1: cover tape, knife width matched to hole size
  • Coat 2: widen 3 to 4 inches past coat 1 edges, feather with a 10-inch knife
  • Coat 3: widen another 3 to 4 inches, feather with a 12-inch knife

Keep a damp sponge nearby to knock down ridges between coats, since smoother layers now mean far less sanding once everything's fully dry.

Step 4. Sand, prime, and paint the patch

Once the final coat of compound is bone dry, which for standard mud usually means waiting overnight, it's time to smooth everything out. Sanding drywall patches is where a lot of good repairs get ruined by heavy hands, so go slow and check your progress often instead of grinding away in one pass.

Sanding without damaging the tape

Grab a sanding sponge or 150-grit sandpaper on a pole sander and work in circular motions, feeling for ridges rather than trying to remove material fast. Press too hard and you'll sand straight through the top layer of compound and expose the tape underneath, which means mixing another coat and losing a day. Run a work light at a low angle across the wall as you go since raking light shows every high spot and dip that's invisible under normal room lighting.

If you can feel a ridge with your palm, the light will find it after paint.

Wipe the dust off with a damp cloth or tack cloth before moving on, because leftover dust will show up as texture under primer.

Priming and painting for a seamless finish

Primer matters more than most DIYers assume. Compound and surrounding drywall absorb paint differently, so skipping primer almost always leaves a visible flat spot called flashing, even under two coats of finish paint. Use a stain-blocking primer, let it dry fully, then match your topcoat with the same sheen as the rest of the wall since a mismatched sheen is often more obvious than the patch itself was.

  • Sand lightly between primer and first paint coat
  • Feather paint edges beyond the primed area
  • Check the finish under both daylight and lamp light

If you'd rather skip the sanding dust and matching guesswork altogether, our drywall repair crews handle patch, prime, and paint in a single visit.

Getting a smooth, lasting repair

Get the tape right and everything else falls into place. Patching drywall with tape comes down to four things: a clean prepped hole, the correct tape for the job, thin layered compound coats, and patient sanding before you prime. Skip any one of those steps and you're setting yourself up for a seam that reappears the moment temperatures swing or the house settles a little more.

Most failed patches trace back to rushed tape work or a single thick coat of mud instead of several thin ones. Slow down on those two steps and your repair will disappear under paint instead of haunting your wall for years.

Some cracks keep coming back no matter how carefully you tape and feather, and that usually points to something structural rather than a technique problem. If that's what you're dealing with, or you'd rather hand off the sanding dust altogether, get a free estimate on professional drywall patching and our crew will take it from here.

Recent Posts

By cinchweb August 28, 2026
Compare 5 DIY options for a ceiling popcorn removal tool, from budget scrapers to sanders, with costs, dust levels, and asbestos safety tips.
By cinchweb August 26, 2026
Learn how to repair a hole in drywall of any size, from spackle fixes to mesh patches, plus when to call Sacramento Valley pros.
By cinchweb August 25, 2026
Learn ceiling and drywall repair costs, DIY vs pro tips, and how to vet Sacramento Valley contractors before your next home fix.
By cinchweb August 24, 2026
Learn how do you repair hole in drywall with sizing tips, patching methods, texture matching, and when to call Super Shooters for tricky repairs.
By cinchweb August 21, 2026
Compare 8 top drywall patching kit picks by hole size, price, and dry time, plus when to call a pro instead of DIY.
By cinchweb August 20, 2026
Learn how to paint a popcorn ceiling step by step, asbestos testing, prep, tools, and application tips from Sacramento's Super Shooters experts.
By cinchweb August 20, 2026
Learn how to patch small hole in drywall with mesh, compound, and paint for a seamless fix, plus signs it's time to call a pro.
By cinchweb August 19, 2026
Learn joint compound drywall repair step-by-step: tools, taping, feathering, sanding tips, and when to call Super Shooters for professional help.
By cinchweb August 17, 2026
Discover the 6 essential tools for drywall repair, plus costs and tips—and learn when Sacramento Valley homeowners should call a pro instead.
Show More