

Share this article

October 6, 2026

Drywall Patching Clips: How to Use Them and Which to Buy

You have a hole too big for mesh tape and too awkward to cut back to the nearest stud. Maybe a doorknob went through the wall, or a plumber opened it up and left a gap. Drywall patching clips solve this problem without opening up the whole wall, and they cost a few dollars.

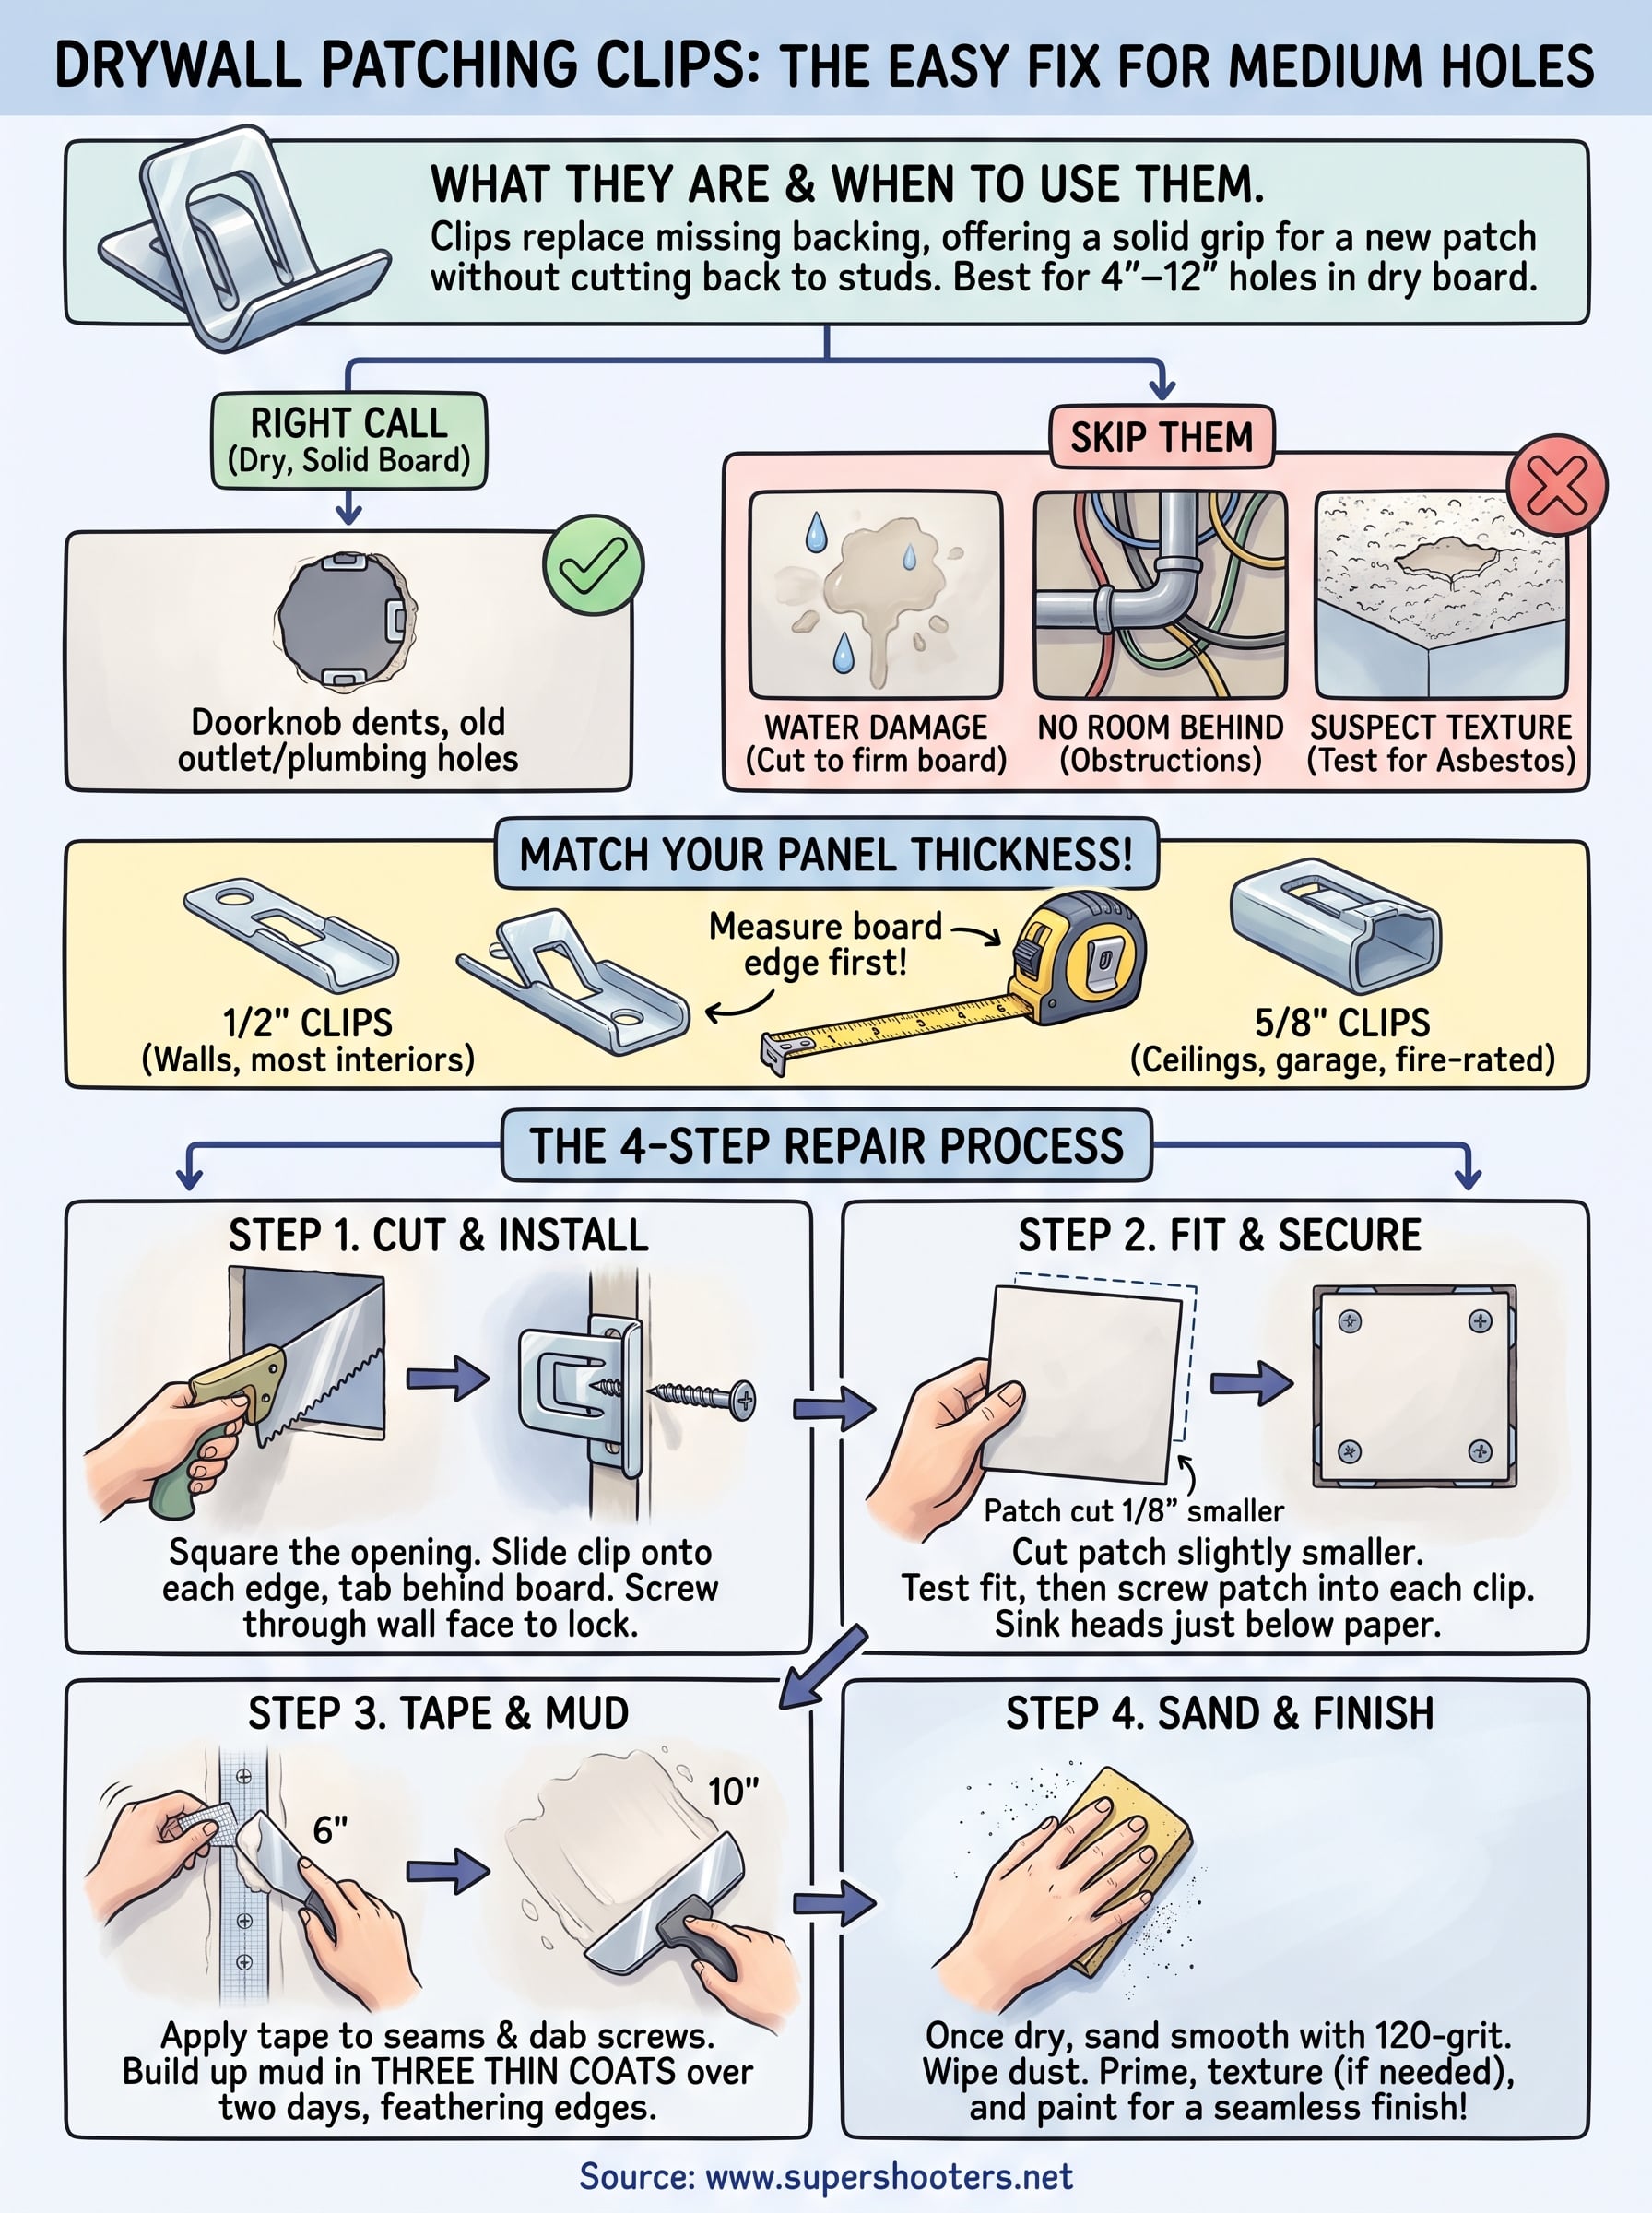
Here is the short answer. Clips are small metal or plastic tabs that grip the edges of the hole and give a new drywall patch something to screw into. You trim the hole square, slide a clip onto each edge, set the patch, and fasten it. Buy clips matched to your panel thickness , since most homes use 1/2" drywall on walls and 5/8" drywall on ceilings and garage walls.

Below, we walk through the full process step by step, from cutting the opening to taping, mudding, and texture matching. We also cover which clip products fit each thickness and where to buy them. At Super Shooters, we have patched drywall across the Sacramento Valley for over 30 years, so the tips come from real jobs, including when a clip repair is not the right call.

What drywall patching clips are and when to use them

Drywall patching clips are small tabs, usually galvanized steel or plastic, that grip the cut edge of a hole and give a new patch something solid to screw into. Some retailers label them drywall repair clips , and they do the job of wood backing without the work of opening the wall. They suit medium holes that are too big for mesh and too small to justify cutting back to the studs.

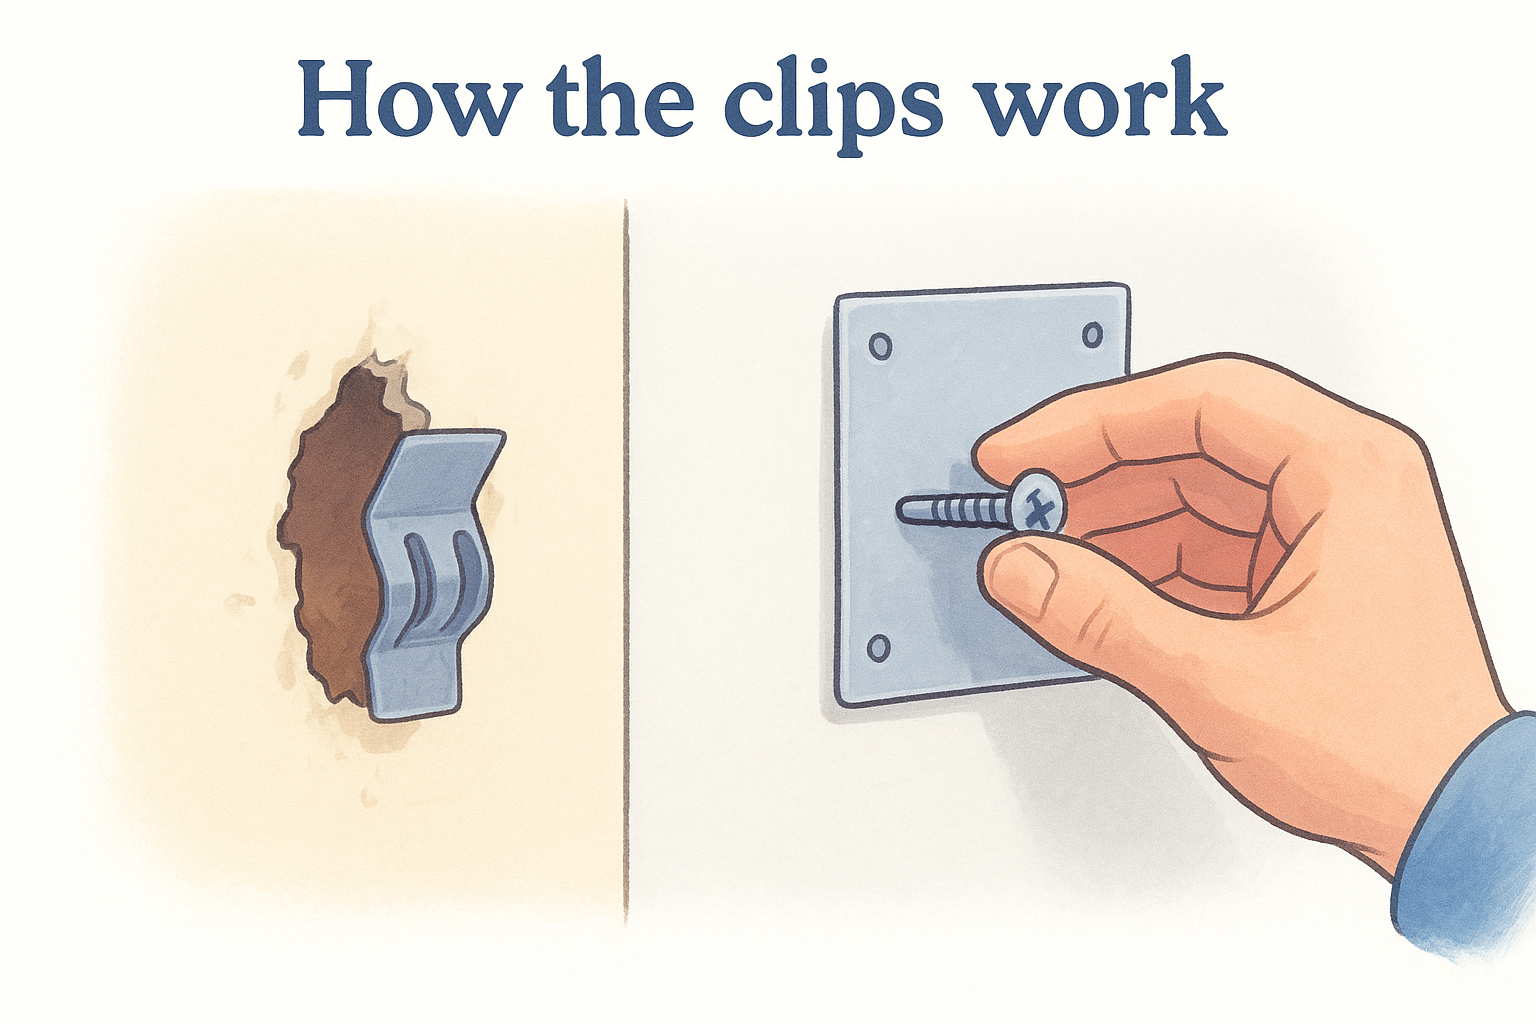
How the clips work

Most designs follow the same logic. One leg of the clip tucks behind the existing board, and you drive a screw through the wall face to lock it in place. The new patch then screws into the part of the clip that sits in the opening. The clip replaces the missing backing , so the patch can sit flush without a wood cleat or a stud nearby. Clips are made for specific panel depths, so matching the clip to 1/2" or 5/8" board is what keeps the surface level.

When clips are the right call

Use this table to size up your hole before you buy anything. The ranges are rules of thumb from our own repair work, not hard limits.

Hole size and condition Best fix
Under 4 inches Self-adhesive mesh patch
4 to 12 inches, dry board around it Patching clips
Over 12 inches, or crossing a stud Cut to the studs and fasten to the framing
Wet, moldy, or crumbling board Remove all damaged board, then re-patch

Clips work best in walls where the board around the hole is solid and dry . Think doorknob dents, removed outlets, and old plumbing access holes.

Clips replace the missing backing, not the missing structure.

When to skip them

Some situations call for a different fix, and forcing a clip repair will leave you with a patch that cracks or pops.

  • Water damage means the board is likely soft past the visible stain. Cut it out until you reach firm board , and fix the leak first.
  • Wiring or pipes behind the hole may leave no room for a clip to seat.
  • Ceiling holes in a home built before the 1980s need care. Popcorn texture from that era can contain asbestos , so have it tested for asbestos before you cut or sand.

Step 1. Gather tools and pick the right clips

A repair goes faster when everything is on the floor next to you before you cut. Plan on ten minutes of prep and one trip to the hardware store, because a missing screw size can stall the job halfway through.

Tools and materials

Most of this is already in a garage toolbox. The only specialty item is drywall patching clips , which you can find at Home Depot, Lowe's, and on Amazon. Buy a four-pack per patch, one clip for each edge, plus a spare set.

  • Drywall patching clips
  • Scrap drywall in the same thickness as your wall
  • Drywall saw or utility knife
  • Tape measure, pencil, and a 2-foot level
  • Drill and 1-1/4" drywall screws
  • Joint compound, 6" and 10" knives, and paper or mesh tape
  • 120-grit sanding sponge and a dust mask

Match the clips to your panel thickness

Check the package for a thickness rating before you pay. Clips rated for 1/2" board fit most interior walls. Choose 5/8" clips for ceilings, garage walls, and fire-rated assemblies, where builders use thicker Type X board.

Not sure what you have? Measure the cut edge of the hole with a tape measure, or look at the edge of a removed outlet opening. A clip that is too thin leaves the patch sunken, and one that is too thick leaves a ridge you will fight with mud.

Measure the board first, then buy the clip.

Step 2. Cut the hole and install the clips

Now the real work starts. Clean, square edges decide whether the clips grip, so take your time with the saw and keep the opening no bigger than it needs to be .

Cut a clean opening

Start by squaring off the damage. Trace a rectangle around the hole with a pencil and a level, then check for hidden wiring and pipes before the saw goes through. Work through it in this order:

  1. Turn off the breaker if the hole is near an outlet or switch.
  2. Score the lines with a utility knife.
  3. Cut along them with a drywall saw, keeping the blade shallow.
  4. Pull out the loose board and brush crumbs off the edges.

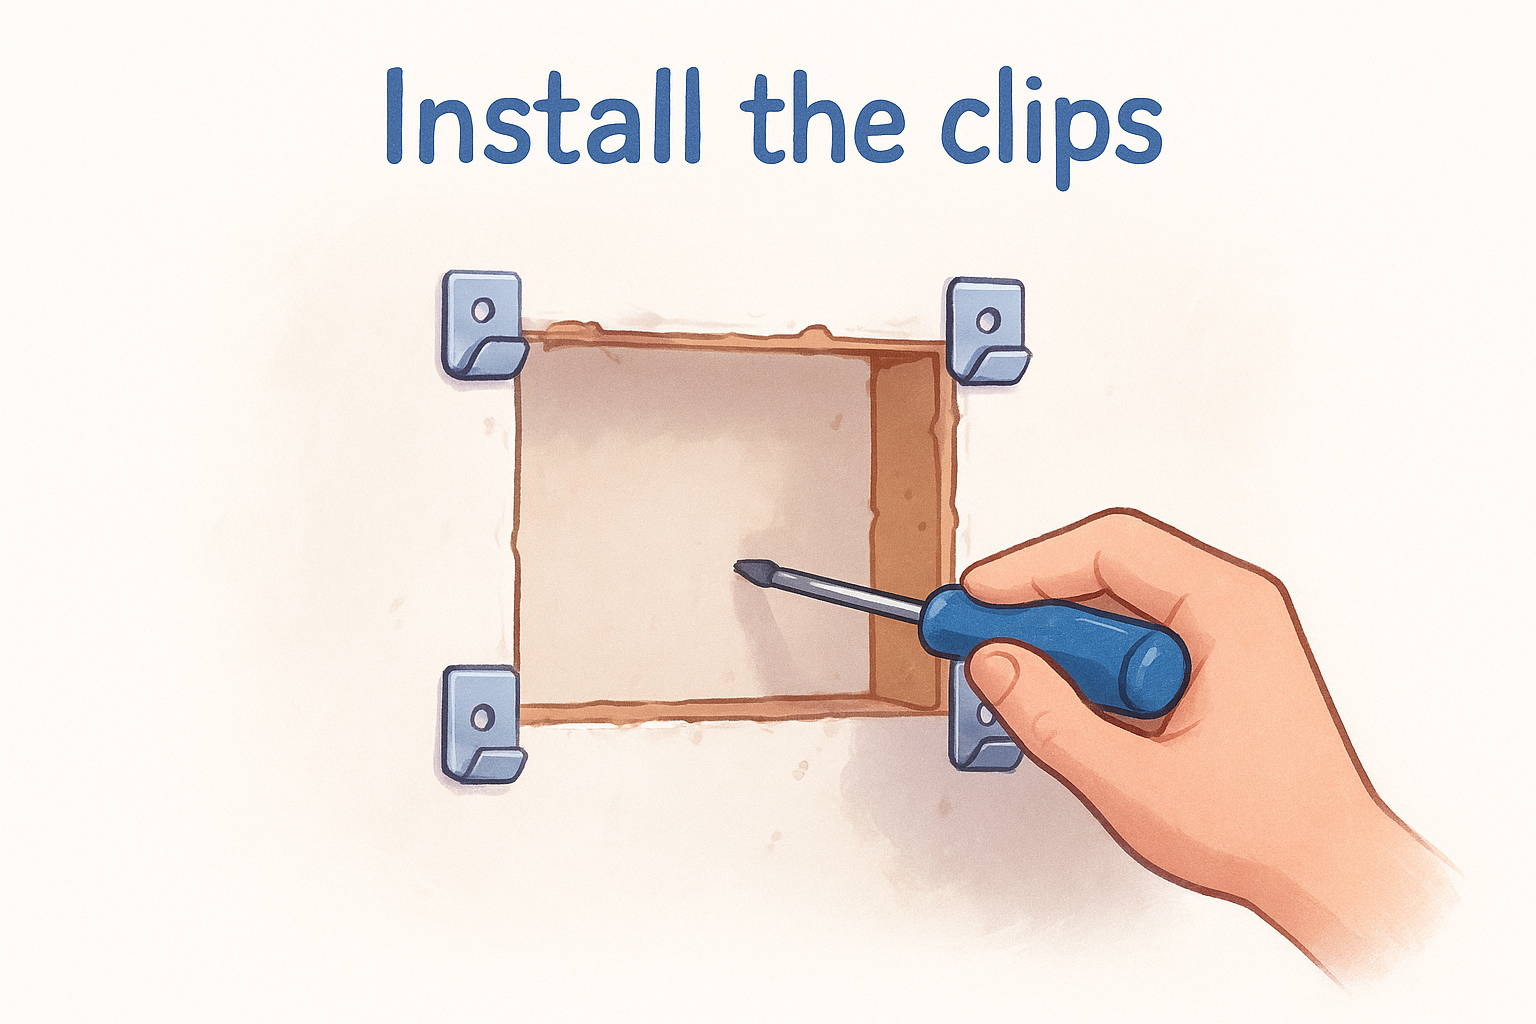
Install the clips

Slide one of your drywall patching clips onto each edge of the opening, centered, with the tab tucked behind the board. Drive a screw through the wall face and into the clip. Stop when the head sits just below the paper surface . A torn paper face will not hold mud.

Square edges and snug clips are what let the patch sit flush.

Openings wider than 8 inches need a second clip on each long side, spaced evenly. Designs differ a little between brands, so follow the package instructions for screw placement. Before you move on, press on each clip. If one wiggles, pull it and reseat it now, because a loose clip is much harder to fix once the patch is in.

Step 3. Fit the patch and secure it with screws

With the clips seated, you can cut the patch. This takes about fifteen minutes , and the goal is a piece that drops in flush with the wall face .

Cut the patch to size

Measure the opening at its widest and tallest points, then transfer those numbers to your scrap board. Cut the patch 1/8" smaller than the opening on every side. That gap lets it drop in without binding and leaves room for compound later. Protect the paper face, because torn paper soaks up mud and shows through paint.

Set the patch and drive the screws

Test fit before you fasten anything. If the patch sticks, shave the edge with a utility knife instead of forcing it. Then work through these steps:

  1. Hold the patch flush with the wall.
  2. Drive a 1-1/4" screw through the patch into each of your drywall patching clips .
  3. Sink every head just below the paper, as you did on the clips.
  4. Run your palm across the seam to feel for high or low spots.

A patch that sits a hair below the wall is easy to fix, but one that sits proud is not.

Fix problems now, not after taping. If an edge sits proud, back the screw out a quarter turn and press the patch in. If a corner sags, add one more screw into the nearest clip. A patch that moves when you push on it needs attention before any mud goes on, so press every side firmly and make sure nothing flexes.

Step 4. Tape, mud, sand, and finish the repair

Now the patch has to disappear. Plan on three thin coats of compound spread over two days , because each coat must dry fully before the next one goes on.

Tape the seams

Start by pressing paper or mesh tape over every seam where the patch meets the wall. Mesh tape is easier for beginners, while paper tape makes a stronger joint. Spread a thin layer of compound over the tape with your 6" knife and dab each screw head too. Scrape the surface smooth and let it dry.

Build up the mud and sand it

The goal is a wide, thin repair that blends into the wall. Work in this order:

  1. Apply the second coat with a 10" knife, feathering the edges 3 to 4 inches past the first coat.
  2. Let it dry, then knock off any ridges with the knife.
  3. Apply a third, thinner coat that reaches slightly wider.
  4. Sand with a 120-grit sponge until your palm cannot find the seam.

Three thin coats beat one thick coat every time.

Sanding makes fine dust, so keep the mask on and wipe the wall with a damp cloth afterward.

Prime, texture, and paint

Finally, seal the repair with drywall primer. Bare compound soaks up paint and leaves a dull square that shows in side light. If your wall is textured, use a spray can to match orange peel or knockdown before you paint. Once the paint dries, your drywall patching clips are buried and no one will know they are there.

Getting a clean repair without cutting to the studs

Drywall patching clips let you fix a medium hole with a saw, a drill, and an afternoon instead of a wall teardown. The recipe is the same every time: square the opening, seat the clips, set a patch cut 1/8" small, and finish with three thin coats of mud .

Most failed repairs trace back to two things, the wrong clip thickness or rushed drying time. Match 1/2" clips to walls and 5/8" clips to ceilings and garage walls, and your drywall patching clips will hold for years.

Some holes are not a weekend job. Large openings, water-damaged board, and older ceilings with suspect texture deserve a pro . If that sounds like your wall, our crew can handle drywall repair and patching across the Sacramento Valley. We offer free in-home estimates , and you pay nothing until the work is done.

Recent Posts

By cinchweb • October 8, 2026
Compare 6 Chicago pros for ceiling drywall repair near me, see prices ($250–$1,500 patches to sections), and learn how to vet quotes before paying.

By cinchweb • October 7, 2026
See 2026 California asbestos abatement cost per square foot by material, plus a 1,000 sq ft example, removal vs. encapsulation, and how to read a quote.

By cinchweb • October 5, 2026
Find the best joint compound for skim coating: compare lightweight, all-purpose, Plus 3, Easy Sand and Durabond, plus how to mix, apply and sand.
By cinchweb • October 5, 2026
Is vertical drywall installation okay? Learn when it works, how to hang sheets step by step, common mistakes, and when to hire a pro.
By cinchweb • October 5, 2026
Learn how to patch drywall outlet hole damage safely: match the patch to the gap, then finish with thin coats and primer for a seamless wall.
By cinchweb • October 2, 2026
Drywall ceiling repair near me? Compare 5 contractors, including Super Shooters, and learn what to ask about estimates, warranties and asbestos.

By cinchweb • October 1, 2026
Learn how to patch a nail hole in drywall with tools under $15, spackle, sanding, priming, and painting tips for a seamless, lasting repair.
By cinchweb • September 30, 2026
See real cost ranges, timelines, and what's included in drywall installation services, plus contractor red flags Sacramento Valley homeowners should avoid.
By cinchweb • September 30, 2026
Learn DIY wall plaster crack repair: identify crack types, prep, mesh tape, texture matching, and when to call Super Shooters for a free estimate.

Show More
