
October 5, 2026
Patching Outlet Holes in Drywall: How to Get Smooth Walls
An outlet box cut a half inch too wide leaves an ugly gap around the cover plate. An old, unused opening leaves a dark hole in the middle of your wall. Either way, you want to know how to patch drywall outlet hole problems without leaving a bump or a visible square under the paint.
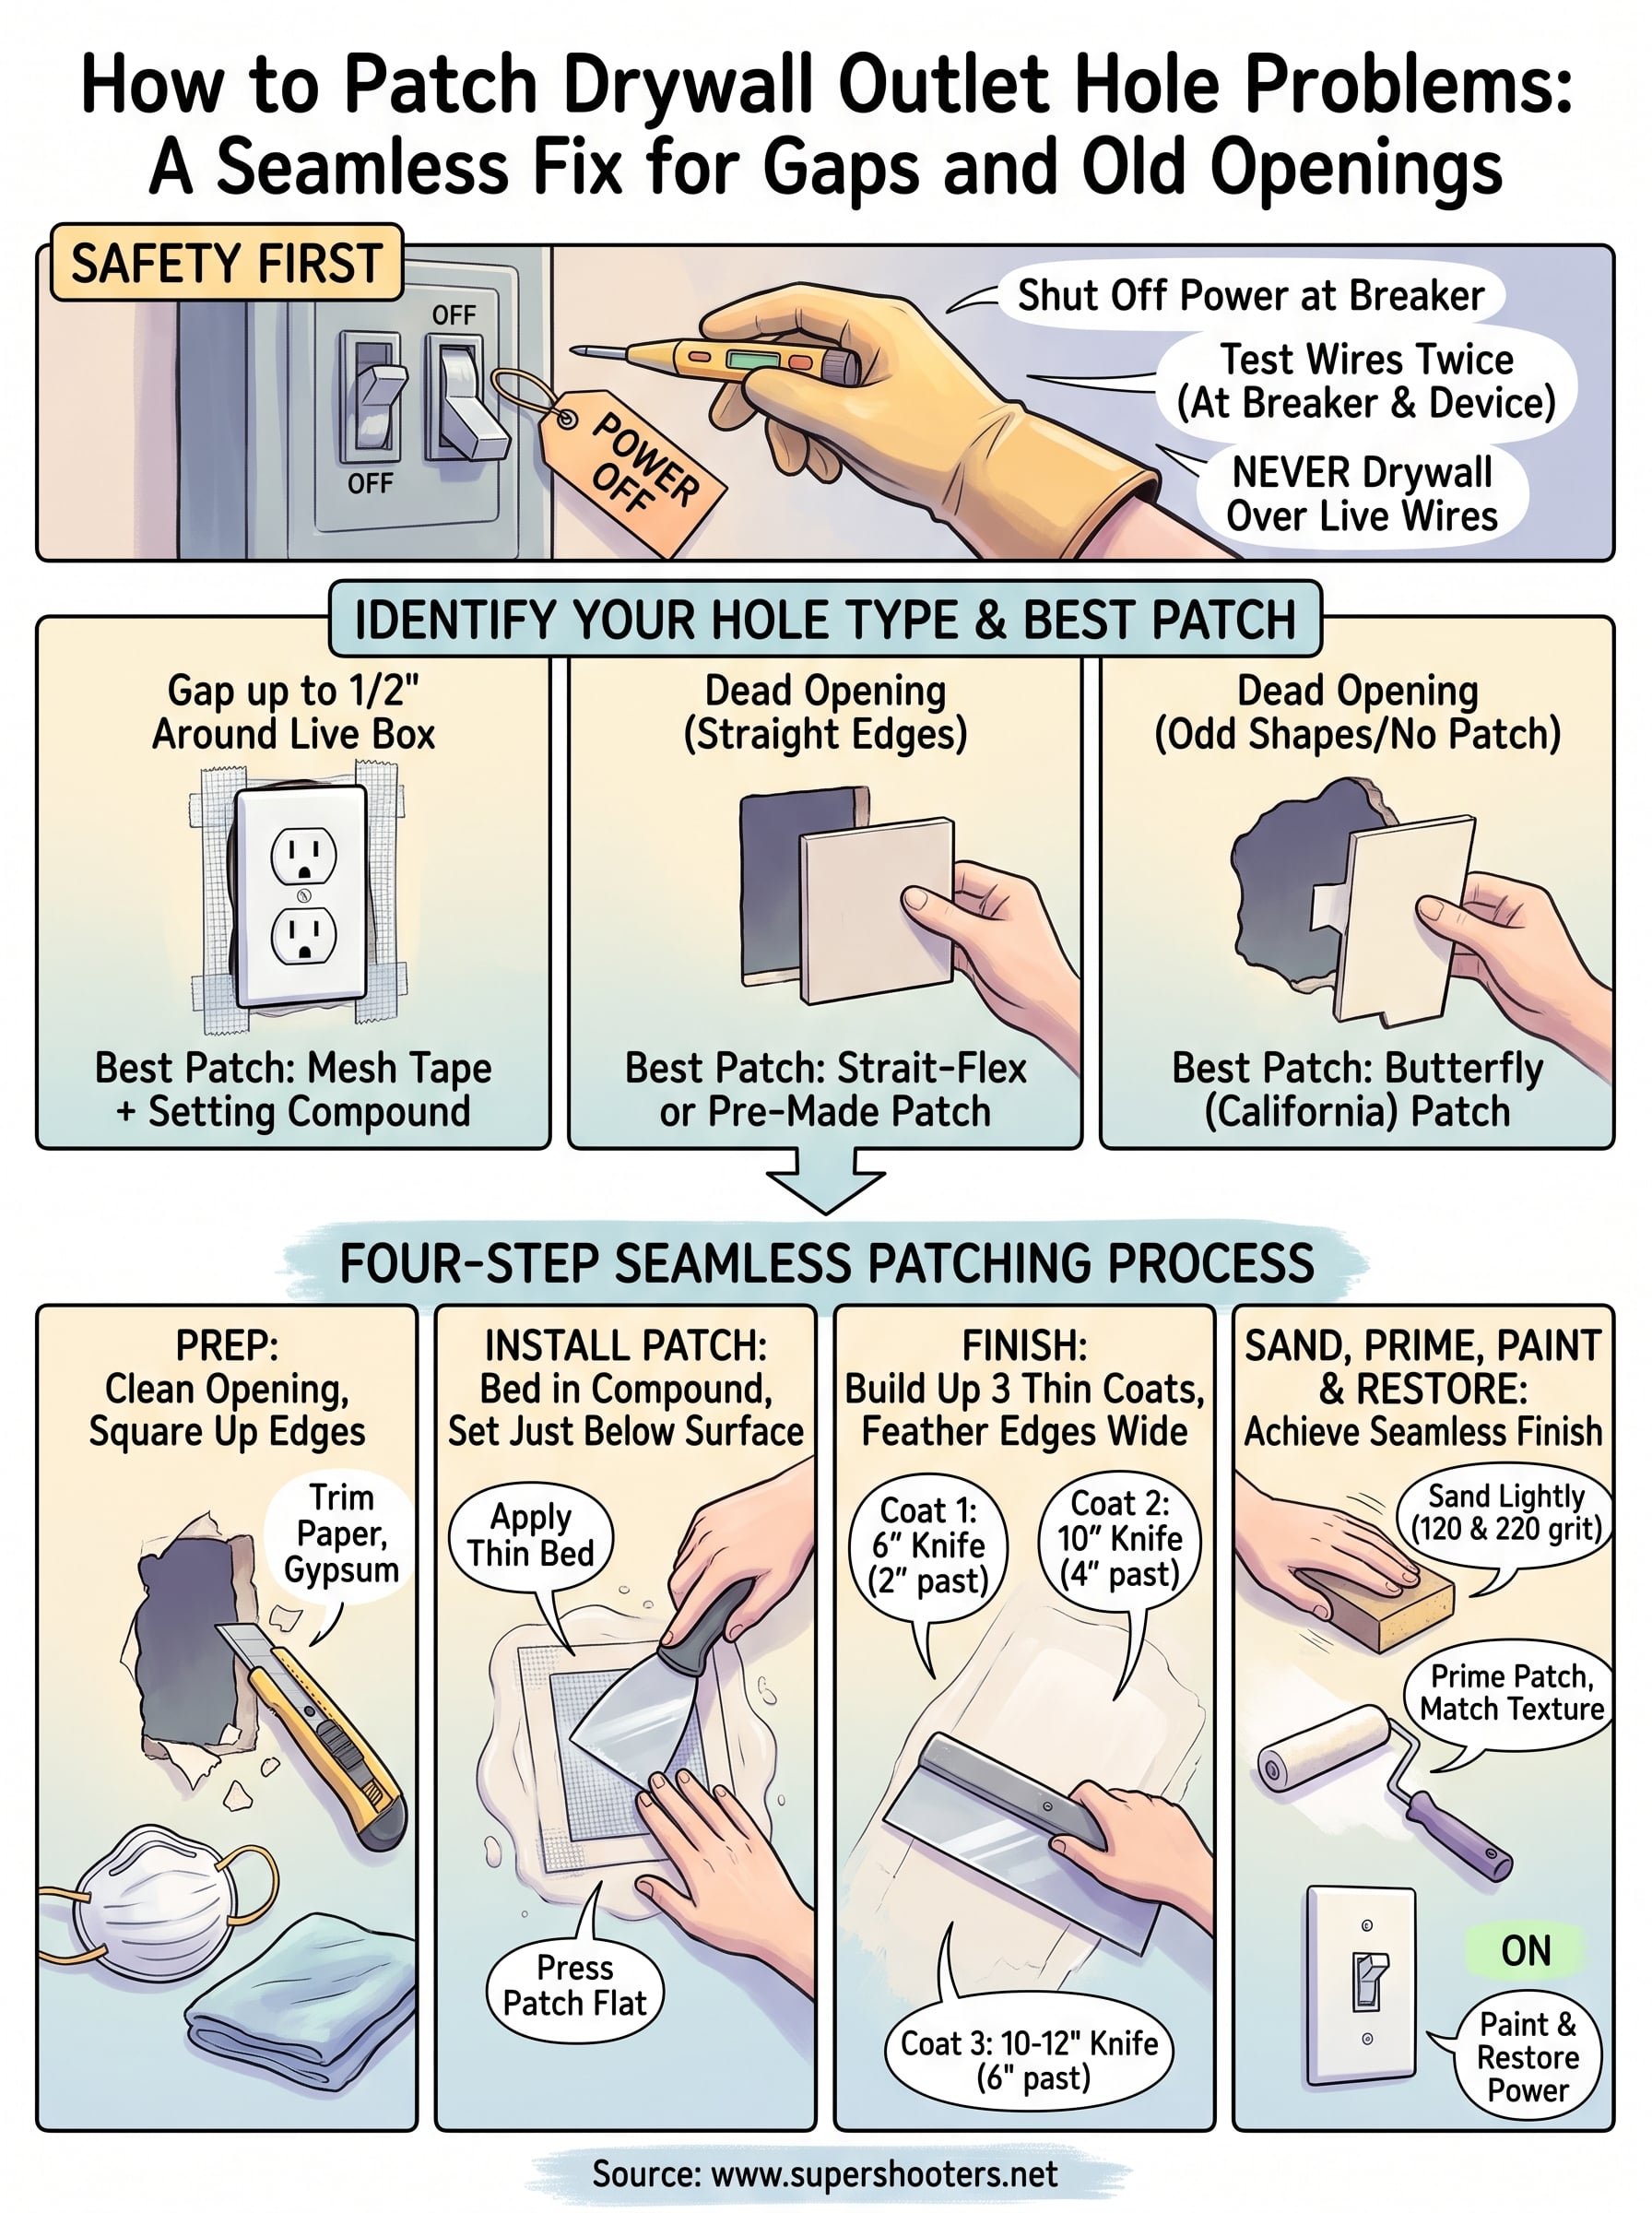
Here is the short answer. For a small gap around a live outlet, use setting-type joint compound and a strip of mesh tape. For a dead opening, use a butterfly (California) patch or a Strait-Flex patch , then finish with three thin coats of compound. Always shut off power at the breaker before you touch the box.
At Super Shooters, we have repaired drywall in Sacramento Valley homes for over 30 years and finished more than 10,000 projects. This guide walks you through the tools you need, each patch method step by step, and how to sand and feather the edges so the wall looks seamless once it is painted or textured.
Before you patch: outlet hole types and safety
Outlet repairs fall into two camps, and the camp you are in decides your method. Spend five minutes on diagnosis and safety now, and the patch itself goes fast. Skip it, and you may bury a problem behind the wall.
Identify your hole type
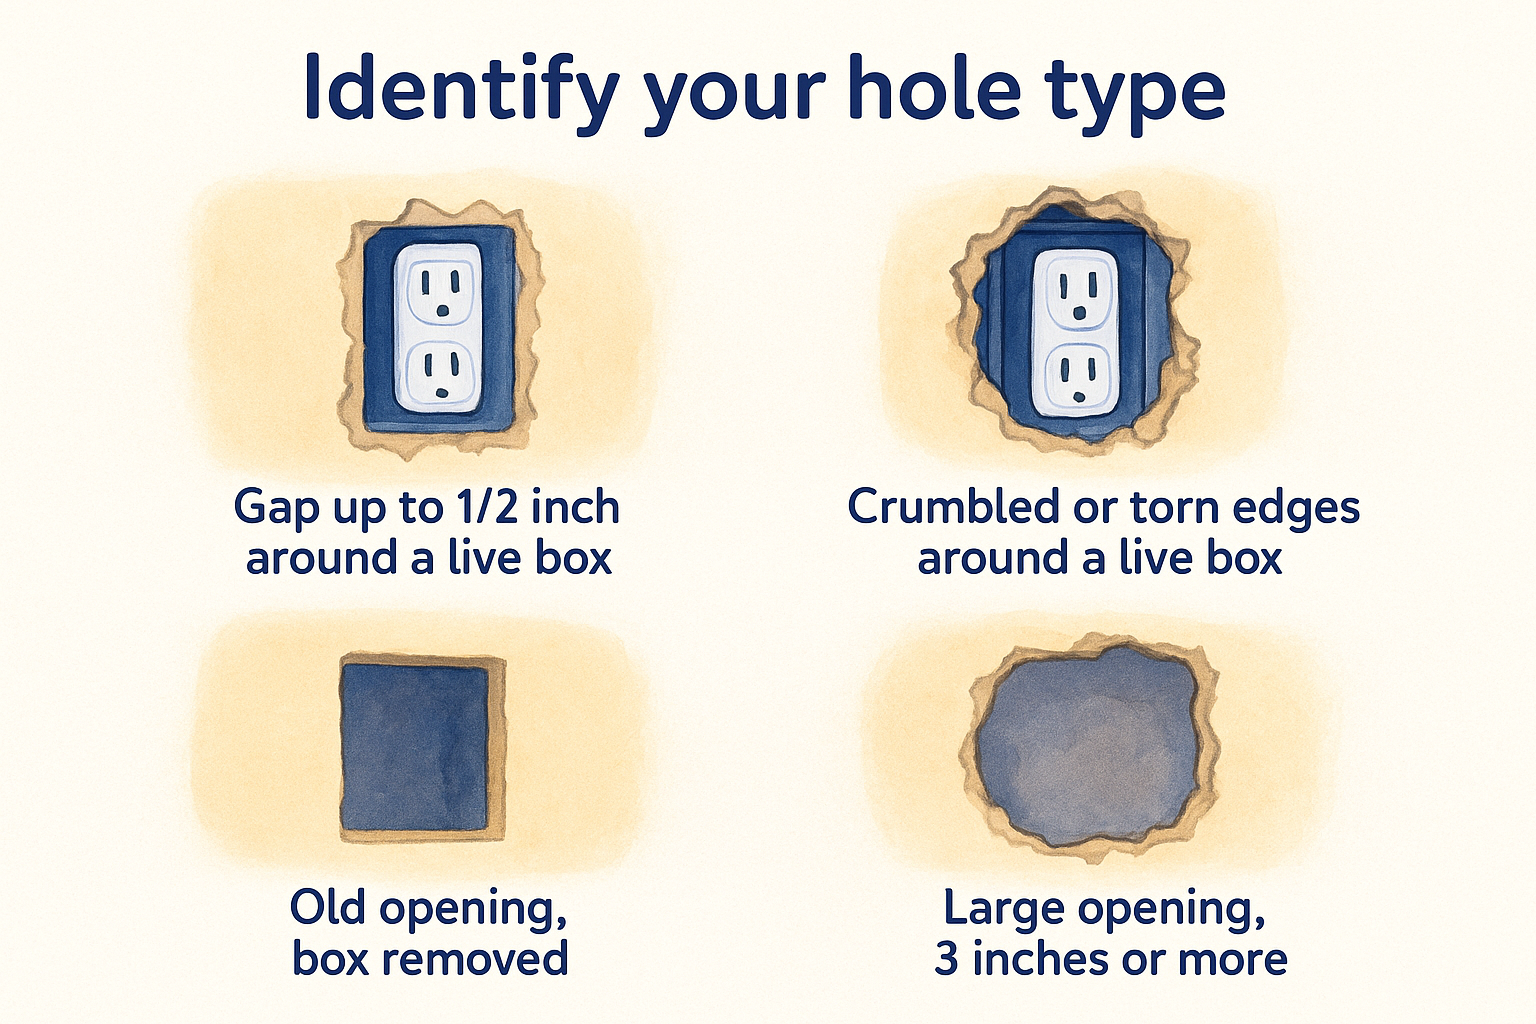
Look at the opening before you buy anything. A gap around a box you still use needs a different fix than a hole where a box used to be. Patching outlet holes in drywall works best when the patch matches the hole , and the table below shows the usual pairings.
| Hole type | Typical cause | Best patch |
|---|---|---|
| Gap up to 1/2 inch around a live box | Cutout traced too loosely | Setting-type compound and mesh tape |
| Crumbled or torn edges around a live box | Box pulled loose, rough cutting | Mesh patch plus compound |
| Old opening, box removed | Outlet relocated or abandoned | Butterfly (California) patch or Strait-Flex patch |
| Large opening, 3 inches or more | Old work box or cable pulled out | Backing strips and a drywall plug |
Electrical code also sets a limit. The National Electrical Code (section 314.21) says gaps at the edge of a box in a drywall surface must not exceed 1/8 inch . If your gap is wider, fill it. Do not just cover it with a bigger plate.
Safety rules that come first
Turn off the breaker, then confirm with a non-contact voltage tester. Do not trust the label on the panel. Test the outlet itself, and test every outlet in the same box, because one box can be fed by two circuits .
Removing an outlet for good raises a second issue. Live wires cannot simply disappear into the wall. They must end in a junction box with an accessible cover. If you are unsure, hire a licensed electrician before you patch anything.
Never drywall over a live box or loose wires. Make the electrical safe first, then patch.
Homes built before the mid-1980s add one more concern. Old joint compound and texture can contain asbestos. If your house is from that era, test a sample before you sand , since sanding sends fibers into the air. We handle asbestos abatement and testing for Sacramento Valley homeowners, so call us if the results come back positive.
Tools and materials to gather
Having everything within reach keeps the compound from setting before you use it. For most outlet patches you need:
- Non-contact voltage tester
- Utility knife and drywall saw
- 6-inch and 10-inch taping knives
- Setting-type compound (20 or 45 minute) and all-purpose compound
- Self-adhesive mesh tape
- A butterfly patch or Strait-Flex patch for dead openings
- Scrap 1/2 inch drywall for larger holes
- 120 and 220 grit sanding sponges
- Dust mask, primer, and paint or texture
Step 1. Cut power and prep the opening
Every good patch starts with an opening that is dead, clean, and solid. This step takes about 15 minutes, and it decides whether your compound bonds or cracks a week later. It applies whether you are fixing a loose cutout or learning how to patch an old outlet hole in drywall.
Kill the power and strip the hardware
Flip the breaker off, then confirm with your voltage tester at the outlet itself. Once the box is dead, work through these steps:
- Unscrew the cover plate and set it aside.
- Remove the two screws holding the outlet and pull it forward.
- Test the wires again before you touch them.
- Wrap electrical tape around the sides of the outlet so the terminals cannot touch the box.
Test the wires twice: once at the breaker, once at the device.
If you are keeping the outlet, leave it wired and let it hang in the box while you work. If the opening is dead, have an electrician cap the wires and close the box before you go any further.
Clean up the opening
Trim away torn paper, crumbled gypsum, and loose chunks with a utility knife. Keep cutting until you reach solid, firm board . Anything soft will flex under the patch and show up as a crack after painting.
Vacuum the dust out of the gap, then wipe the edges with a barely damp rag and let them dry. Mesh tape and compound grip clean paper far better than dusty paper. Peel any flaking paint around the cutout too.
Finally, measure the gap with a ruler. A gap under 1/2 inch around a live box only needs tape and compound. For a dead opening, square up the edges with your drywall saw, because butterfly and Strait-Flex patches sit best against straight, tidy sides.
Step 2. Choose the right patch for your hole
Your measurements from Step 1 point to one of three fixes. Picking the right one saves you an extra coat of compound and keeps the patch from telegraphing through the paint .
Match the patch to the opening
Knowing how to patch an outlet hole in drywall comes down to two questions. How wide is the gap, and is there a live box behind it? The table sorts the three methods side by side.
| Patch | Best for | Difficulty | Set time |
|---|---|---|---|
| Mesh tape and setting compound | Gap under 1/2 inch around a live box | Easy | 20 to 45 minutes |
| Strait-Flex patch | Dead opening with straight edges | Easy | 20 to 45 minutes |
| Butterfly (California) patch | Odd shapes or no pre-made patch on hand | Moderate | 1 to 2 hours with glue |
Quick decision rules
Use these rules if you are still unsure which patch to buy:
- Live box, small gap: mesh tape and setting compound.
- Dead 2 by 4 inch opening: a Strait-Flex patch is the fastest route.
- Irregular hole or torn edges: cut a butterfly patch from scrap 1/2 inch drywall.
- Opening of 3 inches or more: add backing strips and a drywall plug first.
Match the patch to the hole: tape for gaps, a pre-made or butterfly patch for dead openings.
Buy the patch before you mix any compound. A pre-made Strait-Flex patch costs a few dollars and removes most of the cutting, while a butterfly patch costs nothing if you already have a drywall scrap. Either one beats stuffing a dead hole with foam or paper, which shrinks and cracks within weeks.
Step 3. Install the patch
Here is how to patch drywall outlet hole damage with each method. Mix compound in small batches , because setting-type powder hardens in 20 to 45 minutes whether you are ready or not. With every method, keep the patch slightly below the wall surface , so the finish coats can bring it flush.
Press every patch flat into a thin bed of compound, and stop just below the wall surface.
Mesh tape and setting compound for a live box
This is the simplest way of patching an outlet hole in drywall when the box stays in use. Your goal is to bridge the gap and lock the edges so they cannot crumble again.
- Press strips of self-adhesive mesh tape over the gap, overlapping the sound drywall by about 1 inch.
- Mix a small batch of 20 minute setting compound to a peanut butter texture.
- Press compound through the mesh with a 6-inch knife, filling the gap completely.
- Scrape the surface almost flush, then let it set.
Strait-Flex patch for a dead opening
A pre-made patch removes most of the guesswork. Center it over the opening and press the adhesive down firmly, working from the middle toward the edges. Air pockets under the patch will bubble later.
- Peel the backing and set the patch squarely over the hole.
- Smooth it flat with your taping knife.
- Spread a thin layer of compound over the patch, feathering 2 inches past each edge .
Butterfly (California) patch for odd shapes
This patch costs nothing if you have a scrap of 1/2 inch drywall. Cut a piece about 2 inches larger than the hole on every side. Score the paper face, snap off the gypsum, and peel it away so only a 1 inch paper flange remains on the front.
- Trim the gypsum core so it drops into the hole with a tight fit.
- Spread compound on the flange and around the hole edges.
- Press the patch in until the flange lies flat against the wall.
- Smooth a thin skim coat over the flange and let it dry fully, up to two hours.
Step 4. Finish, texture and paint for a seamless wall
Learning how to patch drywall outlet hole damage is mostly learning how to finish it. The patch itself is only the base. Plan on three thin coats of compound spread over a day, because thick coats crack, shrink, and force heavy sanding later.
Build up thin coats
Let the first coat dry or set completely, then scrape off any ridges with your knife. Each new coat should be wider than the last, which feathers the edges into the wall. Use setting compound for the first coat and all-purpose compound for the last two.
| Coat | Knife | Extends past patch |
|---|---|---|
| 1 (from Step 3) | 6-inch | 2 inches |
| 2 | 10-inch | 4 inches |
| 3 | 10 or 12-inch | 6 inches |
Sand, prime and match texture
Sand with a 120 grit sponge, then switch to 220 for the edges. Use light, circular strokes and wear a dust mask . Hold a flashlight flat against the wall and look across the patch. Any shadow you see is a ridge or a dip, so add a thin coat and sand again.
Prime next, even on a small patch. Bare compound soaks up paint differently than the wall around it, and the result is a dull square called flashing . One coat of drywall primer seals the patch so the paint dries evenly.
Thin coats, wide feathering, and primer hide a patch better than any special tool.
If your wall is textured, match its texture before you paint. Spray-can texture works for orange peel, and a damp sponge or knockdown knife handles the rest. Test on cardboard first.
Paint and restore the outlet
Roll on two coats of your wall color, and extend the paint past the primer into the surrounding wall. Let it dry fully. Then tighten the outlet back into its box, screw on the cover plate, and switch the breaker on. Test the outlet before you put the tools away.
Getting a wall that looks untouched
A good outlet patch comes down to four habits. Kill the power and clean the opening , match the patch to the hole, set it just below the surface, and finish with thin, wide coats of compound. Prime and match the texture, and the repair disappears. Done this way, the job takes an afternoon and a few dollars in materials.
Some jobs go beyond a weekend fix. Water-stained walls , long settlement cracks, or old openings in several rooms call for a steady hand and the right tools. Our team has done this work for over 30 years across the Sacramento Valley. Request a free estimate for professional drywall repair and patching, and we will look at your wall and quote the job with no payment due until it is finished.