June 19, 2026
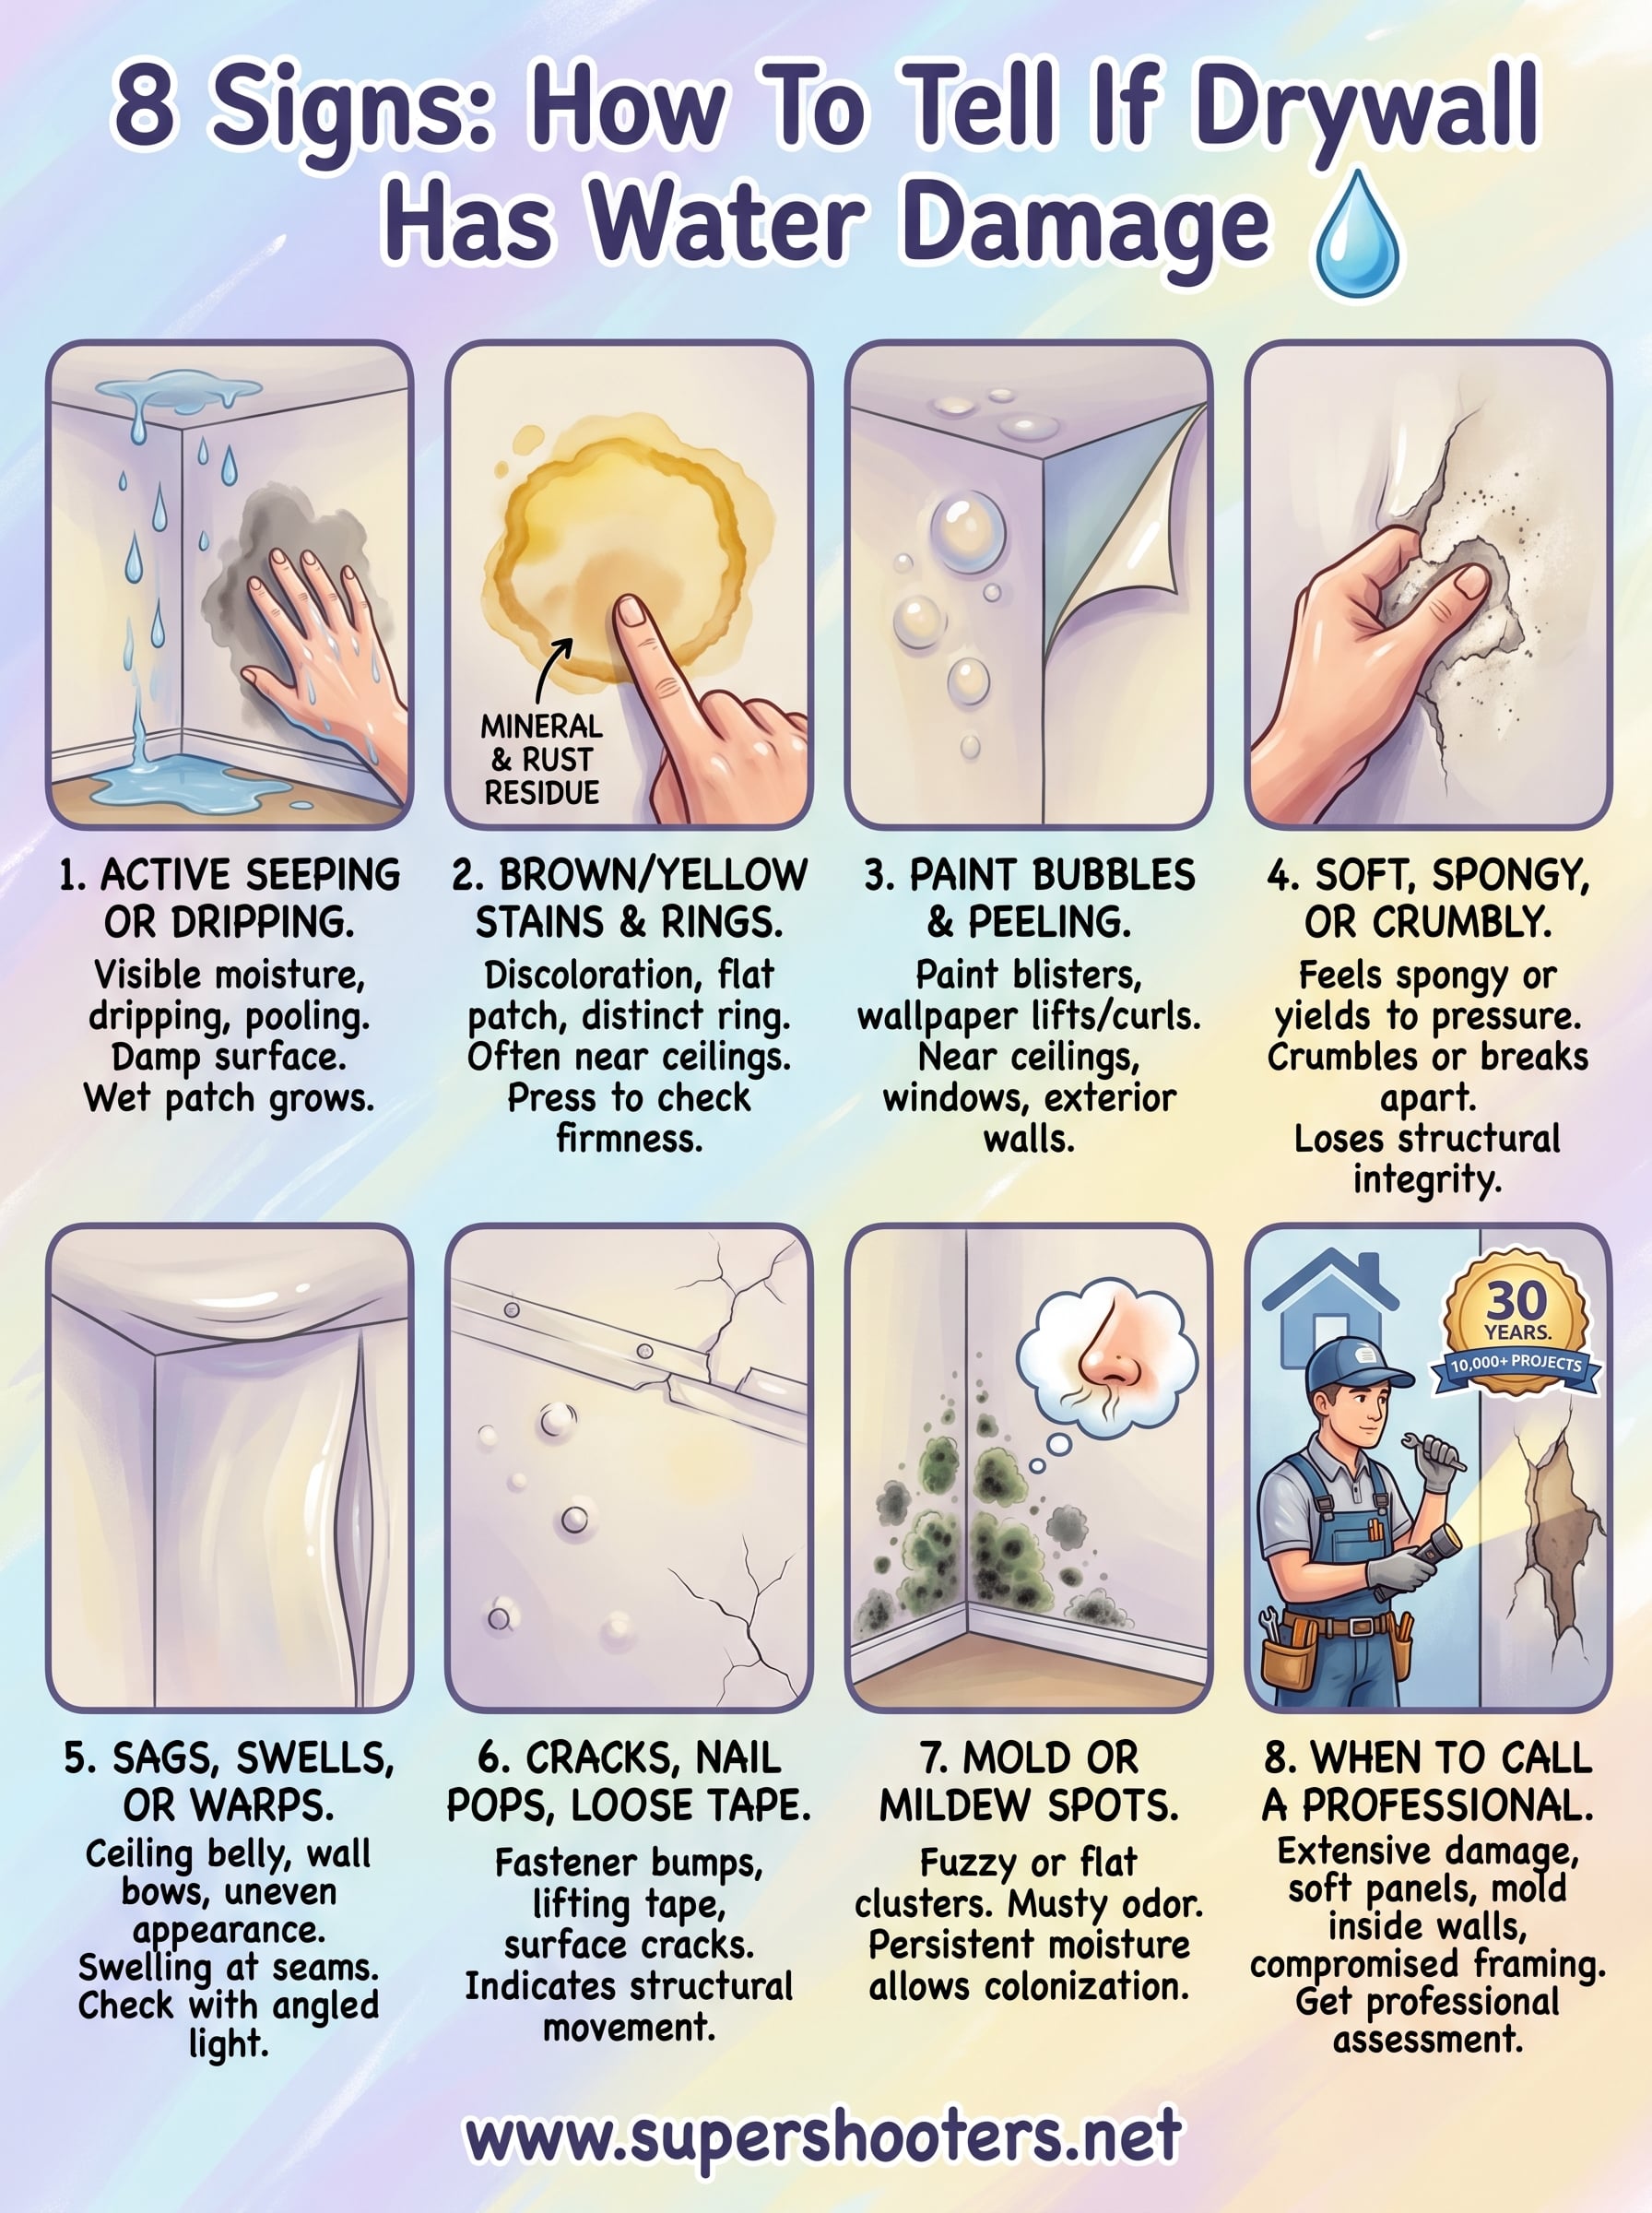
8 Signs: How To Tell If Drywall Has Water Damage In Walls
Water damage doesn't always announce itself with a dramatic ceiling collapse or a puddle on the floor. More often, it starts quietly, a faint discoloration here, a soft spot there, and by the time you notice, the damage behind your walls may already be significant. Knowing how to tell if drywall has water damage early can save you thousands of dollars and prevent serious issues like mold growth and structural deterioration .
The tricky part is that not every stain or crack means active water damage. Some signs point to old, resolved leaks. Others signal an ongoing problem that's getting worse by the hour. Understanding the difference matters because your next step, repair, replacement, or a call to a professional , depends entirely on what you're actually dealing with.
At Super Shooters, we've repaired and replaced water-damaged drywall across the Sacramento Valley for over 30 years, completing more than 10,000 residential projects . We've seen every stage of water damage, from barely noticeable warning signs to walls that needed to be gutted down to the studs. This guide walks you through eight specific signs to look for, what each one tells you about the severity of the problem, and when it's time to bring in a professional for restoration.
1. Water is actively seeping or dripping
Active water intrusion is the most urgent sign on this list. When water is visibly moving through your drywall, whether it's dripping from a ceiling, running down a wall, or pooling at the base of a surface , you're not dealing with a historical problem. You have a live leak that's causing damage in real time, and every hour you wait makes the repair more expensive.
What you'll notice
The most obvious indicator is visible moisture on the drywall surface itself . You might see water beading up, a wet sheen across a section of wall, or actual drips falling from a ceiling. In some cases, you'll notice a dark, spreading wet patch that grows larger over a short period of time. Touch the surface and your hand will come away damp. The drywall paper facing may also begin to separate or peel where the water saturation is heaviest.
Quick checks to confirm
Before you call anyone, do a quick walk-through to narrow down the source. Check the room directly above the wet area if you're dealing with a ceiling leak. Look for an overflowing appliance, a burst pipe, or a roof issue. For wall leaks, run your hand along the full height of the affected area to find where the moisture is most concentrated, which points you toward the entry point.
If the wet area is growing while you watch it, shut off the water supply to your home immediately and contact a plumber before addressing the drywall.
You should also check adjacent walls and the floor below the affected section. Water travels along framing and insulation before it exits, so the visible wet spot may not be directly below the actual source of the leak.
What to do next
Do not attempt to patch or paint over actively wet drywall. The material needs to dry completely before any repair work begins, otherwise you'll trap moisture inside the wall cavity and create a perfect environment for mold growth. Once the leak source is fixed, use fans and a dehumidifier to dry the area thoroughly. If the drywall has softened, buckled, or started to crumble , it needs full replacement rather than a surface repair.
2. Brown or yellow stains and water rings show up
Stains are one of the most reliable ways to tell if drywall has water damage, and they're often the first thing homeowners spot. A brown or yellow discoloration forms when water soaks into the drywall and evaporates, leaving behind mineral deposits and rust-colored residue from whatever the water passed through. The result is a flat, discolored patch or a distinct ring where the water's edge dried against the surface.
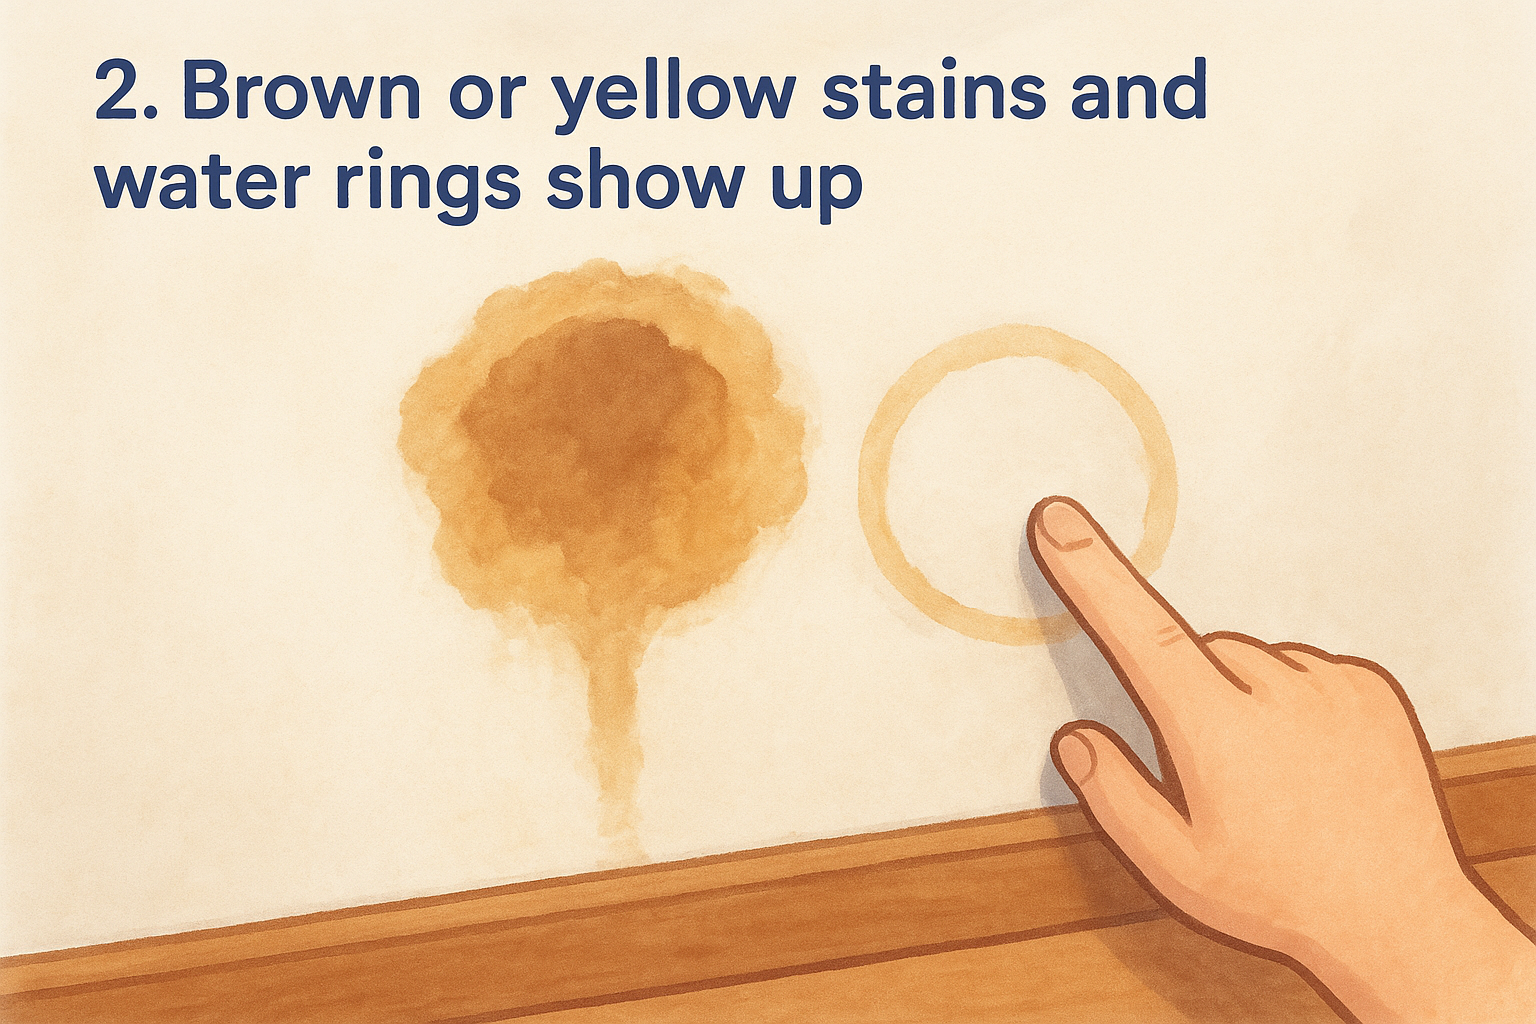
What you'll notice
These stains typically appear as irregular brown, tan, or yellow patches that feel slightly rough or papery to the touch. You'll often see a darker ring around the outer edge , which is where the water repeatedly dried and concentrated its minerals. Ceiling stains are especially common directly below bathrooms or in homes with aging roofs.
A single stain ring usually indicates a past leak. Multiple overlapping rings suggest the problem has occurred more than once and may still be active.
Quick checks to confirm
Press the center of the stain with your fingertips. Dry, firm drywall beneath the stain points to an old, resolved leak. If the surface feels soft or gives slightly under pressure, moisture is still present and the problem hasn't stopped. You can also track whether the stain is expanding by lightly marking its outer edge with a pencil and checking it again after 24 hours.
What to do next
Don't paint over a stain before confirming the source is fully fixed. Standard paint and primer will not seal water damage , and the stain will bleed through within weeks. Once the leak is resolved and the drywall has dried completely, apply a stain-blocking primer before repainting to stop the discoloration from returning.
3. Paint bubbles or wallpaper peels
When water gets into drywall, it breaks down the bond between the paper facing and the gypsum core . That separation pushes outward, and what you see on the surface is paint that blisters into bubbles or wallpaper that lifts, curls, and peels away from the wall. This sign tells you water damage has already progressed past the surface level and reached the underlying drywall material .
What you'll notice
You'll spot round or irregular bubbles in painted surfaces, ranging from small blisters to raised patches several inches wide. With wallpaper, the edges lift first, followed by full sections pulling away from the wall. Both signs tend to appear near ceilings, around windows, or along exterior walls where moisture intrusion is most likely to enter .
Bubbling paint that reappears after repainting is a strong indicator that the moisture source has not been resolved.
Quick checks to confirm
Run your hand across the bubbled or peeled area and press gently. If the bubble pops and releases moisture, the drywall beneath is still wet and actively absorbing water. Dry bubbles that simply flatten under pressure suggest an older leak, though the drywall paper may already be compromised and require replacement regardless.
What to do next
Popping the bubbles and repainting will not fix the underlying problem. First, identify and eliminate the moisture source before touching the surface. If the drywall paper has separated or softened, that section of drywall needs to be cut out and replaced. Repainting over damaged paper produces a weak surface that won't hold finish work properly, no matter how many coats you apply.
4. Drywall feels soft, spongy, or crumbly
Texture changes are one of the most direct ways how to tell if drywall has water damage without cutting into a wall. Gypsum, the core material inside drywall , absorbs water readily and loses its structural integrity as it saturates. What starts as a firm, solid panel turns soft and weak, sometimes to the point where you can press your thumb through the surface with minimal force.
What you'll notice
The affected section will feel noticeably different from the surrounding wall when you press against it. Mild water damage produces a spongy, slightly yielding surface. More severe saturation causes the drywall to crumble at the edges or break apart when disturbed. You might also notice a powdery white residue at the surface, which is the gypsum core deteriorating after repeated wetting and drying cycles.
Soft drywall that feels damp to the touch means the moisture source is still active and causing ongoing damage behind the wall.
Quick checks to confirm
Press firmly across the entire suspected area , not just the center. Water spreads through drywall unevenly, so soft spots may be scattered rather than concentrated in one location. Run your knuckle across the surface as well. Hollow or dull sounds during a knock test indicate compromised gypsum that no longer has the density of healthy drywall.
What to do next
Soft or crumbly drywall cannot be repaired with joint compound or surface treatments. The damaged panels must be removed entirely and replaced with new drywall once the moisture source is corrected. Attempting to skim coat or patch over weakened material will result in finish work that fails quickly , often within a single season.
5. The wall or ceiling sags, swells, or warps
Physical deformation gives you one of the most visible ways how to tell if drywall has water damage has moved beyond surface staining. When gypsum absorbs enough water, panels lose structural rigidity and begin to shift , pulling away from framing, bowing outward, or sagging under their own weight.
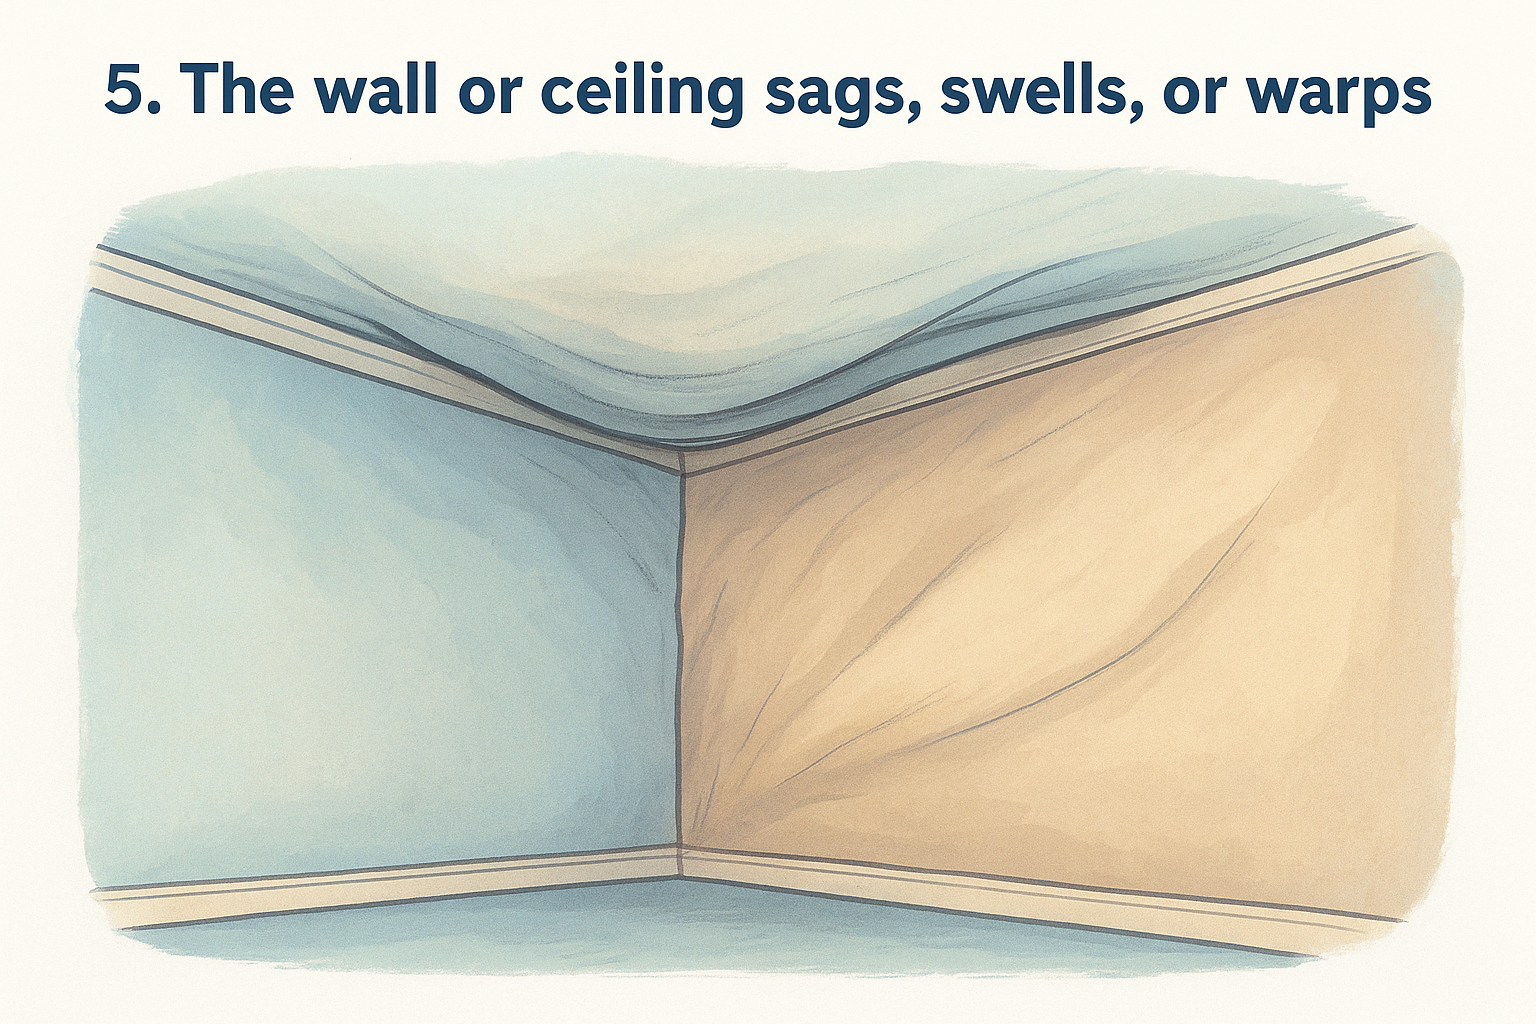
What you'll notice
A sagging ceiling typically shows as a gentle downward curve or a pronounced belly in what should be a flat surface. On walls, sections bow outward or develop a wavy, uneven appearance that wasn't there before, and swelling often concentrates along seams where two panels meet, creating a visible raised ridge.
A ceiling that sags and feels heavy when pressed may be holding pooled water above it. Pressing on it can trigger a sudden collapse.
Quick checks to confirm
Stand back and look across the surface at a low, raking angle with a flashlight held parallel to the wall or ceiling. This technique makes minor warping and swelling far more visible than looking straight on. Check the affected section's edges for separation from adjacent panels or trim as well.
Run your palm flat across the swollen or bowed area and note any sections where the drywall feels noticeably thicker or raised compared to the surrounding surface. Uneven thickness confirms the gypsum core has absorbed water and expanded.
What to do next
Warped or sagging drywall will not return to its original shape once it dries out. The damaged panels require complete replacement because the gypsum core's structural integrity is permanently compromised.
Before scheduling any replacement work, verify that all moisture sources are fully resolved and inspect the framing behind the damaged drywall for rot or weakening. Replacing drywall over deteriorated framing creates a new structural problem immediately.
6. Cracks, nail pops, or loose tape seams appear
Structural movement in your drywall often shows up as cracking, popping fasteners , or separating tape seams . These signs develop when water weakens the gypsum core and causes panels to shift against their fasteners and framing. Knowing how to tell if drywall has water damage through these physical changes helps you catch problems that surface staining alone won't reveal.
What you'll notice
Nail pops appear as small circular bumps where fasteners push outward through softened drywall that can no longer grip the screw or nail. Tape seams lift, bubble, or crack along the joint line, while irregular surface cracks spread outward from corners or across panel fields.
These signs concentrate around areas with the highest water exposure : ceiling joints near roof penetrations , walls adjacent to plumbing runs, and corners where two exterior walls meet.
Multiple nail pops grouped in the same area point to broader panel saturation rather than isolated fastener failure.
Quick checks to confirm
Press each nail pop firmly with your thumb. If the bump compresses and the surrounding surface feels soft , water has weakened the panel enough to allow fastener movement. Run your finger along every visible tape seam to feel for lifting edges or hollow sections where the compound has lost its bond to wet paper beneath.
What to do next
Repairing nail pops or re-taping seams over wet or damaged gypsum will not hold long-term. Fix the moisture source first, allow the wall to dry completely, and then assess whether the underlying panel is structurally sound before attempting any finish work. Panels that feel soft or crumbly need full replacement, not patching.
7. Mold or mildew spots appear on the surface
Mold growth is one of the clearest signs how to tell if drywall has water damage has been present long enough to create a secondary problem. Mold only grows where persistent moisture exists, so spotting it on your walls or ceiling tells you the drywall has been wet long enough for spores to colonize , which typically takes as little as 24 to 48 hours of sustained moisture.
What you'll notice
Black, green, or gray fuzzy or flat circular clusters signal mold growth on your drywall. Mildew tends to look powdery and lighter in color , often white or gray, while more aggressive mold strains produce darker, deeply stained patches that penetrate the drywall paper.
You'll most often find growth in corners, along ceiling edges near exterior walls, or on surfaces where air circulation is limited . A musty odor in the room , even without visible spots, often means mold is growing inside the wall cavity where you can't see it from the surface.
Mold growing only on the surface paint can sometimes be cleaned, but mold that has reached the drywall paper or gypsum core requires full panel replacement.
Quick checks to confirm
Look closely at any discolored patch to distinguish mold from simple dirt or dust. Mold spots typically have a slightly raised, textured surface and spread in irregular patterns rather than uniform streaks.
Wipe the area with a dry cloth and check back after a few days. Dirt stays gone, but mold returns quickly if the moisture source remains active. You can also check whether adjacent areas carry the same musty odor , which points to broader contamination behind the wall surface.
What to do next
Now you know how to tell if drywall has water damage across eight specific signs, from active dripping to mold growth. The pattern across all of them is the same: fix the moisture source first , confirm the area is fully dry, then assess whether the damaged panels need patching or full replacement. Skipping either of those steps produces repairs that fail quickly and cost more to redo.
Some damage is straightforward to address, but water-damaged drywall often hides more than the surface shows. Soft panels, mold inside the wall cavity, and compromised framing require professional assessment before any finishing work begins. Attempting surface repairs over hidden structural damage leads to bigger problems within months.
If you're in the Sacramento Valley and the damage is beyond a basic patch, the team at Super Shooters has handled water-damaged walls and ceilings for over 30 years across more than 10,000 projects . Get a free in-home estimate and let us assess exactly what your walls need. Contact us today to schedule professional drywall repair and patching at your home.
Recent Posts