
July 28, 2026
How to Test Popcorn Ceiling for Asbestos Safely
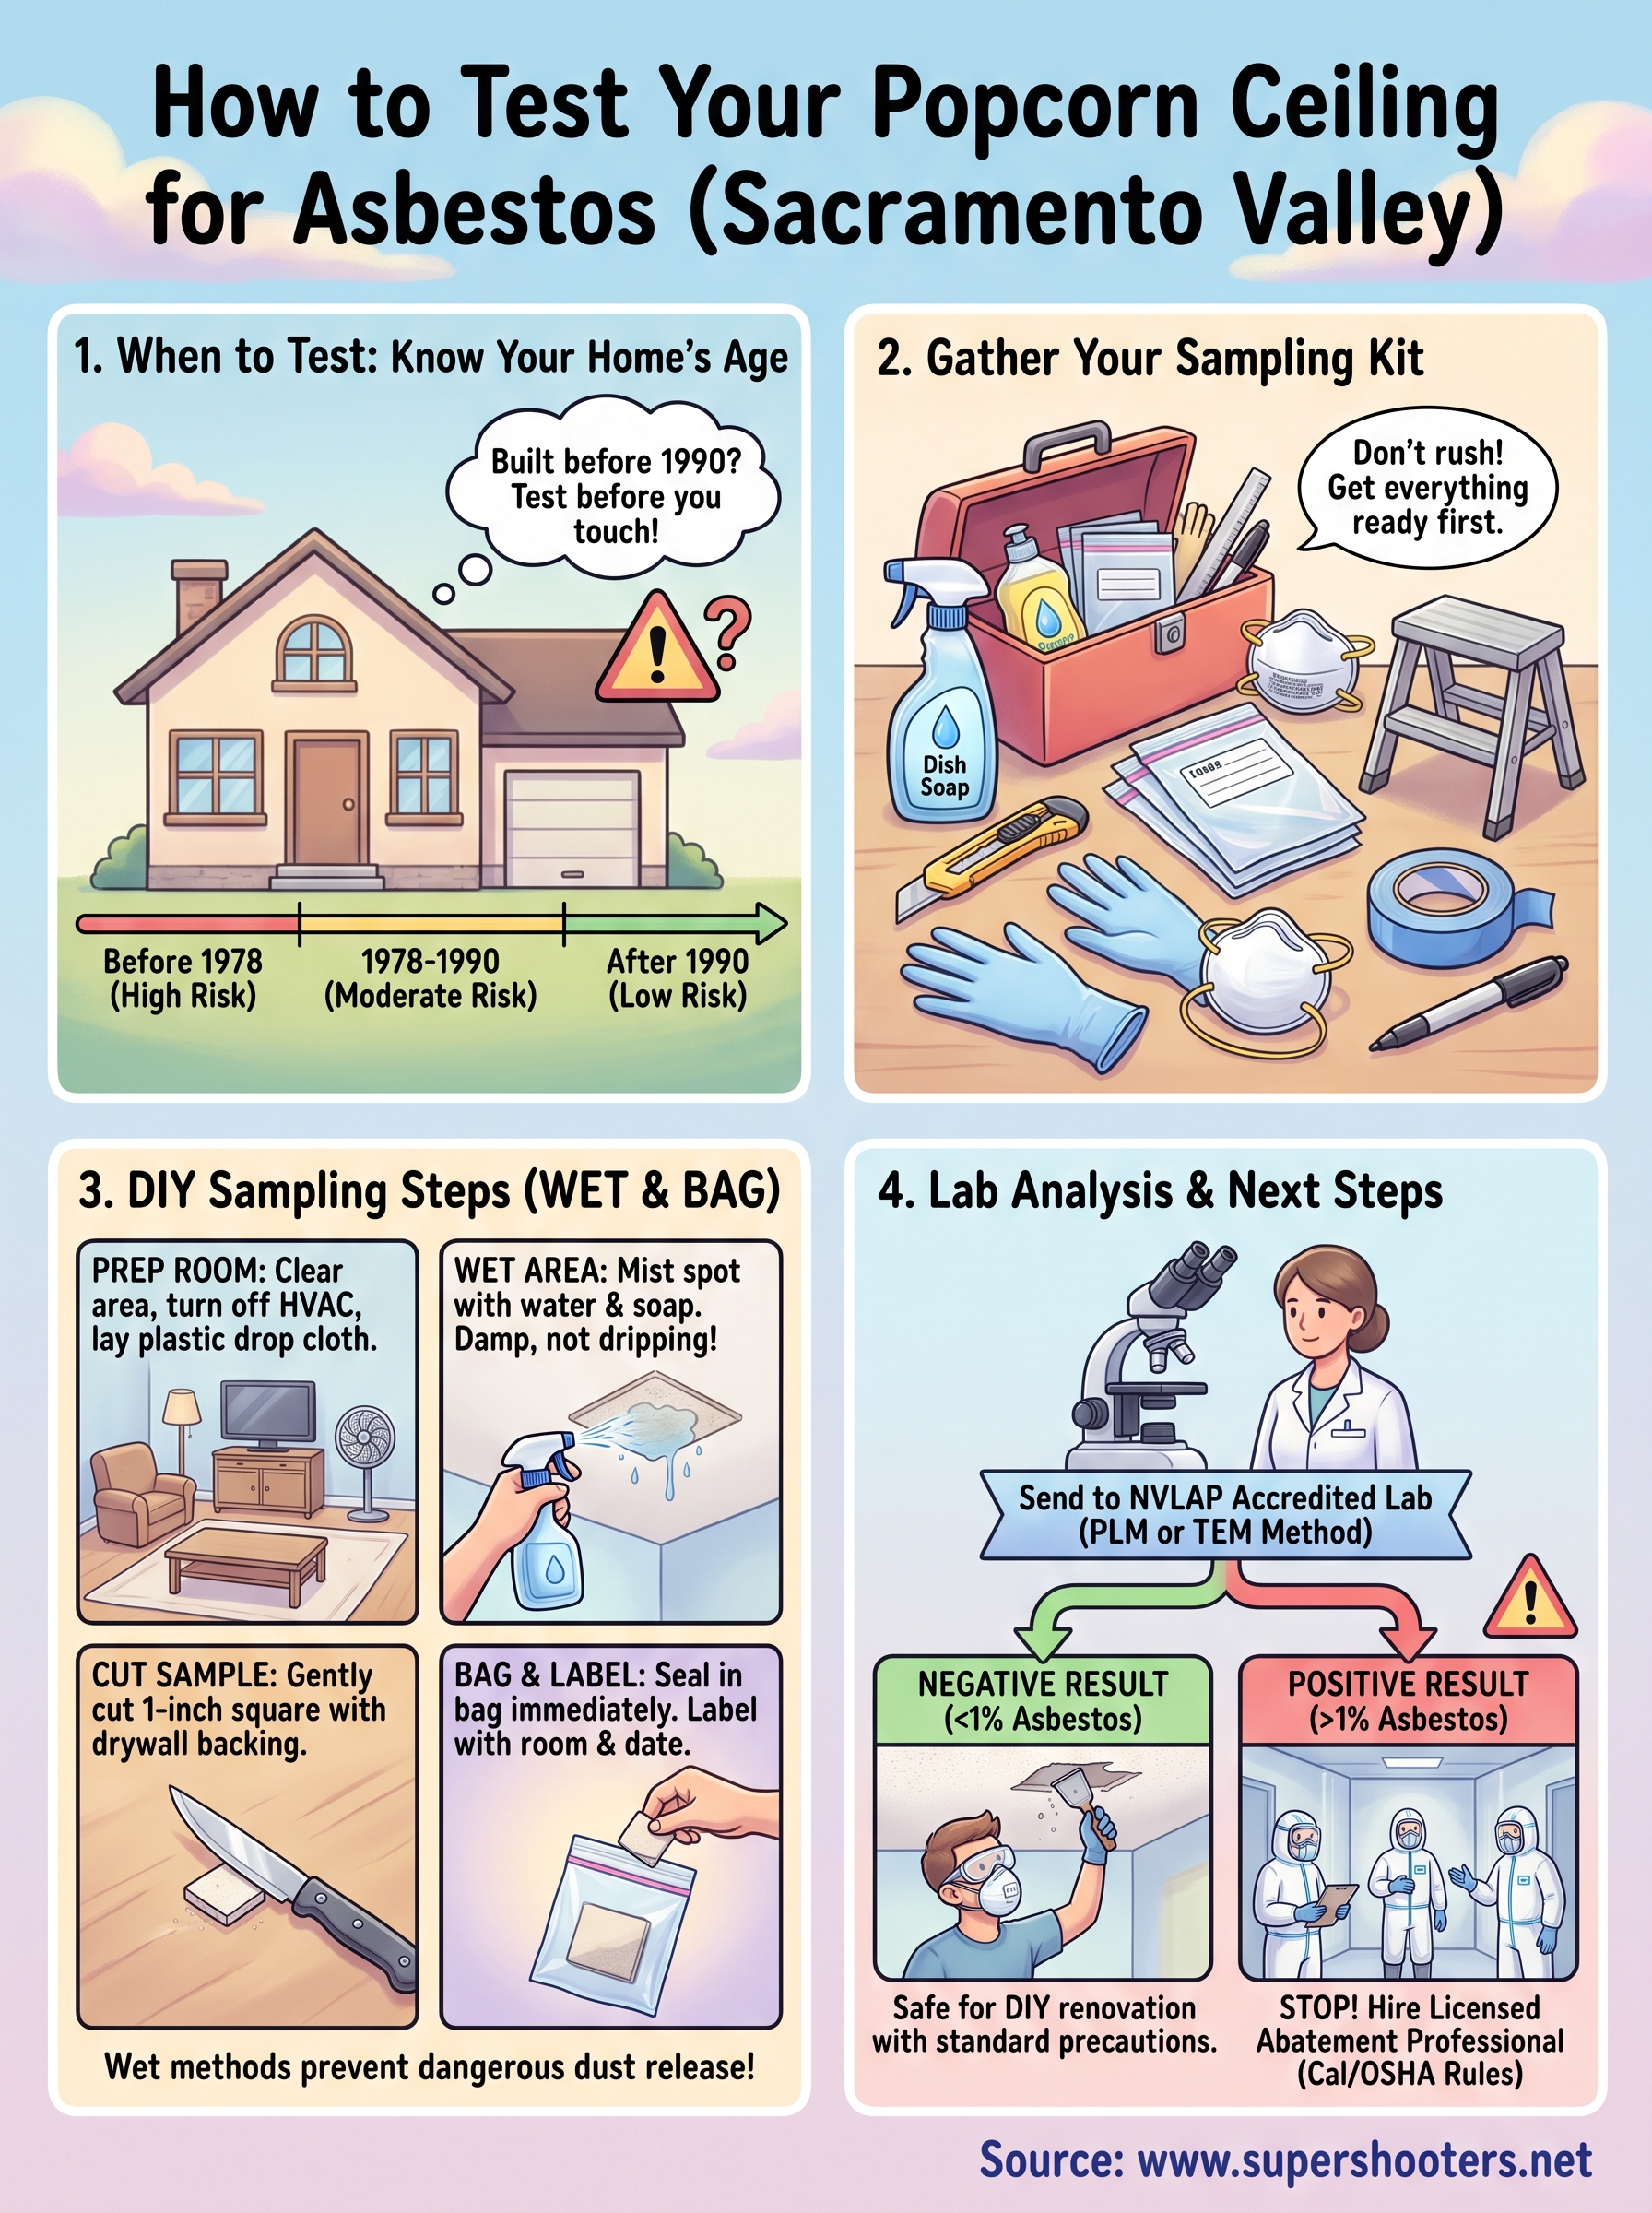
That bumpy popcorn ceiling in your Sacramento Valley home could be hiding more than outdated style. If your house was built before 1990, there's a real chance it contains asbestos, and disturbing it the wrong way can release fibers into the air you breathe. Knowing how to test popcorn ceiling for asbestos correctly, before you scrape, sand, or renovate, protects your family and keeps you from making an expensive mistake.
The short answer: you collect a small sample using wet methods to prevent dust, seal it properly, and send it to an accredited testing lab for analysis. Home test kits exist, but lab results from a certified facility carry more weight if you ever need documentation for a sale or renovation permit. The process takes a few careful steps, and doing them in the wrong order is where most homeowners run into trouble.
In this guide, we'll walk you through the exact sampling procedure, the safety gear you need on hand, and how to choose a reliable asbestos lab . We'll also cover when it makes more sense to skip DIY testing altogether and bring in a licensed professional instead.
What to know before testing your popcorn ceiling
Before you touch that ceiling, understand what you're dealing with. Asbestos-containing popcorn texture was common in homes built between 1945 and 1990, and manufacturers didn't fully stop using it until the material was banned for this purpose in 1978, though existing stock kept getting installed for years after. If your Sacramento Valley home falls in that window, treat the ceiling as suspect until a lab tells you otherwise.
Check your home's age and history first
Start with a quick records check. Pull your home's building permit or original construction date from the county assessor's site, since that single fact narrows your risk significantly.
| Construction Year | Asbestos Risk Level |
|---|---|
| Before 1978 | High, test before any disturbance |
| 1978-1990 | Moderate, test to confirm |
| After 1990 | Low, but still test if unsure |
Never sand, scrape, or drill into a popcorn ceiling until you know what's in it.
Know the rules for DIY sampling
Here's where a lot of homeowners get tripped up. Testing a small, undisturbed sample yourself is legal in most places, including California, but the moment you plan to remove or renovate a ceiling confirmed to contain asbestos, state regulations kick in. California's Contractors State License Board and Cal/OSHA both require licensed abatement for removal work, even if you did the initial sampling yourself. The U.S. Environmental Protection Agency also outlines when professional handling becomes mandatory for larger disturbed areas, so check their asbestos guidance before you plan any renovation timeline ( https://www.epa.gov/asbestos).
Understand what the sample actually tells you
A single sample only confirms whether asbestos exists in that specific spot. If your ceiling has patched areas, multiple texture layers, or was repaired over the decades, one sample might miss a contaminated section entirely. Labs call these separate patches "homogeneous areas," and testing professionals typically recommend at least three samples from different spots in a large room to get a reliable picture. If your home has several rooms with popcorn ceilings, plan to sample each room separately rather than assuming one result covers the whole house.
Step 1. Gather your supplies and prep the room
Before you climb that ladder, get every tool laid out within arm's reach. Working slowly and calmly with the right sampling kit keeps you from rushing and accidentally kicking up dust while you search for a missing item.
Assemble your sampling kit
Most of what you need is already in your garage or under twenty dollars at a hardware store. Gather these items before you start:
- A spray bottle filled with water and a drop of dish soap
- A small, sharp utility knife or a clean putty knife
- A resealable plastic bag or a small, clean film canister
- Disposable gloves and an N95 or P100 respirator
- A step stool or short ladder
- Painter's tape and a permanent marker
Prep the room before you touch the ceiling
Clear the area directly beneath your sampling spot, and move furniture, rugs, and anything you can't easily wipe down out of the room entirely. Turn off any HVAC system, ceiling fan, or window unit so you don't circulate fibers through the rest of the house. Lay down a plastic drop cloth on the floor and tape it in place, since even a controlled sample can drop small flecks of debris.
A quiet, still room with the airflow shut off is your best protection during sampling.
Once the space is sealed off and your protective equipment is on, you're ready to collect the actual sample without contaminating the surrounding area.
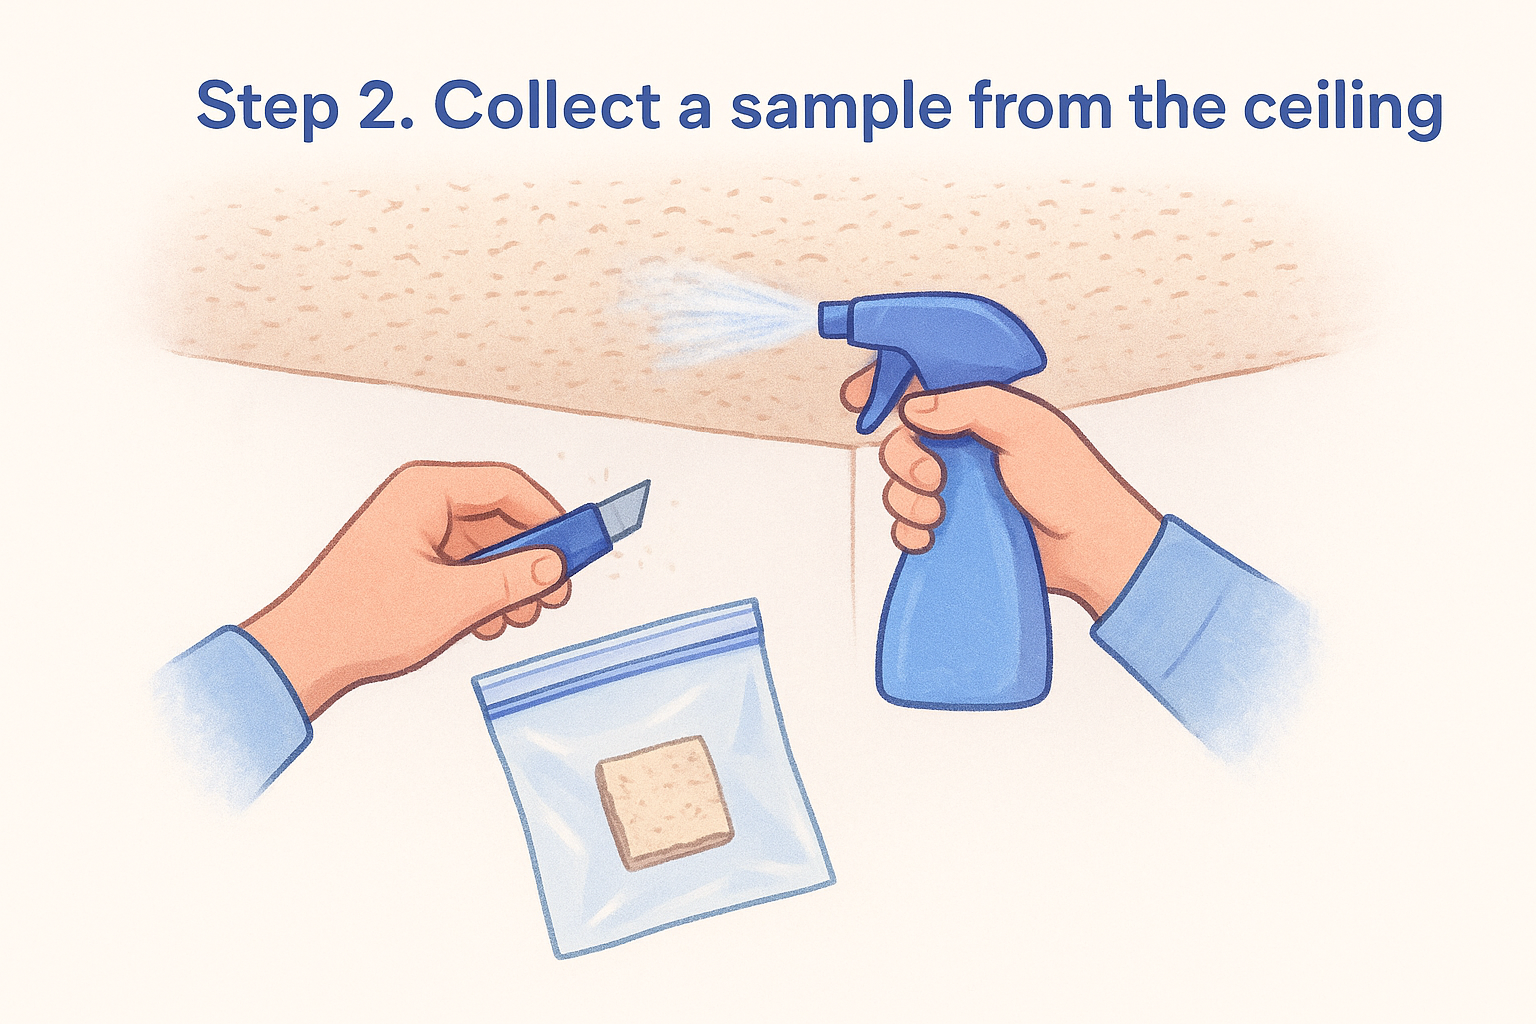
Step 2. Collect a sample from the ceiling
Misting the ceiling before you cut anything is the single most important habit in this whole process. Wetting the texture keeps fibers bonded to the moisture instead of floating into the air where you'd breathe them in.
Wet the area to control dust
Stand on your step stool and spray the target spot until it's damp, not dripping. Give it thirty seconds to soak in before you bring the blade anywhere near it.
A damp ceiling releases far fewer fibers than a dry one, so never skip the misting step.
Cut and bag the sample
Work slowly and let the water do the heavy lifting so the blade doesn't need force.
- Push the utility knife straight up into the texture, cutting a small square roughly one inch across.
- Angle the knife to pop out a chunk that includes the full ceiling thickness, texture and drywall backing together.
- Drop the piece directly into your resealable bag or film canister without touching it with bare hands.
- Seal the container immediately and label it with the room name and date using your marker.
- Wipe the surrounding area with a damp paper towel and dispose of it in the bag with your gloves.
Repeat this process in each separate texture patch you identified earlier, using a fresh bag for every sample location . Keep your respirator on until the room is fully wiped down and the drop cloth is folded inward to trap any debris.
Step 3. Send your sample to an accredited lab
Now that your samples are sealed and labeled, find a lab that carries NVLAP accreditation through the National Institute of Standards and Technology. Skipping this step and mailing your sample to just any facility risks results that won't hold up for permits, disclosures, or insurance claims down the road.
Confirm accreditation before you ship anything
Search the NVLAP lab directory or call the facility directly and ask for their accreditation number. A legitimate lab will provide it without hesitation, along with turnaround times and pricing upfront.
Pick the right analysis method
Most residential samples get tested with one of two methods. Ask which one your lab uses before sending anything.
| Method | Speed | Best For |
|---|---|---|
| PLM (Polarized Light Microscopy) | 1-3 business days | Standard popcorn texture samples |
| TEM (Transmission Electron Microscopy) | 5-7 business days | Confirming trace or borderline results |
A NVLAP-accredited lab result is the only kind that holds up if you ever need to prove your ceiling's status to a buyer or contractor.
Package and ship the sample correctly
Place each bagged sample inside a padded envelope or small box, and never let multiple samples touch inside the same bag. Include the lab's intake form with your name, address, and sample labels matching what's written on each bag. Choose a trackable shipping method, since a lost sample means repeating the entire collection process. Most labs post their mailing instructions online, and the EPA's asbestos guidance page also links to accredited lab resources if you need help locating one near Sacramento Valley ( https://www.epa.gov/asbestos).
Step 4. Decide your next move based on the results
Your lab report will list a percentage of asbestos content, and that single number determines everything about what happens next. Anything above 1% legally counts as asbestos-containing material under EPA and California guidelines, and that classification changes how you're allowed to handle the ceiling from here on out.
If your results come back negative
A clean result means you can scrape, sand, or renovate the ceiling using standard drywall precautions, no special abatement required. Still wear a dust mask and eye protection, since popcorn texture debris is unpleasant to breathe even without asbestos in it. Keep the lab report on file anyway, since future buyers or contractors may ask for proof before starting their own work.
If your results come back positive
Once a lab confirms asbestos above 1%, DIY removal stops being an option and licensed abatement becomes the only safe path.
California law requires a licensed asbestos abatement contractor for removal work once a sample confirms contamination, and Cal/OSHA enforces strict containment and disposal rules for the crew doing that work. Trying to scrape a confirmed asbestos ceiling yourself, even with a respirator, puts your household at risk and can trigger fines if you're caught disposing of the debris improperly. Here's your checklist for next steps:
- Request written abatement quotes from at least two licensed contractors
- Confirm each contractor's Cal/OSHA registration and liability insurance
- Ask whether they handle disposal at a certified landfill
- Get a post-removal clearance test in writing before repainting or retexturing
A positive result isn't a crisis, but it does mean the next call goes to a professional, not another trip to the hardware store.
A safer path forward for your home
Testing your popcorn ceiling isn't complicated once you know the sequence: wet the sample, bag it carefully, and send it to an accredited lab before you touch a scraper. That single lab report tells you whether you're dealing with a weekend drywall project or a job that requires licensed abatement . Skipping this step, or rushing the sampling process, is how homeowners end up with contaminated dust in their HVAC system and a much bigger bill than they expected.
If your results come back positive, or you'd rather skip the sampling altogether and let a licensed crew handle it from the start, Super Shooters has spent over 30 years removing asbestos-containing ceilings safely across the Sacramento Valley. We handle the containment, the disposal, and the paperwork so you don't have to gamble with your family's air quality. Reach out for a free asbestos abatement consultation and get a clear plan for your ceiling before you make another move.