June 22, 2026
How Long Does Drywall Repair Take? Timeline By Patch Size
Most homeowners assume drywall repair is a one-and-done afternoon project. You cut, you patch, you paint, finished. But if you've ever searched how long does drywall repair take , you've probably realized there's a gap between the actual hands-on work and the total time a repair needs before it's truly done . Mud needs to dry. Multiple coats need to cure. Sanding, priming, and painting each add their own windows. Skip or rush any step, and you'll see it in the finish.
The real answer depends almost entirely on the size of the patch and how many coats of joint compound the repair requires. A small nail hole fix and a full sheet replacement aren't even in the same category. One might wrap up in a few hours total; the other could stretch across several days of work and drying time .
At Super Shooters, we've completed over 10,000 drywall and ceiling projects across the Sacramento Valley in our 30+ years of business. That volume of work has given our team a clear picture of how long each type of repair actually takes, not the optimistic estimate, but the real-world timeline . Below, we break it all down by patch size so you can plan your project accurately, whether you're doing it yourself or comparing quotes from a contractor.
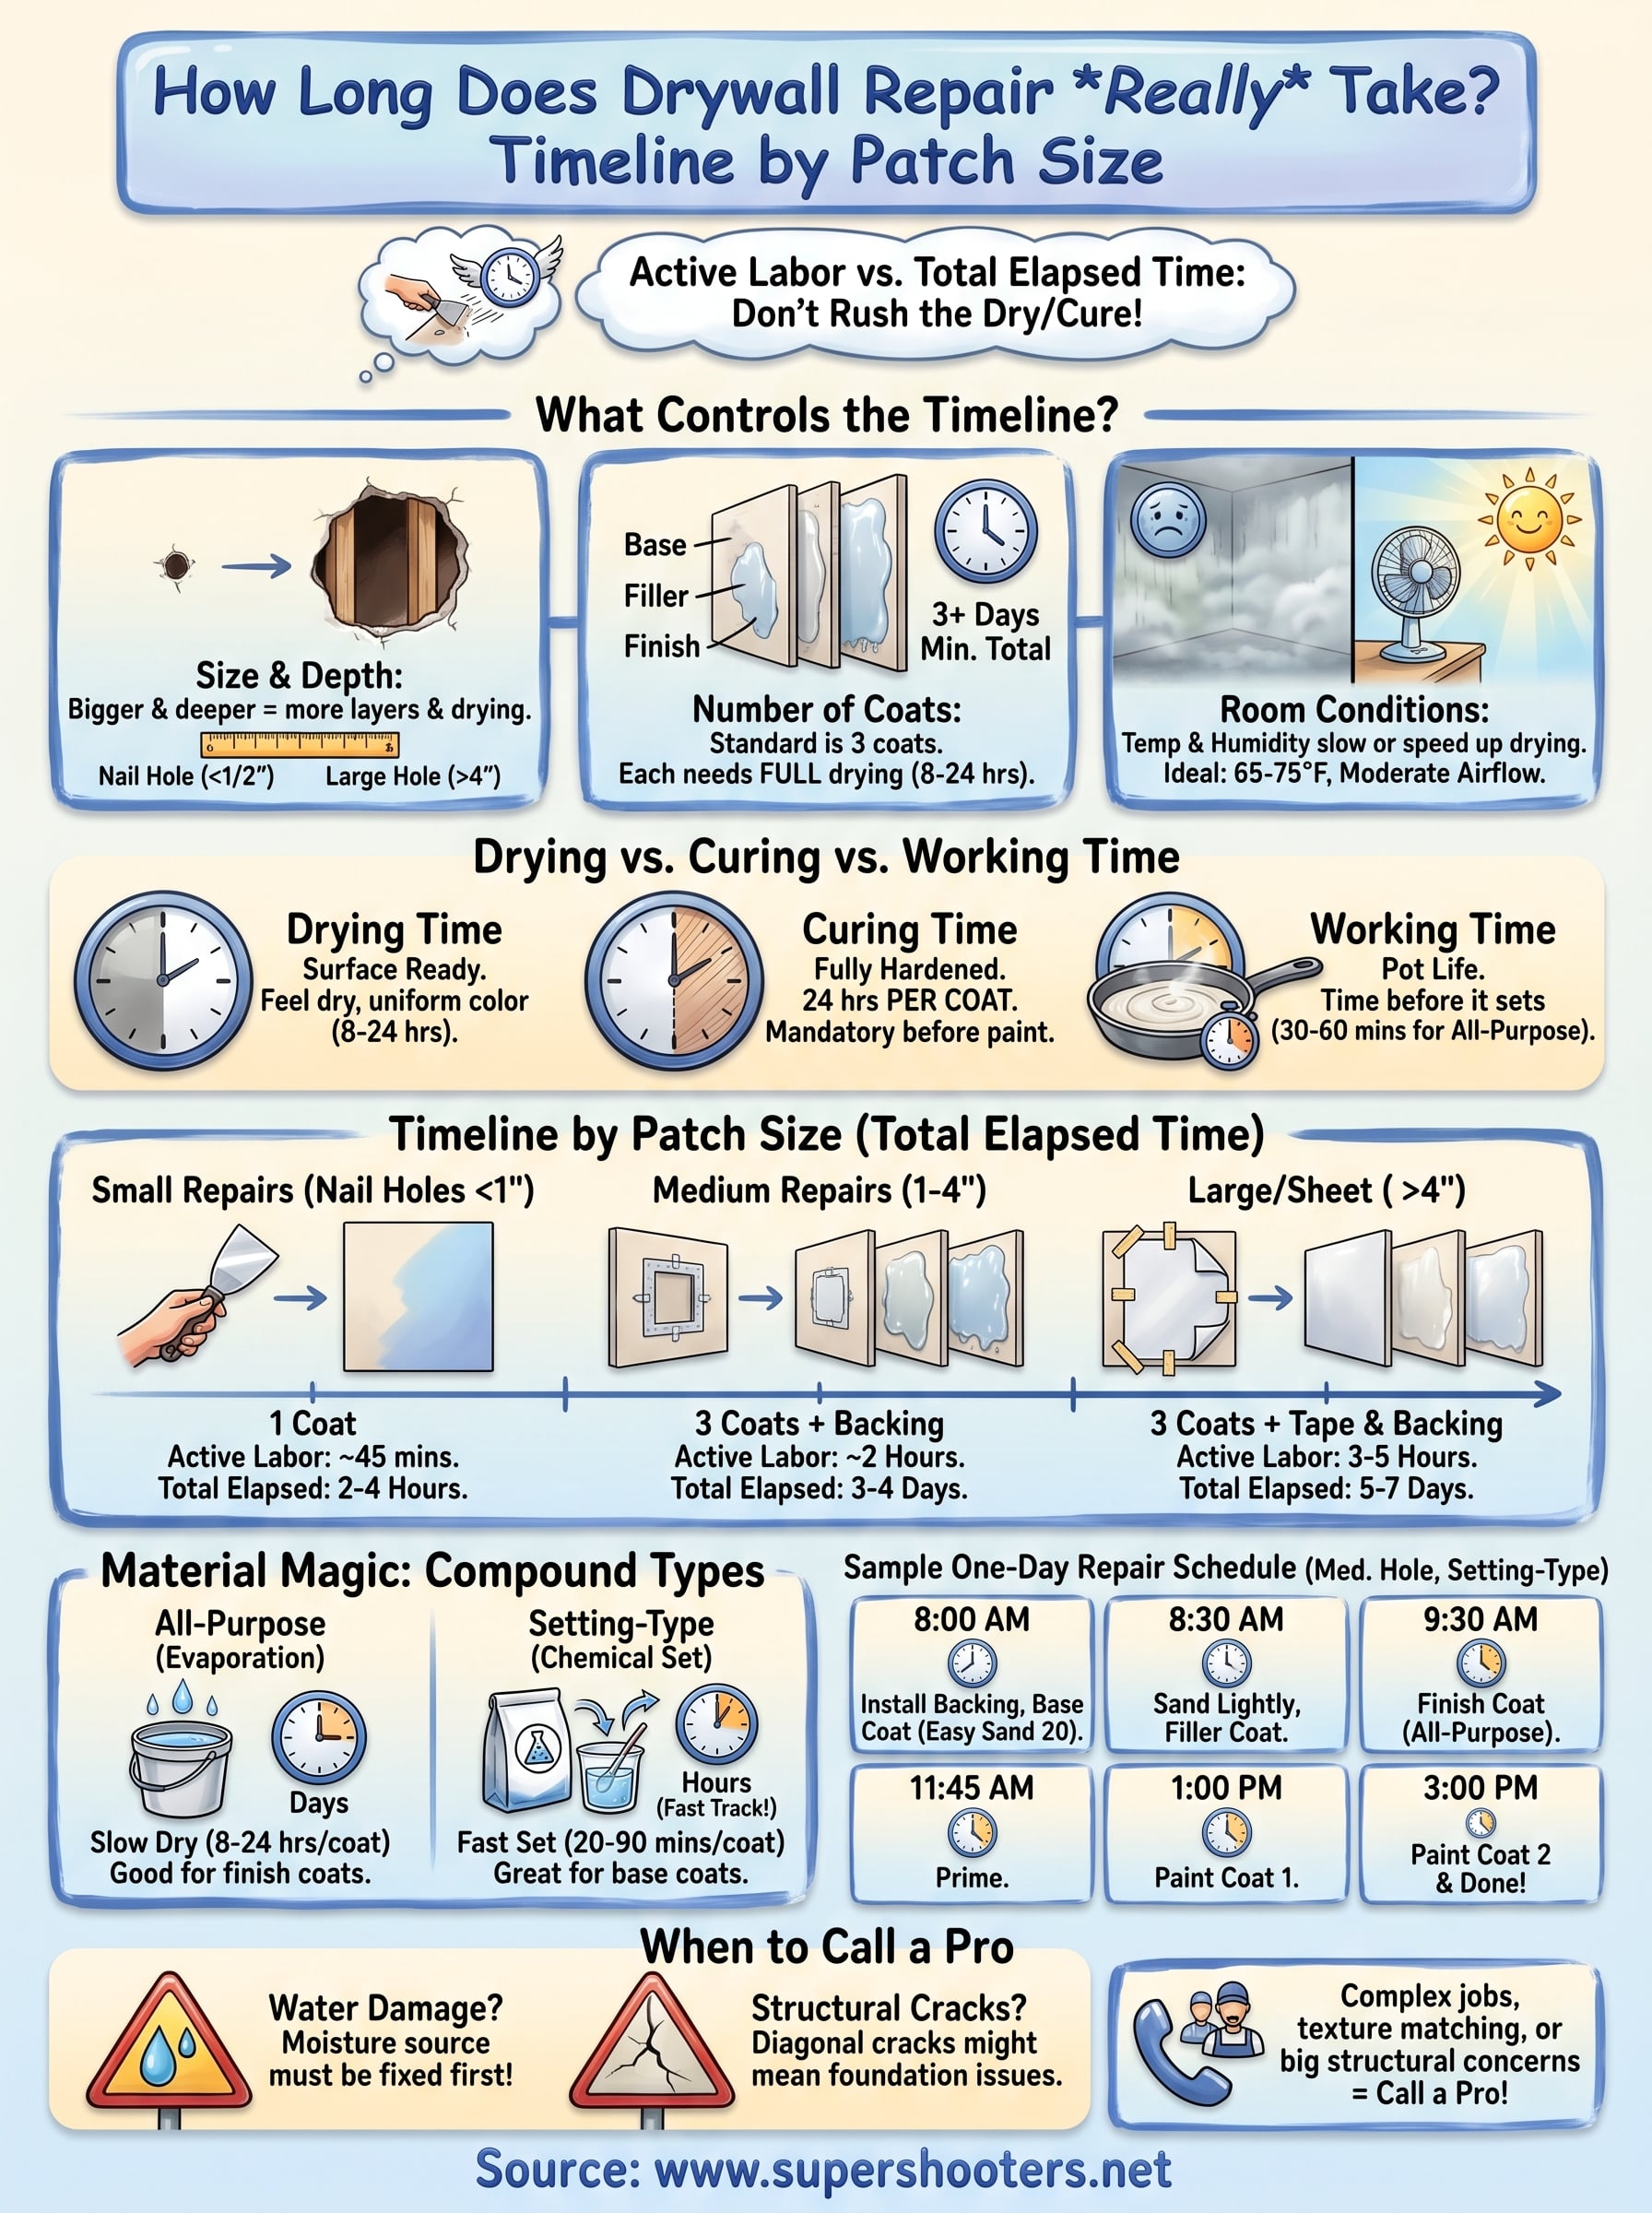
What actually controls a drywall repair timeline
When homeowners ask how long does drywall repair take , the answer almost always comes down to three variables: the size and depth of the damage , the number of coats of compound the repair requires, and the conditions in the room where you're working. These three factors interact with each other, and underestimating any one of them will push your timeline further out than you planned.
Patch size and damage depth
Patch size is the most obvious factor, but depth matters just as much as surface area. A small nail hole is essentially a one-layer repair, while a hole larger than 3 inches that punches through the face paper exposes the gypsum core and requires a backing board, a patch piece, and multiple coats of compound. Each layer adds both hands-on labor time and mandatory drying time between applications.
Here's a breakdown of typical patch categories and what they require:
| Damage Type | Approximate Size | Layers of Compound Needed |
|---|---|---|
| Nail or screw hole | Under 1/2 inch | 1 coat |
| Small ding or dent | 1/2 to 1 inch | 1 to 2 coats |
| Medium hole | 1 to 4 inches | 2 to 3 coats |
| Large hole | 4 to 12 inches | 3 coats plus mesh tape |
| Sheet replacement | Full panel | 3 coats plus tape |
Deeper repairs also require more feathering at the edges to blend with the surrounding wall surface, which means additional sanding passes and more time before you can prime and paint. A repair that looks small on the surface can easily add a full day to your schedule once you factor in blending.
Number of coats required
Every coat of joint compound needs to be completely dry before you apply the next one. That's not optional guidance; it's a structural requirement. Applying a second coat over a wet first coat traps moisture, causes bubbling, and often leads to cracks that appear weeks after painting.
The number of coats is the single biggest multiplier on your total repair timeline, more than the size of the hole itself.
Standard repairs need three coats : a base coat (also called the taping coat), a filler coat, and a finish coat. Each coat typically requires 8 to 24 hours of drying time , depending on thickness and room conditions. That means a three-coat repair takes a minimum of two to three days of total elapsed time, even if the hands-on labor only adds up to an hour or two.
Room conditions and airflow
Humidity and temperature affect how quickly joint compound releases moisture and firms up. High humidity slows drying significantly, while low humidity and moving air speed it up. In a Sacramento Valley summer with indoor temperatures above 80°F and low humidity, compound can dry faster than the package suggests. In a closed bathroom with poor ventilation, the same product might need an extra day between coats.
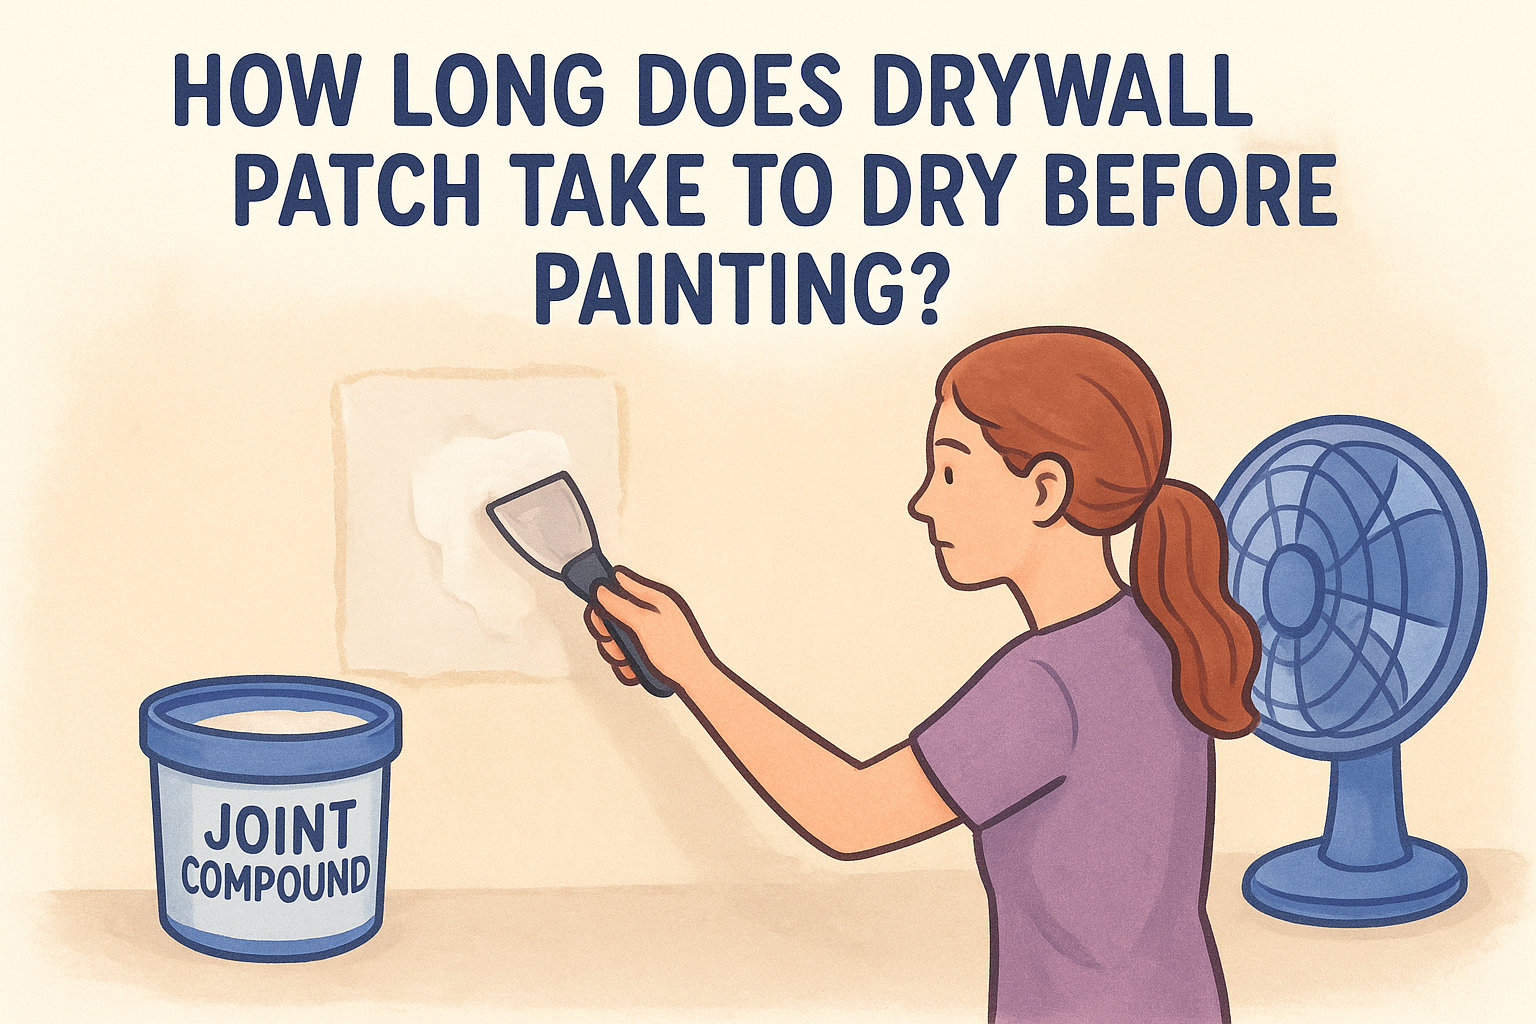
You can improve conditions in your workspace by running a dehumidifier or a box fan aimed across the repair area , not directly at it. Direct airflow causes the surface to dry faster than the interior, which leads to cracking. Keeping the room between 65 and 75°F with moderate airflow gives you the most predictable drying window and keeps your overall project on schedule.
Drying vs curing vs working time
Most guides treat drying time as the only variable you need to track, but there are actually three distinct time windows in any drywall repair: drying, curing, and working time. Confusing them is one of the most common reasons a repair fails or gets delayed. Understanding each one helps you plan an accurate schedule and avoid the mistake of painting over compound that looks ready but isn't.
What "dry" means for joint compound
Drying refers to the point where joint compound has released enough surface moisture to feel firm and change from a dark gray to a consistent white or off-white color across the entire patch. You can usually touch a dry coat without leaving an impression. At this stage, the compound is ready for sanding and the next coat. Most coats reach this point in 8 to 24 hours , depending on thickness, temperature, and ventilation.
The color-change test is your most reliable check. If you see any gray areas remaining, even in the center of a thick application, the compound still holds moisture and is not ready to work with.
What "cured" means and why it matters
Curing goes deeper than surface drying. It describes the point when the compound has fully hardened through its entire thickness , not just at the surface. A coat can look and feel dry to the touch while the interior is still soft. Applying paint or a second coat before full curing causes shrinkage cracks, adhesion failure, and a surface that dents under light pressure.
Full curing typically takes 24 hours per coat under normal indoor conditions, even when the surface feels dry in less time.
For a three-coat repair, plan on a minimum of three days of elapsed time before you prime, regardless of how the surface feels.
Working time: your window to shape and smooth
Working time is the window you have after mixing or opening joint compound before it starts to set. Standard all-purpose compound gives you roughly 30 to 60 minutes of workable time at room temperature before it begins to stiffen. If you're wondering how long does drywall repair take from start to finish, working time is rarely the bottleneck, but running out of it mid-patch forces you to start over and adds time to your schedule. Mix or open only as much compound as you can use in one application.
Timeline by patch size and repair type
The numbers below reflect real elapsed time , not just active labor. Each repair category lists the hands-on work time and the total time before you can prime and paint. Knowing both figures answers the practical question of how long does drywall repair take from the moment you pick up a tool to the moment you roll paint on a finished surface.
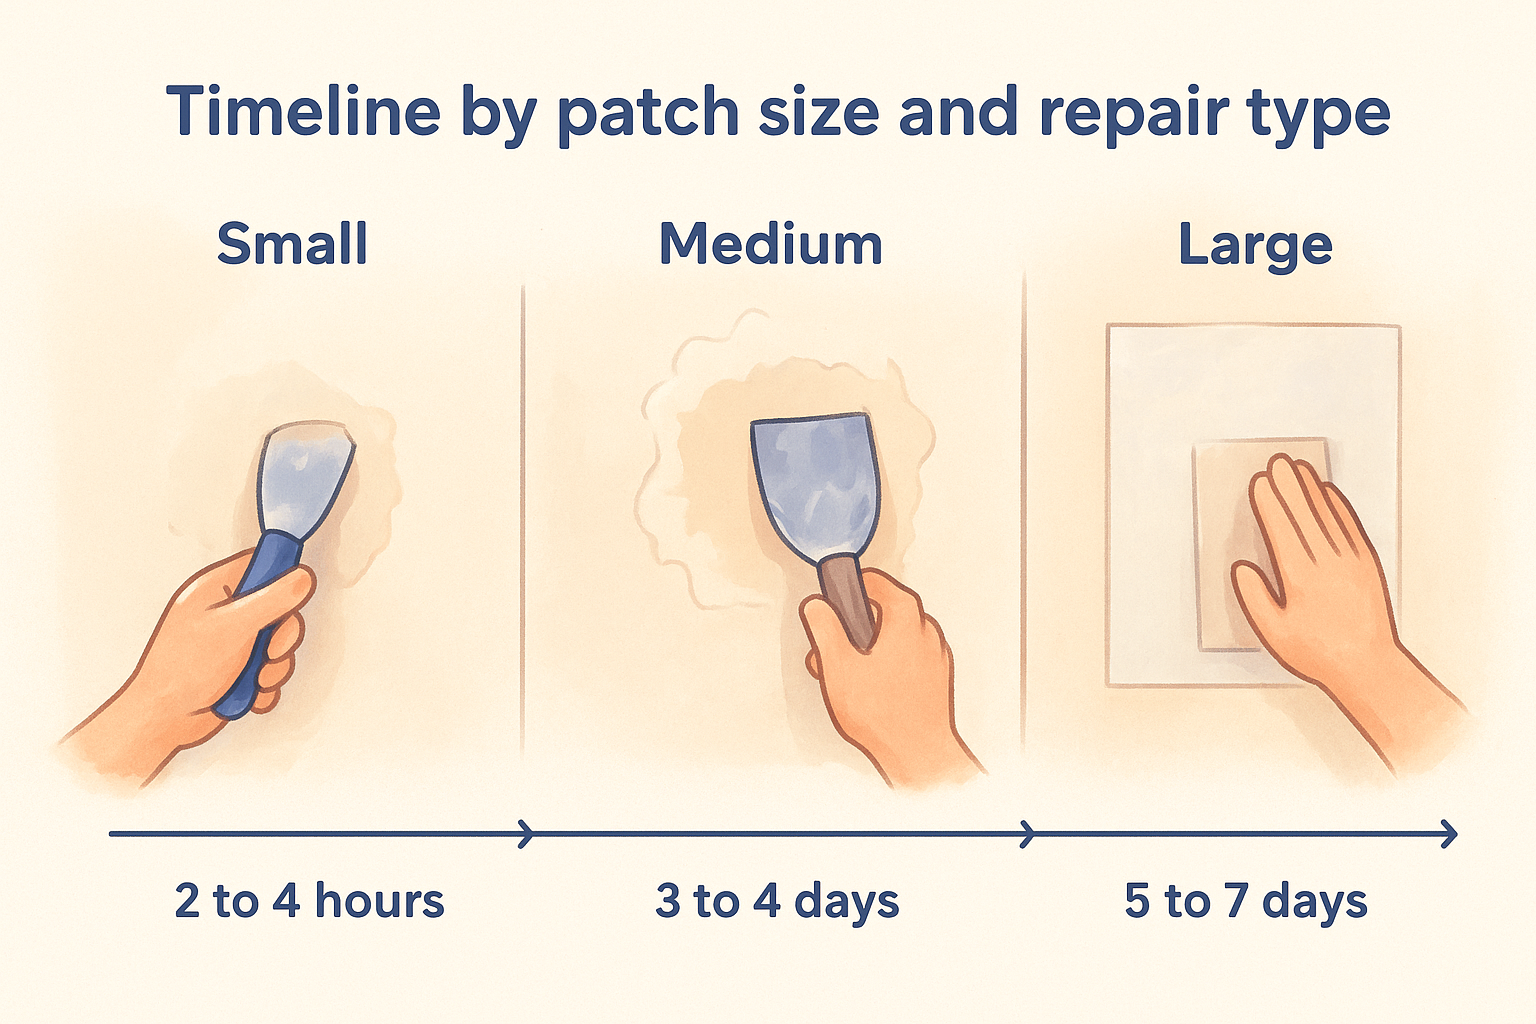
Small repairs: nail holes and dents under 1 inch
Nail holes and small dents are the fastest repairs you'll do. Apply one thin coat of lightweight spackle or all-purpose compound, let it dry completely, sand lightly, and you're ready to prime. Under good ventilation and normal indoor temperatures, the entire process finishes in a single session.
| Step | Time Required |
|---|---|
| Apply compound | 5 minutes |
| Dry time | 1 to 2 hours |
| Sand and clean dust | 10 minutes |
| Prime and paint | 30 to 60 minutes |
| Total elapsed time | 2 to 4 hours |
Medium repairs: holes from 1 to 4 inches
Medium holes need a backing board or a California patch to give the compound something solid to grip. Once the backing is secure, you apply three coats of compound and sand lightly between each coat. The active labor stays manageable, but the drying schedule spreads the repair across multiple days regardless of how quickly you work.
- Day 1: Install backing, apply base coat (30 minutes of labor, then 8 to 24 hours of drying)
- Day 2: Apply filler coat (15 minutes of labor, then 8 to 24 hours of drying)
- Day 3: Apply finish coat (15 minutes of labor, then 8 to 24 hours of drying)
- Day 4: Sand smooth, prime, and paint (about 1 hour)
Total elapsed time: 3 to 4 days. Total active labor: roughly 2 hours.
Large holes and sheet replacement
Holes larger than 4 inches require cutting the damaged section back to the nearest studs, installing new backing, hanging a patch panel, taping all seams, and running three full coats of compound. Sheet replacements follow the same process at a larger scale, with more seams to tape and blend.
A full sheet replacement rarely takes more than 4 to 5 hours of active labor, but the mandatory drying schedule means you should plan for a full week before painting.
Total elapsed time for large repairs: 5 to 7 days. Active labor typically runs 3 to 5 hours spread across multiple sessions throughout the week.
How materials change the clock
The products you choose have as much influence on how long does drywall repair take as the size of the hole itself. Two contractors can tackle the same medium repair and finish days apart simply because they used different compounds. Before you start mixing anything, understanding what each product does to your drying and curing schedule saves you from a slow or failed repair.
All-purpose compound vs. setting-type compound
All-purpose joint compound is what most hardware stores stock by default, and it works well for most repairs. It dries by evaporation, which means humidity and airflow control your wait time. Under good conditions, each coat needs roughly 8 to 24 hours before you can sand and apply the next one.
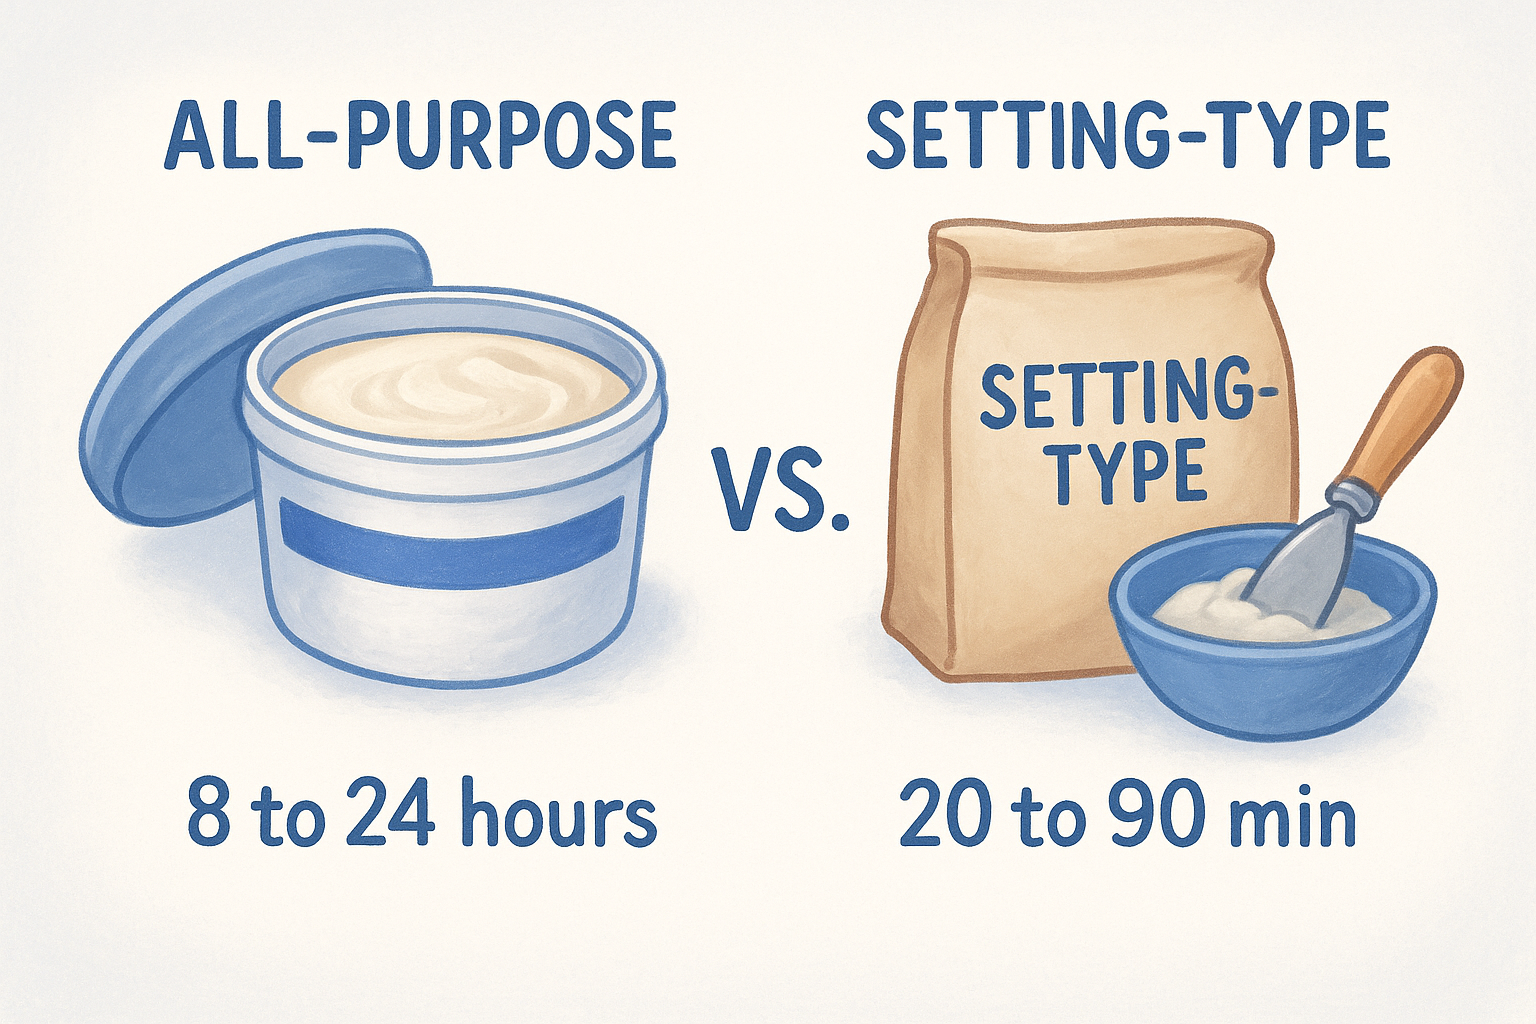
Setting-type compound (sold in bags as a powder you mix with water, often labeled by set time like "Easy Sand 20" or "Easy Sand 45") works differently. It hardens through a chemical reaction, not evaporation, which means you can apply a second coat in 20 to 90 minutes depending on which version you buy. This cuts a three-day repair down to a single afternoon in many cases.
Setting-type compound is the single fastest way to compress your repair timeline without sacrificing finish quality.
| Compound Type | Dry/Set Time Per Coat | Best Use |
|---|---|---|
| All-purpose (pre-mixed) | 8 to 24 hours | Standard repairs, finish coats |
| Lightweight all-purpose | 6 to 12 hours | Finish and skim coats |
| Setting-type (20-minute) | 20 to 30 minutes | Base and filler coats on large holes |
| Setting-type (45-minute) | 45 to 60 minutes | Base coats with more working time |
Primer selection and paint drying time
Most homeowners forget to account for primer drying time when they calculate a repair window. A standard latex primer needs 1 to 2 hours before topcoating. Drywall-specific primers, sometimes called PVA sealers, dry faster and seal the compound more effectively so your paint color matches the surrounding wall instead of appearing flat or chalky.
Latex paint over a primed surface typically dries to the touch in 1 hour and accepts a second coat after 2 to 4 hours, so budget at least a half-day on your final session just for finishing coats.
Plan a one-day repair schedule
A one-day repair is achievable for small to medium holes if you build your schedule around setting-type compound instead of all-purpose. The key is using products that harden through a chemical reaction in 20 to 45 minutes so you can stack coats in a single morning rather than waiting overnight between applications. Before you start, confirm your working conditions: room temperature between 65 and 75°F, moderate airflow, and all your materials staged and ready so you don't lose working time searching for tools mid-patch.
What you need before you start
Gathering your materials before you mix anything is non-negotiable on a compressed schedule. Running to the hardware store mid-repair with wet compound on the wall burns time you don't have. Pull together everything listed below and set it within arm's reach of the repair area before you open a single bag.
- Setting-type compound (Easy Sand 20 or Easy Sand 45)
- Pre-mixed lightweight all-purpose compound for the final finish coat
- 4-inch and 8-inch putty knives
- 120-grit and 220-grit sanding sponges
- A backing board or California patch kit for holes over 1 inch
- PVA drywall primer and a small roller
- Dust mask and drop cloth
Sample one-day schedule for a medium hole
This schedule assumes a 2 to 4 inch hole and directly answers how long does drywall repair take when you use fast-setting compound. Adjust the start times to fit your day, but keep the sequence intact.
| Time | Task |
|---|---|
| 8:00 AM | Install backing board, mix Easy Sand 20, apply base coat |
| 8:30 AM | Sand lightly, wipe dust, apply filler coat |
| 9:15 AM | Sand lightly, wipe dust |
| 9:30 AM | Apply thin finish coat with all-purpose compound |
| 11:15 AM | Sand finish coat smooth with 220-grit sponge |
| 11:45 AM | Apply PVA primer, let dry |
| 1:00 PM | Roll first paint coat |
| 3:00 PM | Roll second paint coat |
Rushing the finish coat is where most one-day repairs break down. Give all-purpose compound a full 90 minutes before you sand, even when the surface feels dry sooner.
When to call a pro and what to ask
Some repairs are genuinely straightforward, but others have physical or technical conditions that make a professional contractor the smarter call . Knowing the difference saves you from a week of frustrating work that ends with a visible patch and a paint job that won't match. If the damage involves your timeline, your skill level, or structural concerns, reaching out to an experienced crew often costs less than redoing a failed attempt.
Signs the repair is beyond DIY
Water damage is the clearest indicator that a repair needs professional attention. If drywall has been wet long enough to go soft, sag, or show mold, you're not dealing with a surface repair. The source of the moisture needs to be confirmed dry before any new drywall goes up, and the affected area may require remediation before patching . Installing new material over an active moisture problem guarantees the repair will fail.
Large structural cracks, particularly those running diagonally from window or door corners, often point to foundation settlement or framing movement rather than surface damage. Patching the drywall without addressing the underlying cause means the crack comes back, sometimes wider. A professional can assess whether the repair is cosmetic or a symptom of a deeper issue.
If you're unsure how long does drywall repair take for a job that involves water or cracks near openings, a professional walkthrough gives you a more accurate answer than any online guide.
Questions to ask before you hire
Vetting a contractor before you sign anything protects your time and budget. Use this short list of questions during any estimate or consultation to get the information you actually need:
- Is your contractor's license current and verifiable?
- How many coats of compound do you apply, and what is your drying schedule between coats?
- What is the realistic total timeline from start to when I can paint?
- Do you handle priming and texture matching, or is that a separate scope?
- What does your warranty cover and for how long?
- Will you provide a written estimate before work begins?
Written answers to these questions, not verbal reassurances, give you a reliable basis for comparing bids and holding the contractor accountable to the agreed scope.
Quick recap and next steps
How long does drywall repair take comes down to three things: patch size, number of compound coats, and room conditions. Small nail holes close out in a few hours. Medium holes need three to four days of elapsed time even when the active labor stays under two hours. Large holes and full sheet replacements stretch to a week because drying and curing cannot be rushed without ruining the finish. Using setting-type compound compresses that window significantly for small and medium repairs, letting you stack coats in a single morning instead of waiting overnight between each one.
If your repair involves water damage, structural cracks, or texture matching, a professional crew saves you time and rework. Super Shooters has completed over 10,000 projects across the Sacramento Valley and offers free in-home estimates with no payment required until the job is done. Book your free drywall repair estimate and get a real timeline from an experienced crew.
Recent Posts