Share this article

August 24, 2026

How Do You Repair a Hole in Drywall? Step-by-Step Guide

A doorknob dent, a moving mishap, an accidental elbow through the wall, sooner or later every homeowner ends up staring at a hole in their drywall wondering what to do next. If you've searched how do you repair hole in drywall , you're probably hoping for a fix that doesn't require calling a contractor or spending your Saturday driving to three different hardware stores.

The good news is that most drywall holes are fixable with basic tools and a little patience. Small nail holes need nothing more than spackle and a putty knife, while anything larger than a fist calls for a patch, joint compound, and some sanding. Knowing how to repair drywall hole in wall damage correctly the first time saves you from a lumpy, visible patch that stands out under paint.

This guide walks you through the process step by step, from sizing up the damage to blending the repair so it disappears into the wall. We'll also cover how to patch a big drywall hole , the kind left behind by plumbing work or a rowdy pet, using mesh tape and backing material for a repair that actually holds. And if you'd rather skip the mess, our team at Super Shooters handles drywall repair across the Sacramento Valley every day.

Assess the hole and gather your supplies

Before you touch a putty knife, take a good look at the damage. The size of the hole determines everything else , from the materials you buy to the amount of drying time you'll need between coats. A nail hole and a doorknob-sized crater are not the same job, and treating them the same way is the fastest route to a lumpy repair. Grab a tape measure and get an honest number before you decide how you're going to repair the hole in drywall.

Measure the damage first

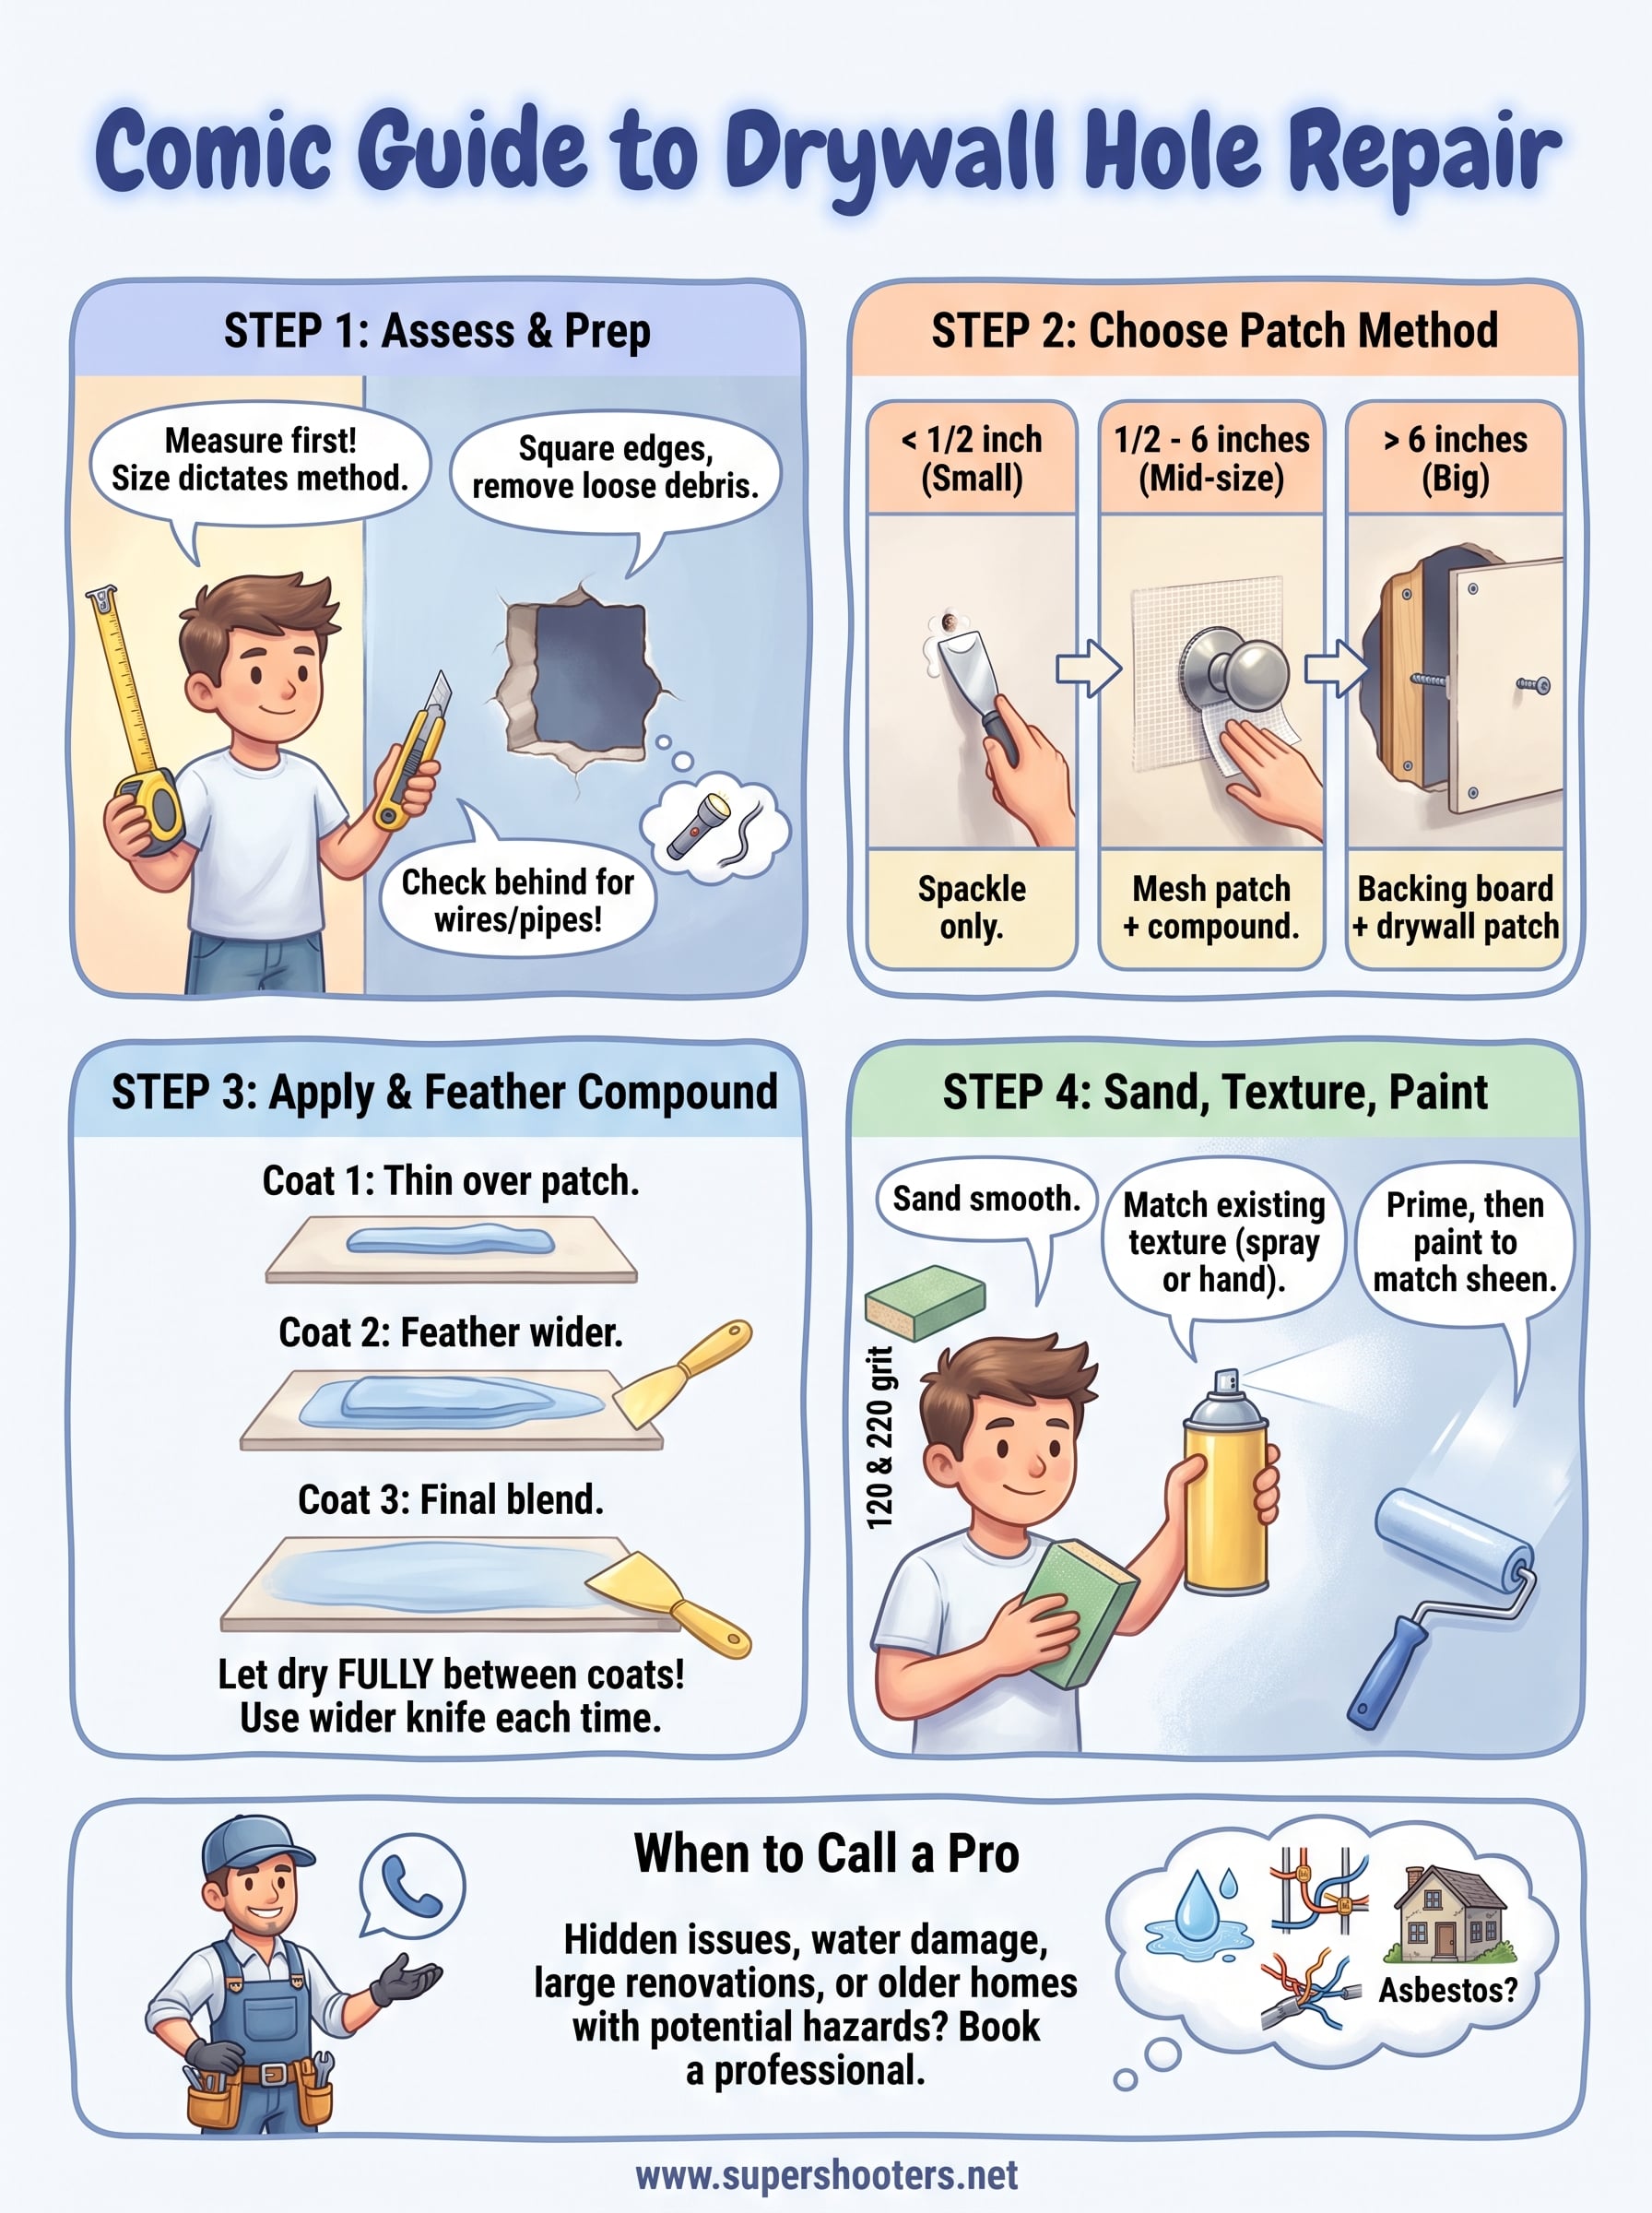
Most holes fall into one of three categories, and each one calls for a different fix. Use this as a quick reference before you shop.

Hole size Common cause Repair method
Under 1/2 inch Nail or screw holes, picture hangers Spackle only
1/2 inch to 6 inches Doorknob dents, minor impacts Self-adhesive mesh patch
6 inches or larger Plumbing access, pet damage, wall punches Backing board plus drywall patch

The size of the hole, not how it happened, should decide your repair method.

Build your supply list

Once you know which category you're dealing with, gather everything before you start, starting with the basic drywall patching tools every DIYer should own. Running out of joint compound mid-project means waiting a day for a hardware store run while the patch sits half-finished. Here's what to have on hand for most repairs:

  • Utility knife and drywall saw
  • Self-adhesive mesh patch or a drywall repair kit for larger holes
  • Scrap drywall and wood furring strips (for holes over 6 inches)
  • Joint compound (all-purpose or lightweight)
  • 6-inch and 12-inch putty knives
  • 120-grit and 220-grit sanding sponges
  • Primer and paint that matches your wall
  • Drop cloth and painter's tape

Stock these up front and you'll move through the job without interruptions. If you're patching a hole larger than a basketball, or you suspect the damage exposes wiring, plumbing, or insulation, stop here and photograph it before covering anything up. That documentation helps if you end up calling in a professional, and it gives you a clear before-and-after once the repair is done.

With your supplies staged and the hole measured, you're ready to start the actual repair work.

Step 1. Prep the damaged area

Before any patch goes on, the hole needs clean, stable edges. Loose paper, crumbling gypsum, and jagged edges all keep a patch from sitting flush, so removing debris around the hole is not optional. Use your utility knife to cut away any cracked or bulging drywall until you reach solid material on all sides.

Square off the opening

Jagged, irregular holes are harder to patch cleanly than a simple square or rectangle. Take your drywall saw and square off the damaged area, cutting straight lines a half inch or so beyond the visible damage. This gives you a clean edge to work against and makes it much easier to cut a patch that fits.

Check what's behind the wall

Once the opening is squared off, look inside before you go further. Wiring, plumbing, or insulation sitting close to the surface changes your approach and may mean this isn't a job for a putty knife alone.

A clean, squared opening is what separates a patch you can barely see from one you can't stop noticing.

Finally, vacuum the area and wipe down the surrounding wall with a damp cloth. Dust left behind interferes with adhesion, whether you're using a self-adhesive mesh patch or screwing in a backing board. For holes over 6 inches, this is also the moment to cut your furring strips to length, since you'll need them ready the second the opening is prepped.

Step 2. Patch the hole

How you patch the hole depends entirely on the size you measured earlier. Matching the patch method to the hole size keeps you from overbuilding a simple fix or underbuilding one that needs real support.

Small holes get spackle

For anything under half an inch, skip patches entirely. Press lightweight spackle into the hole with a putty knife, scrape it flush, and let it dry. No mesh or backing is needed for holes this small, and a second thin coat usually finishes the job, as our walkthrough on patching a small hole in drywall yourself explains.

Mid-size holes need a mesh patch

For holes between half an inch and 6 inches, center a self-adhesive mesh patch over the opening and press it flat against the wall. The adhesive backing holds it in place without screws, and the mesh gives your joint compound something to grip in the next step.

A hole under 6 inches almost never needs backing, just a mesh patch and compound.

Large holes need backing first

If you're figuring out how to patch a big drywall hole , this is where furring strips come in. Slide a wood strip behind the opening on each side, then screw through the drywall into the strip every couple of inches. This gives you a solid surface to attach your drywall patch to, and it's the same idea behind the California patch and cleat repair pros use on big openings.

  1. Screw furring strips flush behind the top and bottom edges
  2. Cut a drywall patch to match the opening exactly
  3. Screw the patch into the furring strips
  4. Check that the patch sits flush with the surrounding wall

A flush patch now saves you extra sanding later.

Step 3. Apply and feather joint compound

Now that your patch is secured, it's time to build up joint compound in thin layers, usually three coats of drywall mud before the surface is ready to sand. Rushing this step is the number one reason patches end up looking like a bump on the wall instead of a smooth, invisible repair. Work in layers, and let patience do most of the work for you.

Load the first coat

Apply your first layer of compound directly over the mesh tape or patch seams with a 6-inch putty knife, pressing firmly enough to fill any gaps underneath. Keep this coat thin, since a thick first layer takes longer to dry and cracks more easily as it cures. Cover the entire patch area, including the screw heads if you used furring strips.

Feather the edges wider each time

Switch to your 12-inch putty knife for the second and third coats, extending each one a few inches beyond the last. This technique for feathering mud into a seamless finish is what blends the patch into the surrounding wall instead of leaving a visible ridge. Drag the knife at a low angle, applying light pressure at the outer edges so the compound tapers to nothing.

Feathering wider with each coat is what makes a patch disappear instead of standing out.

Let each coat dry fully

Don't rush between coats. Most joint compound needs 24 hours to dry before you paint a patch, and applying a new layer over a damp one traps moisture and causes cracking down the road. Give each layer its full drying time, and you'll thank yourself when sanding day comes around.

Step 4. Sand, texture, and paint

Once the final coat of compound is bone dry, grab your sanding sponge and smooth everything down. Sanding between grits matters here: start with 120-grit to knock down ridges and high spots, then finish with 220-grit for a surface that feels seamless under your hand. Wipe away dust with a slightly damp cloth before moving on, since sanding dust left behind will show up as texture under paint.

Match the existing texture

Most Sacramento Valley homes have some kind of texture on their walls, whether it's orange peel, knockdown, or a smoother finish. Blending drywall patch texture for a seamless match is what makes a repair invisible instead of obvious from across the room. You can buy texture spray in a can for small to mid-size patches, or mix your own using thinned joint compound and a texture sprayer for larger repairs. Test your spray pattern on a scrap piece of cardboard first, since one heavy-handed pass is hard to undo once it's on the wall.

A texture that doesn't match the surrounding wall gives away a patch faster than any visible seam.

Prime before you paint

Never skip primer on a fresh patch. Joint compound absorbs paint differently than the surrounding wall, and skipping this step leaves a dull, flat patch even after two coats of your regular paint. Let the primer dry fully, then paint using the same sheen and color as the rest of the wall for a blend that holds up under daylight and lamp light alike.

Step back once the paint dries and check the wall from a few angles. If you can't find the patch, you've matched both the texture and the sheen correctly.

When to call in a drywall pro

Most drywall holes are well within reach of a patient DIYer with the right supplies and a free weekend. But some jobs cross a line where calling in a professional makes more sense than pushing through alone. If your hole exposes wiring, plumbing, or signs of water damage, or if it's part of a larger renovation with multiple walls involved, a contractor gets it done faster and with a cleaner finish. Older homes around Sacramento Valley sometimes hide acoustic ceiling material behind wall damage too, which is a job for a licensed asbestos acoustic ceiling crew rather than a weekend fix.

Repairing your own nail holes and doorknob dents is satisfying, and now you know how do you repair hole in drywall the right way. But when the damage is bigger than a patch and some patience can handle, book professional drywall hole repair in the Sacramento Valley with Super Shooters and let 30 years of local experience finish the job right.

Recent Posts

By cinchweb August 21, 2026
Compare 8 top drywall patching kit picks by hole size, price, and dry time, plus when to call a pro instead of DIY.
By cinchweb August 20, 2026
Learn how to paint a popcorn ceiling step by step, asbestos testing, prep, tools, and application tips from Sacramento's Super Shooters experts.
By cinchweb August 20, 2026
Learn how to patch small hole in drywall with mesh, compound, and paint for a seamless fix, plus signs it's time to call a pro.
By cinchweb August 19, 2026
Learn joint compound drywall repair step-by-step: tools, taping, feathering, sanding tips, and when to call Super Shooters for professional help.
By cinchweb August 17, 2026
Discover the 6 essential tools for drywall repair, plus costs and tips—and learn when Sacramento Valley homeowners should call a pro instead.
By cinchweb August 16, 2026
Discover 5 must-have popcorn ceiling removal tools, from bagged scrapers to asbestos test kits, plus when to call Super Shooters instead.
By cinchweb August 15, 2026
Learn how to vet drywall repair contractors, what to expect during repairs, pricing factors, and how licensing and warranties protect your home.
By cinchweb August 14, 2026
Learn how to repair ceiling cracks for good with mesh tape, setting compound, texture matching, and expert tips on when to call a pro.
By cinchweb August 13, 2026
Learn how to set up plastic sheeting for popcorn ceiling removal, seal vents and fixtures, and contain debris safely. Free Sacramento Valley estimates.
Show More